
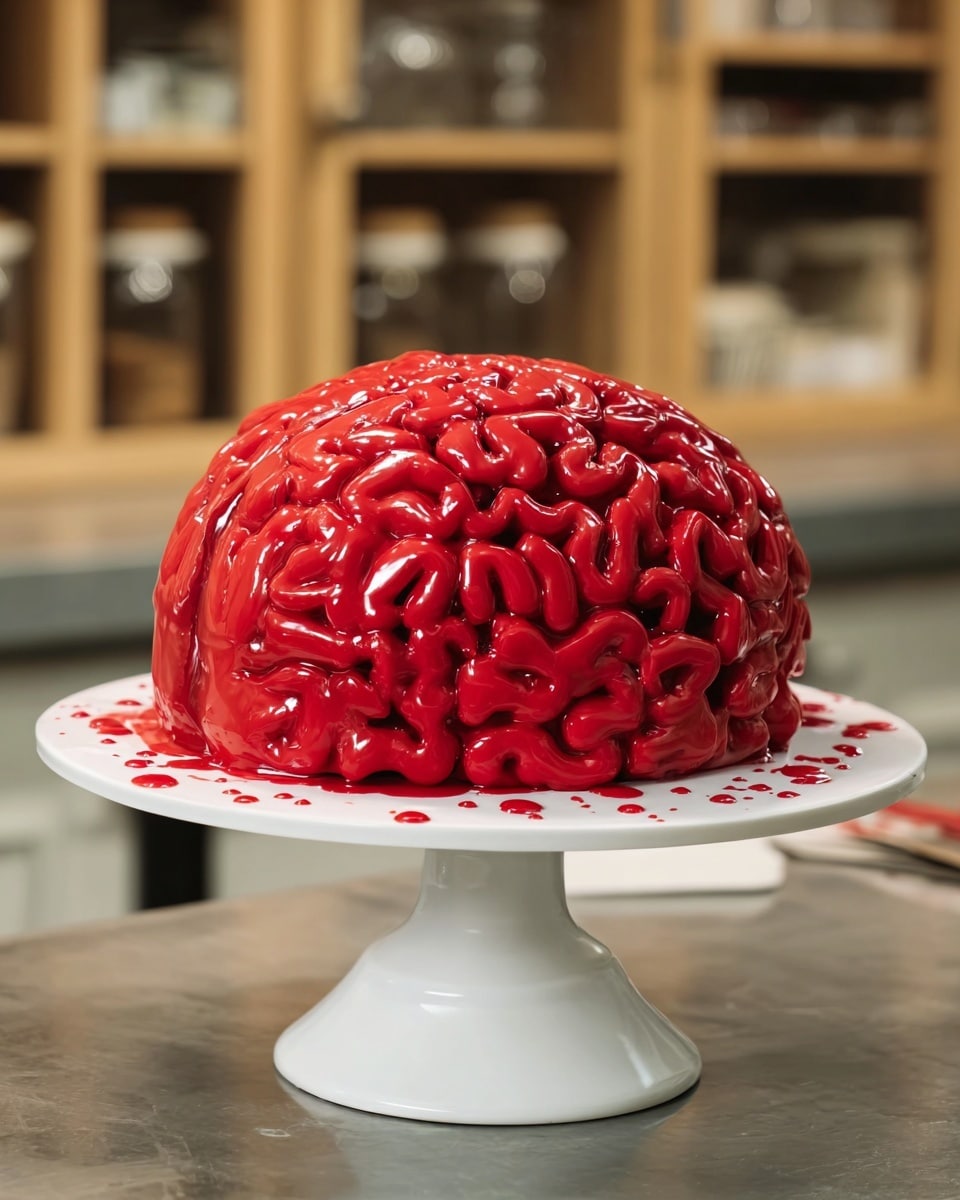
If you’re looking for a show-stopping dessert that’s as fun to make as it is to eat, you’ve got to try this Brain Cake Recipe. I absolutely love how this cake looks — it’s perfect for Halloween or any spooky-themed party — and the rich red velvet paired with creamy pink frosting always gets people talking. Trust me, once you try it, you’ll be hooked on making this quirky treat again and again!
Why You’ll Love This Recipe
- Eye-Catching Design: This cake’s brain shape and textured frosting really steal the show.
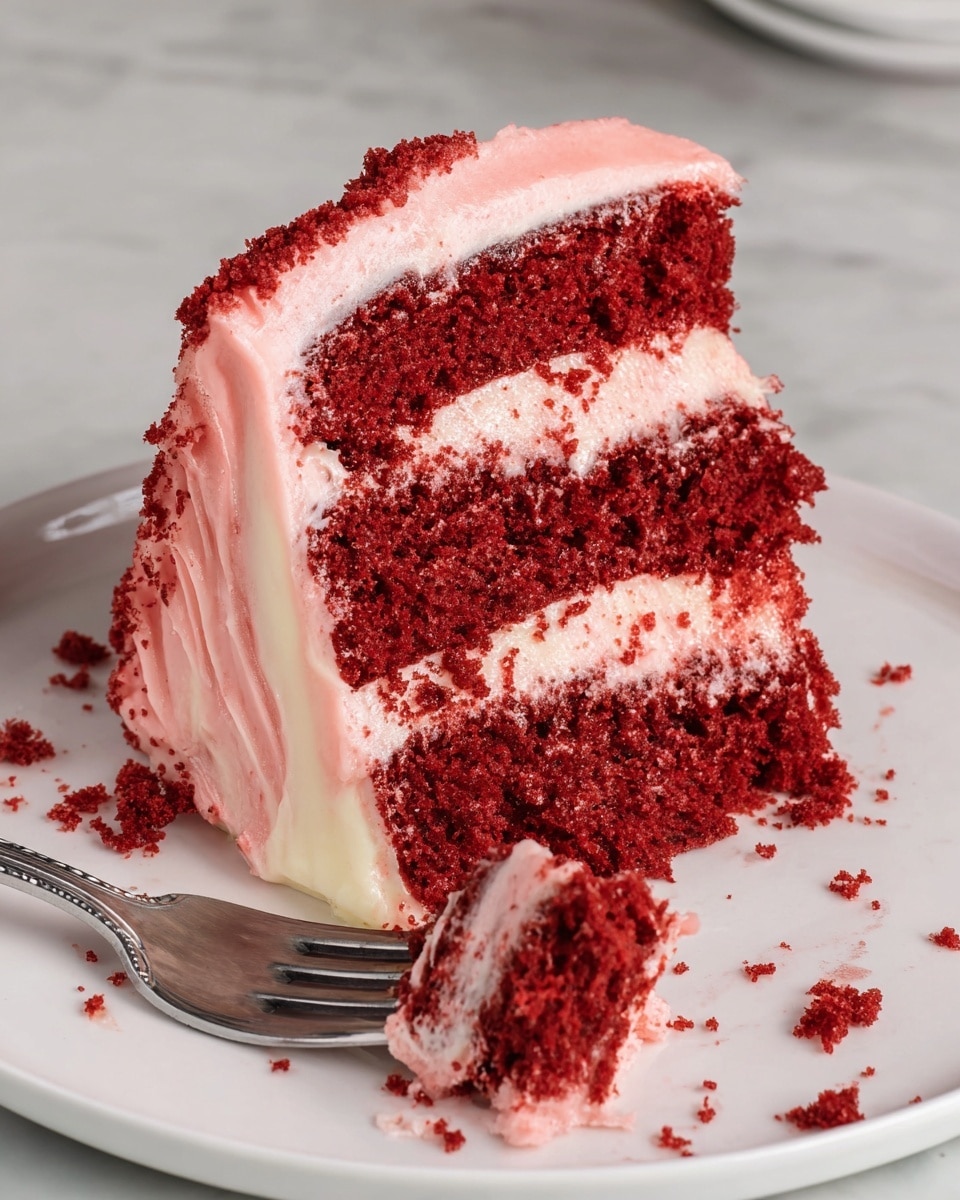
- Rich, Moist Flavor: The red velvet layers are perfectly tender with a subtle cocoa kick.
- Creamy, Tangy Frosting: The cream cheese buttercream complements the cake beautifully with a hint of tartness.
- Fun and Approachable: With helpful tips along the way, even if you’re new to cake decorating, you’ll have a blast creating this masterpiece.

Ingredients You’ll Need
The ingredients in this Brain Cake Recipe come together to balance moist cake layers with a flavorful frosting and spooky edible “blood” detail. Picking fresh and room-temperature items will make the mixing process smooth and the flavors shine.
- Cake Flour: Gives the cake a tender crumb without making it dense.
- Unsweetened Cocoa Powder: Just a touch for that classic red velvet chocolate hint.
- Baking Soda: Essential for lift and lightness.
- Unsalted Butter: Use room temperature for easier creaming with sugar.
- Granulated Sugar: Sweetness and structure in every bite.
- Eggs: Bring moisture and richness—important to have them at room temp for best texture.
- Buttermilk: Adds tang and tenderizes the cake crumb.
- Vegetable or Canola Oil: Keeps the cakes unbelievably moist.
- Vanilla Extract or Vanilla Bean Paste: This little flavor booster is key to a full, rounded taste.
- White Vinegar: Reacts with baking soda for lift and maintains the cake’s vibrant color.
- Red Gel or Liquid Food Coloring: Gel coloring is my favorite since it doesn’t thin the batter or frosting.
- Full-Fat Cream Cheese: For that tangy and luscious frosting everyone loves.
- Powdered Sugar: The backbone of our buttercream for sweetness and smooth cheeky texture.
- Heavy Whipping Cream: Keeps the frosting silky and spreadable.
- Seedless Raspberry or Strawberry Jam: This turns into edible fake blood that adds a creepy but delicious finishing touch!
Variations
I love how versatile this Brain Cake Recipe is. Feel free to customize frosting flavors or colors and even swap out ingredients to suit dietary needs—there’s room to get creative!
- Vegan or Dairy-Free Version: I’ve experimented with substituting plant-based butters and cream cheese alternatives with great success—just swap in your favorite versions for the butter, cream cheese, and dairy liquids.
- Different Flavor Twists: Try adding orange zest to the frosting for a citrusy punch or use black food coloring for a darker, eerier brain look.
- Mini Brain Cakes: For parties, I’ve made smaller individual brain cakes in mini cake pans—they’re adorable and practical for portion control.
- Blood Variations: Mix in different jams like blackberry for a deeper color or add a little corn syrup to your jam for a glossy finish.
How to Make Brain Cake Recipe
Step 1: Prepare Your Cake Layers
First, preheat your oven and get three 8-inch or 7-inch pans greased and lined with parchment—this helps prevent any sticking. Sifting the dry ingredients together really helps avoid lumps and ensures even mixing. When you cream the butter and sugar, mix it till it’s pale and fluffy since this step traps air for a lighter cake. Don’t forget to gradually add liquids and then the dry ingredients, mixing just enough to combine so you keep the batter light. Bake the layers until a toothpick comes out clean but remember to expect moist crumbs—that’s perfect! I like to cool the layers in the pans for about 10 minutes, then transfer them to a wire rack to cool completely before shaping.
Step 2: Shape the Cake Like a Brain
Once cooled, stack your cake layers and carefully trim two sides to form an oval-shaped brain. Don’t worry if this feels a little intimidating—I discovered popping the cake layers in the freezer for 20 minutes makes trimming so much easier because the cake firms up and won’t tear. When shaping, go slow and keep a sharp, small knife handy. It’s all about patience here; it’s worth it for that perfect ‘brain’ silhouette.
Step 3: Whip Up the Cream Cheese Buttercream
This frosting is my favorite part. Beat butter and cream cheese until silky smooth, then add vanilla and salt. Slowly add powdered sugar and cream while keeping the mixer on low to avoid a powder cloud (been there!). Adjust the frosting’s thickness by adding more cream or sugar as needed—aim for a spreadable but stable texture. A tiny squirt of red coloring transforms it into a lovely pink shade that looks perfect for our brain theme.
Step 4: Frost and Sculpt Your Brain
Layer and frost each cake tier with an even spread of buttercream, then apply a thin crumb coat over the whole brain shape and get it chilling in the fridge until firm. Using a large round tip, pipe squiggly lines across the cake’s surface to mimic the brain’s signature folds. Don’t sweat if your lines aren’t perfect—it just adds character! Chill the cake again to set everything in place.
Step 5: Add the Edible Fake Blood
Whisk together some seedless raspberry jam, water, and optional red gel coloring for that creepy, realistic blood look. Use a pastry brush to slather this glaze on top, making sure to get it between the frosting folds. It brings the whole brain effect to life and tastes absolutely delicious, adding a tart sweetness to cut through the richness.
Pro Tips for Making Brain Cake Recipe
- Freeze Before Cutting: Chilling the cake layers in the freezer makes trimming so much easier and prevents crumbling.
- Room Temperature Ingredients: Ensures your batter mixes smoothly and your frosting whips to the right consistency.
- Use Gel Food Coloring: It won’t affect the cake’s texture or add any bitterness like some liquid colorings can.
- Don’t Stress the Piping: Imperfections add to the brain’s natural look, and the edible blood covers any little gaps perfectly.
How to Serve Brain Cake Recipe
Garnishes
I usually keep garnishes minimal with this cake because it’s such a statement on its own. Sometimes, I add fresh raspberries around the base for a little extra “bloody” effect or a sprinkle of edible glitter to catch the light for a touch of whimsy. If you want to amplify the spooky vibe, edible spider rings or small candy eyeballs placed carefully can be a fun touch.
Side Dishes
This brain cake pairs wonderfully with simple sides like a scoop of vanilla ice cream or a fresh berry compote to balance the richness. For something more festive, I like to serve it alongside a chilled blood orange sorbet or a spiced mulled wine, especially for autumn occasions.
Creative Ways to Present
For parties, I’ve displayed this Brain Cake on a silver platter surrounded by gauzy cheesecloth and fake cobwebs—that dark and eerie setup never fails to impress! Another time, I piped little veins extending from the main brain onto the cake board for a “creepy crawler” effect that got lots of compliments. You can even carve smaller ghost-themed cupcakes to serve alongside for a themed dessert table.
Make Ahead and Storage
Storing Leftovers
After our last party, I wrapped leftover brain cake tightly with plastic wrap and stored it in the fridge. The buttercream does a fantastic job keeping the cake moist, and it stayed fresh and delicious for up to a week. Just be sure to cover any cut surfaces with leftover frosting to prevent drying out.
Freezing
I highly recommend freezing the cake layers ahead of time if you want to break up the process. I’ve also frozen fully frosted cakes by wrapping them in multiple layers of plastic wrap and foil—when thawed overnight in the fridge, they retain their texture and flavor beautifully.
Reheating
Because it’s a cake, you won’t want to “reheat” per se, but removing it from the fridge about an hour or two before serving lets it soften up to room temperature, which really brings out the cream cheese buttercream’s flavor and the cake’s moistness. Avoid microwaving to keep the texture intact.
FAQs
-
Can I Use Regular All-Purpose Flour Instead of Cake Flour?
You can, but I recommend measuring carefully and possibly sifting twice because cake flour is lighter and produces a more tender crumb. If you only have all-purpose, you might notice your cake is a bit denser but it will still taste great.
-
How Do I Make This Brain Cake Recipe Vegan?
Swap dairy butter and cream cheese with plant-based alternatives and replace eggs with an egg replacer or flax eggs. Also, use dairy-free milk like almond or oat milk mixed with an acid to mimic buttermilk. The frosting might need some tweaking for consistency, but it’s absolutely doable!
-
What’s the Best Way to Store This Cake?
Keep it tightly wrapped in the fridge for up to a week or freeze it wrapped well for longer storage. It’s best served at room temperature, so bring it out a couple hours before serving.
-
Can I Make This Cake Ahead of Time?
Absolutely! I love baking and freezing the layers days ahead or even frosting and chilling it the day before. Just make sure to store it well and allow time to come back to room temperature before serving for best flavor and texture.
Final Thoughts
This Brain Cake Recipe is one of my favorite projects in the kitchen because it combines creativity with classic flavors everyone loves. Whether you’re gearing up for a spooky celebration or just want to wow your friends with something unique, this cake never disappoints. From shaping the cake to piping the frosting and adding that eerie blood finish, the process is so rewarding. Give it a try—you’ll enjoy every bite and all the fun along the way!
Print
Brain Cake Recipe
- Prep Time: 20 minutes
- Cook Time: 27 minutes
- Total Time: 1 hour 17 minutes
- Yield: 20 servings
- Category: Cakes
- Method: Baking
- Cuisine: American
Description
This Brain Cake recipe features a moist red velvet cake baked in layers and shaped to resemble a realistic brain. The cake is frosted with a smooth cream cheese buttercream tinted pink and decorated with piped brain-like squiggles coated in a glossy, edible fake blood made from berry jam, perfect for Halloween or themed celebrations.
Ingredients
Red Velvet Cake
- 2 1/2 cups cake flour (300g)
- 2 Tbsp unsweetened cocoa powder, sifted (10g)
- 1 tsp baking soda (6g)
- 1/2 tsp fine salt (3g)
- 1/2 cup (1 stick) unsalted butter, room temperature (113g)
- 1 3/4 cups granulated sugar (350g)
- 2 large eggs, room temperature (112g)
- 1 1/4 cups buttermilk, room temperature (300g)
- 1/2 cup vegetable or canola oil (120g)
- 2 tsp vanilla extract or vanilla bean paste (8g)
- 1 tsp white vinegar (4g)
- 1 tsp red gel food coloring or 1 Tbsp liquid food coloring
Cream Cheese Buttercream Frosting
- 1 1/2 cups (3 sticks) unsalted butter, room temperature (339g)
- 1 cup (8 oz) full-fat cream cheese, room temperature (226g)
- 1 Tbsp vanilla extract or vanilla bean paste (12g)
- 1 tsp fine salt (6g)
- 7 cups powdered sugar (904g) or a 2lb. bag
- 3 Tbsp heavy whipping cream, room temperature (45g)
- Small squirt of red gel food coloring or 1 tsp liquid food coloring
Edible Fake Blood
- 1/2 cup seedless raspberry or strawberry jam
- 3 Tbsp water (45g)
- 1/4 tsp red gel food coloring or 1 tsp liquid food coloring (optional)
Instructions
- Preheat and Prepare Pans: Preheat your oven to 350°F (175°C). Grease three 8-inch or three 7-inch cake pans with non-stick baking spray and line them with parchment paper to prevent sticking.
- Mix Dry Ingredients: In a medium bowl, sift together cake flour, cocoa powder, baking soda, and salt. Set this dry mixture aside.
- Cream Butter and Sugar: Using a stand mixer with a whisk or a hand mixer, cream the butter and granulated sugar on medium-high speed for 1-2 minutes until lighter in color and fluffy. Scrape the bowl sides as needed.
- Add Eggs: On medium speed, beat in the eggs one at a time until fully combined.
- Combine Wet Ingredients: Mix in buttermilk, oil, vanilla extract, white vinegar, and red gel food coloring on low speed. The mixture may appear curdled, but it will smooth out with the dry ingredients.
- Incorporate Dry Ingredients: Add the dry ingredients to the wet in two additions, mixing on low speed until just combined with no visible flour streaks.
- Divide and Bake: Divide the batter evenly (approximately 415g per pan) into the prepared pans. Bake for 24-28 minutes, or until a toothpick inserted in the center comes out with moist crumbs.
- Cool Cakes: Let cakes cool in pans for 10 minutes, then loosen edges with an offset spatula and invert onto wire racks to cool completely. No need to level as layers bake flat.
- Shape the Brain: Stack the cooled layers and cut off about 1 inch from two sides of the cake to create an oval, brain-like shape. Use a sharp knife to round the top edges. If difficult to cut, chill layers in freezer for 20 minutes first.
- Make Frosting: Beat butter and cream cheese on medium speed until smooth. Add vanilla and salt, beating until incorporated. Gradually add powdered sugar and heavy cream on low speed. Adjust consistency with extra cream or sugar. Tint with a small amount of red food coloring for a pale pink shade.
- Prepare Edible Blood: Whisk together seedless jam, water, and optional red food coloring until smooth and thin; cover and set aside.
- Assemble and Frost Cake: Place first cake layer on a cake board, secure with a dab of frosting. Spread an even layer of frosting between layers, stacking and trimming for brain shape as needed. Apply a thin crumb coat of frosting around the cake and chill until firm.
- Pipe Brain Texture: Using a piping bag fitted with a large round tip, pipe squiggly lines on each hemisphere of the brain shape to mimic brain folds. Chill again until firm.
- Apply Fake Blood: Using a pastry brush, spread the edible fake blood over the piped frosting, filling all crevices and adding extra around the base for an eerie effect.
Notes
- Feeds approximately 20 people due to cake trimming and shaping.
- Make cake layers in advance and freeze to simplify process; thaw before assembling.
- Frosting can be made ahead and stored airtight in fridge up to 1 month or freezer up to 3 months.
- A frosted cake lasts up to a week in the fridge or one month in the freezer; bring to room temperature before serving.
- Use gel food coloring to maintain proper texture and avoid bitterness in cake and frosting.
- To make vegan or dairy-free, substitute dairy with plant-based milk, heavy cream alternatives, vegan butter, and egg replacer.
- Leftover cake scraps are perfect for cake pops or as topping for ice cream; store wrapped up to 3 days.
- Properly measure flour by spooning into measuring cup and leveling or use a kitchen scale for best results.
- Chill cake layers before cutting and assembling to prevent tearing and help keep shape.
- Don’t worry about perfect piping; the berry jam blood coats imperfections for a polished look.
Nutrition
- Serving Size: 1 slice (1/20th of cake)
- Calories: 450 kcal
- Sugar: 40g
- Sodium: 320mg
- Fat: 25g
- Saturated Fat: 14g
- Unsaturated Fat: 9g
- Trans Fat: 0.5g
- Carbohydrates: 55g
- Fiber: 1g
- Protein: 4g
- Cholesterol: 85mg


