

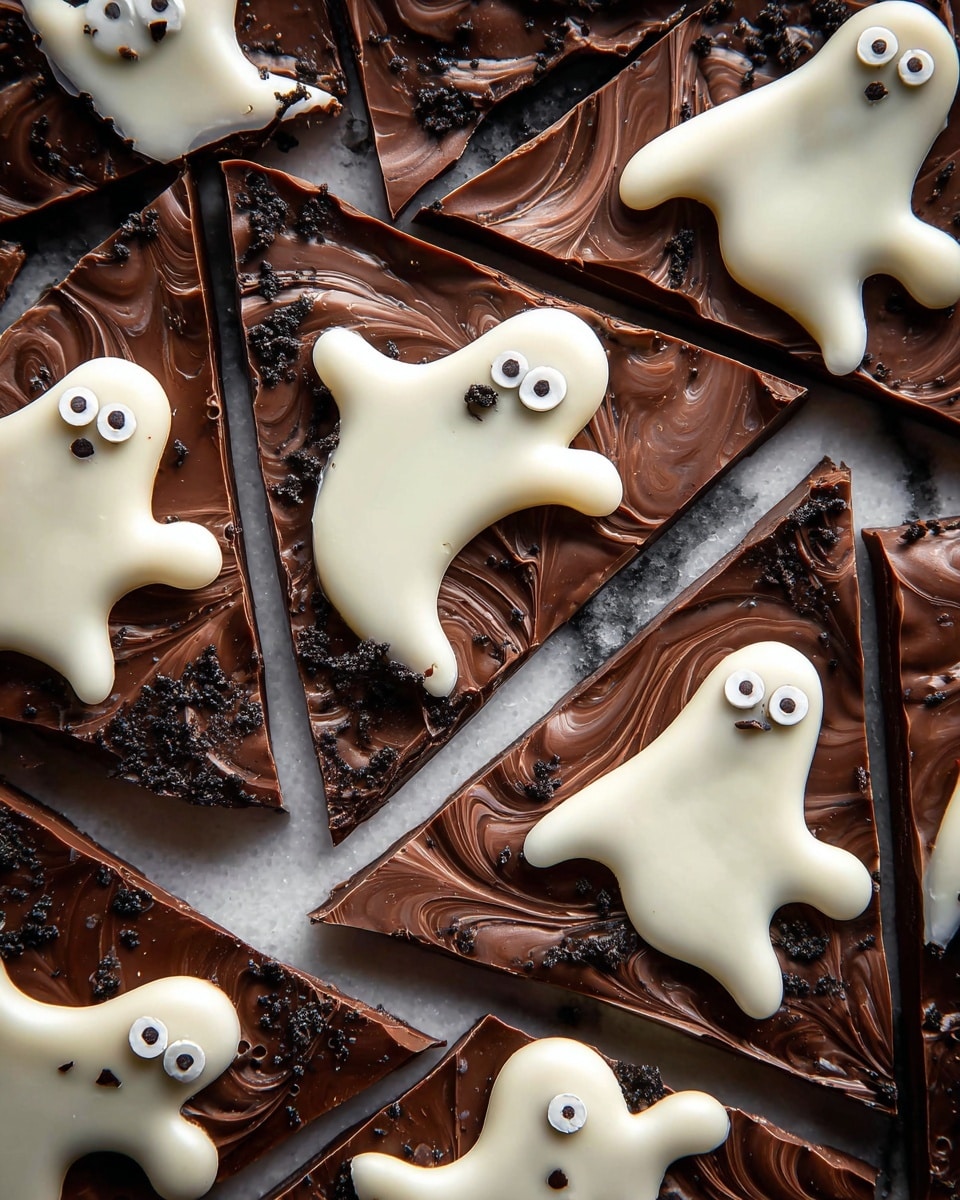
If you’re on the hunt for a fun, festive treat that’s as delightful to make as it is to eat, you’re gonna adore this BOO! Chocolate Peanut Butter Bars Recipe. I absolutely love how these bars combine that classic peanut butter and chocolate combo with a playful Halloween twist—ghost-shaped bars with candy eyes! When I first tried this recipe, I couldn’t believe how easy it was to pull off a treat that looks so impressive but comes together in under an hour. Trust me, you’re going to want to keep this one in your dessert rotation.
Why You’ll Love This Recipe
- Easy and Quick to Make: You’ll find these bars come together with simple steps and common ingredients in less than an hour.
- Fun and Festive: The ghost shapes and candy eyes bring a charming, spooky vibe that’s perfect for Halloween or anytime you want to surprise your guests.
- Perfect Balance of Flavors: Creamy peanut butter blends so well with rich chocolate, plus the crunch from cereals keeps every bite satisfying.
- Kid-Friendly Activity: Decorating the ghosts is a creative way to get kids involved in the kitchen—and they love making those silly faces!

Ingredients You’ll Need
All the ingredients for this BOO! Chocolate Peanut Butter Bars Recipe come together to create a wonderfully crunchy, chocolaty, and peanut buttery treat. The combination of corn flakes and brown rice krispies gives it that perfect texture, while the mix of honey and maple syrup adds a natural sweetness. Here are the stars you’ll be working with:
- Honey: This natural sweetener adds a lovely floral note and helps everything stick together.
- Maple syrup: Adds depth and warmth to the sweetness, balancing the peanut butter beautifully.
- Creamy peanut butter: Make sure it’s smooth for easy mixing and that indulgent creamy flavor.
- Corn flakes cereal: Provides a light and crispy crunch that doesn’t get soggy too fast.
- Brown rice krispies: Another crispy element that complements the corn flakes for a great texture mix.
- Semi-sweet or dark chocolate: Choose your favorite for a rich coating that’s not too sweet.
- White chocolate: For making those ghostly dollops you’ll shape into adorable spooky figures.
- Candy eyes and black sprinkles: This is where the magic happens—adding personality and fun to your ghosts!
Variations
I love how flexible this BOO! Chocolate Peanut Butter Bars Recipe is—you can easily tweak it to your taste or dietary needs. I often adjust the chocolate types or add a sprinkle of sea salt for a salty-sweet contrast. Don’t be afraid to make it your own!
- Nut-Free Variation: When hosting friends with allergies, I swap peanut butter for sunflower seed butter, and opt for dairy-free chocolate. It still tastes amazing and everyone loves it!
- Extra Crunch: Sometimes I toss in chopped nuts or pretzel pieces for an added crunch and saltiness that my family goes crazy for.
- Healthier Twist: You can replace the cereals with puffed quinoa for a higher protein bite and less sugar.
How to Make BOO! Chocolate Peanut Butter Bars Recipe
Step 1: Prep Your Pan and Mix Cereals with Peanut Butter
Start by lining a 9×13 inch baking dish with parchment paper—this really saves time later when you’re removing the bars. In a large bowl, combine the corn flakes, brown rice krispies, and 1 cup of creamy peanut butter. Using your hands or a sturdy spoon, gently mix to combine everything well. The peanut butter will help bind the cereals, giving you that perfect chew and crunch balance.
Step 2: Create the Sweet Syrup and Combine
In a small pot over medium heat, combine the honey and maple syrup. Bring this mixture to a light boil and let it cook for 2 minutes while stirring occasionally. This combines the flavors and thickens it slightly. Pour this hot syrup into your cereal and peanut butter bowl, then mix quickly but thoroughly. Once mixed, spread the mixture firmly into your parchment-lined pan. Press down firmly to make sure it holds together well after chilling. Pop it in the fridge for about 15 minutes to set.
Step 3: Melt Chocolate and Spread
While the base chills, melt your semi-sweet or dark chocolate with the remaining ¼ cup of peanut butter in the microwave. I like to do this in short 20-second bursts, stirring between each until smooth. This creates a silky peanut butter chocolate topping that’s a match made in heaven. Once melted and combined, spread this evenly over the chilled cereal base. Return the pan to the fridge for another 15 minutes to let the chocolate layer firm up.
Step 4: Shape the Ghosts with White Chocolate
Next, melt your white chocolate to use for the ghost shapes. Using a teaspoon for smaller ghosts or a tablespoon for larger ones, dollop the white chocolate onto the dark chocolate layer, spacing each dollop about an inch apart. Then, grab a wooden skewer or the end of a skinny spoon and gently drag the white chocolate downward to create ghostly shapes. Don’t worry if they aren’t perfectly symmetrical—the character is in the imperfection! Add two mini candy eyes to each ghost for that iconic look.
Step 5: Chill, Cut, and Serve Your BOO! Chocolate Peanut Butter Bars
Put the entire pan back into the fridge for about 15 minutes to let the white chocolate ghosts set solid. When ready, carefully cut around each ghost shape, creating irregular edges that add to their spooky charm. Keep your bars chilled until you’re ready to serve—these are best straight from the fridge, but they’re still delicious at room temp!
Pro Tips for Making BOO! Chocolate Peanut Butter Bars Recipe
- Press Firmly but Gently: When pressing the cereal mixture into the pan, try not to crush the flakes but make sure it’s compact enough to hold together after chilling.
- Chocolate Melting Trick: Microwave in short bursts and stir often to prevent burning your chocolate—it makes all the difference in smoothness.
- Imperfect Ghosts Are Perfect: Don’t stress about shaping your ghosts perfectly—uneven edges add whimsy and character, making these bars truly unique.
- Use Parchment Paper: Lining your pan keeps the bars from sticking and makes removing and slicing them so much easier.
How to Serve BOO! Chocolate Peanut Butter Bars Recipe
Garnishes
I like to finish these bars off with extra candy eyes or sprinkle some black sanding sugar or edible glitter to enhance the ghostly effect. Sometimes, a few tiny edible pumpkins or stars add a fun fall touch when serving guests. It’s a simple way to make the presentation feel extra special without any stress.
Side Dishes
These bars shine as a standalone treat, but for a party, I love pairing them with a scoop of vanilla ice cream or a dollop of whipped cream to complement the chocolate and peanut butter flavors. A cup of spiced pumpkin latte or hot chocolate alongside amps up the cozy vibes perfectly.
Creative Ways to Present
For Halloween gatherings, I’ve cut these bars into mini “ghost stacks” by layering with thin slices of marshmallow or white chocolate between bars, held together with a cute themed toothpick. I’ve also used black serving trays or orange plates to really make those white chocolate ghosts pop visually. Adding tiny eerie accessories like fake cobwebs around the serving tray turns it into a real conversation starter!
Make Ahead and Storage
Storing Leftovers
I usually store leftover bars in an airtight container in the fridge. This keeps them fresh for about 5 days. Because of the chocolate topping, they hold their texture well chilled and don’t get too sticky or soggy. Just make sure to keep them separated with parchment paper when stacking to avoid sticking.
Freezing
Freezing works great if you want to prep these bars in advance. Wrap individual bars or pieces tightly in plastic wrap and place in an airtight freezer-safe container. They can last up to 2 months this way. When thawing, I recommend moving them to the fridge overnight to avoid condensation ruining that beautiful chocolate layer.
Reheating
There’s no need to reheat these bars since they’re best enjoyed chilled or at room temperature. But if you prefer a softer chocolate layer, you can leave them at room temp for 10-15 minutes before serving. Just don’t microwave or heat directly—it can melt your intricate ghost designs!
FAQs
-
Can I use crunchy peanut butter instead of creamy in the BOO! Chocolate Peanut Butter Bars Recipe?
Yes, you can! However, using crunchy peanut butter will add little peanut bits to your bars which changes the texture a bit. If you love more crunch and texture, this can be a nice twist, but for the smoothest results and easiest mixing, creamy peanut butter is ideal.
-
What type of chocolate works best for the BOO! Chocolate Peanut Butter Bars Recipe?
Semi-sweet and dark chocolate both work wonderfully for the chocolate layer, depending on your sweetness preference. Dark chocolate gives a richer, more intense flavor, while semi-sweet is sweeter and mellower. For the ghost shapes, white chocolate is best because it’s easy to mold and stands out beautifully on top.
-
Can I make these bars gluten-free?
Absolutely! Just make sure to check that your corn flakes and brown rice krispies are certified gluten-free, as some brands contain gluten. The rest of the ingredients are naturally gluten-free, making this recipe a safe and tasty option.
-
How do I avoid the white chocolate ghosts melting or smearing?
Work quickly when shaping the ghosts and keep your hands cool and dry to avoid transferring heat. Also, ensure the chocolate base is well chilled before adding white chocolate. After decorating, refrigerate immediately to help the shapes set firmly.
Final Thoughts
This BOO! Chocolate Peanut Butter Bars Recipe is one of those delightful surprises that brings so much joy both in the kitchen and at the table. I still remember the first time I made them—how my kids’ faces lit up when they saw those imperfect little ghosts staring back at them with candy eyes. It’s not just a sweet treat; it’s a moment of laughter, creativity, and fun. If you want a dessert that’s approachable, delicious, and guaranteed to make people smile, try this recipe. You’ll be so glad you did. BOO!
Print
BOO! Chocolate Peanut Butter Bars Recipe
- Prep Time: 20 mins
- Cook Time: 5 mins
- Total Time: 55 mins
- Yield: 24 bars
- Category: Dessert
- Method: No-Cook
- Cuisine: American
- Diet: Vegetarian
Description
These BOO! Chocolate Peanut Butter Bars are a spooky and delicious no-bake treat perfect for Halloween. Crispy corn flakes and brown rice krispies combine with creamy peanut butter and sweet honey-maple syrup, topped with layers of melted chocolate and decorated with adorable white chocolate ghost shapes and candy eyes. Easy to make and fun to serve, these bars bring festive flavor and fun to any celebration.
Ingredients
For the Base:
- 3 cups corn flakes cereal
- 2 cups brown rice krispies
- 1 cup creamy peanut butter (for mixing)
Syrup Mixture:
- ¾ cup honey
- ¼ cup maple syrup
Chocolate Toppings:
- 8-12 oz semi-sweet or dark chocolate, melted
- ¼ cup creamy peanut butter (for melting with chocolate)
- 6 oz white chocolate, melted
Decoration:
- Candy eyes
- Black sprinkles
Instructions
- Prepare the pan: Line a 9×13 inch baking dish with parchment paper to prevent sticking and make removal easy.
- Mix cereals and peanut butter: In a large bowl, combine the corn flakes, brown rice krispies, and 1 cup of creamy peanut butter, stirring to blend evenly.
- Cook syrup mixture: In a pot over medium heat, combine the honey and maple syrup. Bring to a boil and cook for 2 minutes. Remove from heat.
- Combine syrup with cereal mix: Pour the hot honey-maple syrup into the cereal and peanut butter mixture and stir well to coat everything thoroughly.
- Form the base layer: Spread the mixture evenly into the prepared pan, packing it down tightly. Refrigerate for 15 minutes to set.
- Melt chocolate and peanut butter: In the microwave, melt together the semi-sweet or dark chocolate and ¼ cup peanut butter until smooth.
- Top the base with chocolate: Spread the melted chocolate-peanut butter mixture over the chilled cereal base evenly.
- Create white chocolate ghosts: Melt the white chocolate separately. Spoon small dollops (1 teaspoon for small ghosts, 1 tablespoon for larger ones) onto the chocolate layer about 1 inch apart. Use a wooden skewer or the end of a spoon to drag the white chocolate gently into ghost shapes, embracing imperfections for a spooky look.
- Add candy eyes: Place two mini candy eyes on each white chocolate ghost to give them character.
- Set and cut: Return the pan to the fridge for about 15 minutes to set the chocolate. Cut around the ghosts into irregular shapes and keep refrigerated until ready to serve. Enjoy your spooky BOO! bars!
Notes
- Use parchment paper for easy removal and clean-up.
- Adjust the amount of chocolate and peanut butter to your preference for sweetness and richness.
- For a dairy-free option, substitute peanut butter and chocolate with appropriate vegan alternatives.
- Store bars in the refrigerator to maintain shape and freshness.
- Adding black sprinkles around the ghosts can enhance the spooky decoration.
Nutrition
- Serving Size: 1 bar (about 1/24th of recipe)
- Calories: 190 kcal
- Sugar: 15 g
- Sodium: 70 mg
- Fat: 11 g
- Saturated Fat: 5 g
- Unsaturated Fat: 5 g
- Trans Fat: 0 g
- Carbohydrates: 20 g
- Fiber: 1 g
- Protein: 4 g
- Cholesterol: 5 mg


