
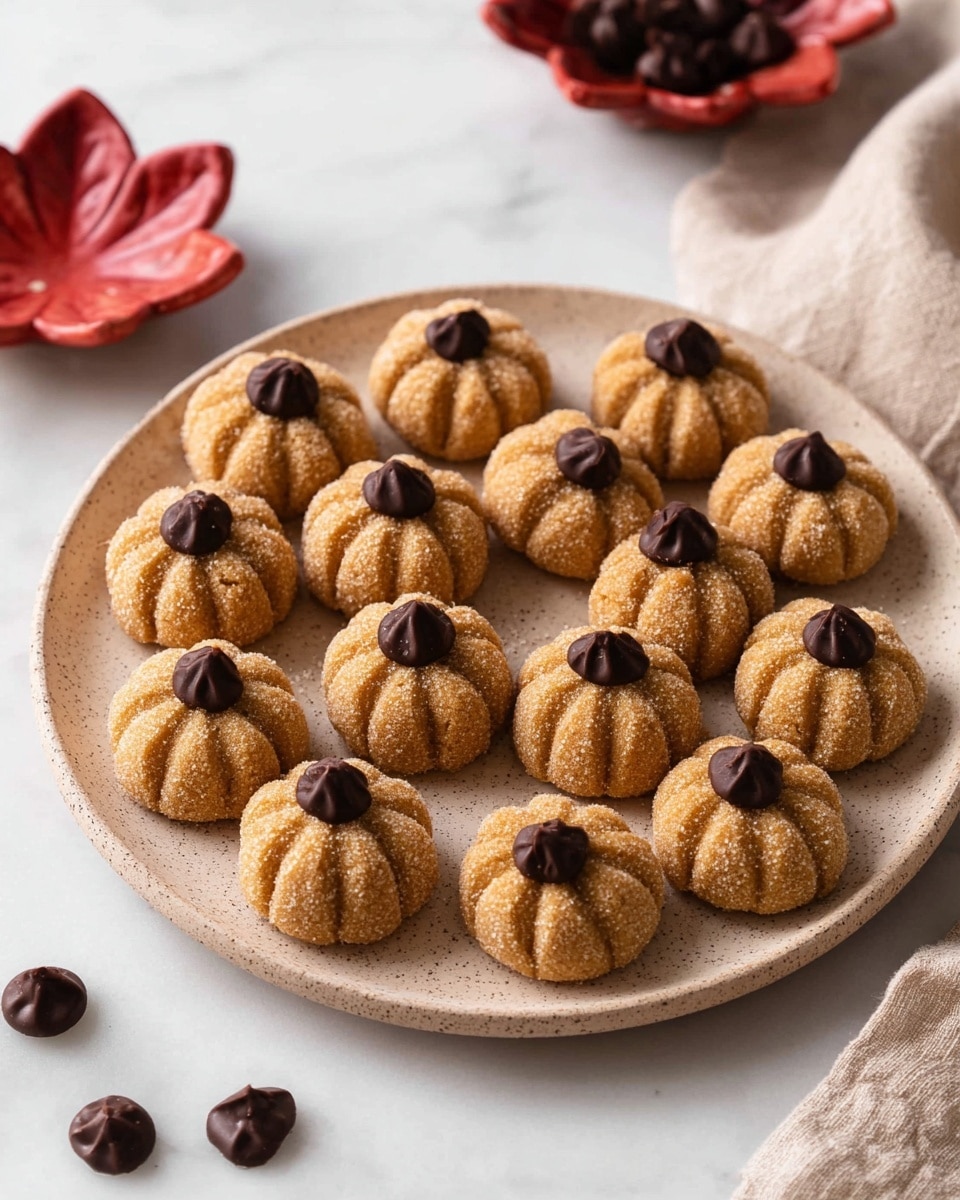
If you’re looking for a fun, festive little treat that’s as delicious as it is adorable, then you’re going to want to stick around for this one. I’m excited to share my easy and utterly charming Biscoff Pumpkins Recipe that’s perfect for topping cakes, cupcakes, or just nibbling on as a cozy snack. Trust me, once you try these sweet, spiced pumpkin-shaped bites, you’ll wonder how you ever celebrated fall without them!
Why You’ll Love This Recipe
- Simple Ingredients: You probably already have Biscoff spread and almond flour in your pantry, making these pumpkins a breeze to whip up.
- No Baking Needed: These are made without an oven, so you can craft them easily while chatting or sipping your favorite fall drink.
- Perfect Festive Decor: These little pumpkins aren’t just tasty—they’re also adorable decor for autumn desserts or Halloween parties.
- Customizable Flavors: The optional pumpkin spice kick adds cozy notes, but you can tweak it to your liking!

Ingredients You’ll Need
These ingredients come together to make a dough that’s just the right balance of sticky, spiced, and sweet. Almond flour helps keep the texture smooth and moldable, while Biscoff spread brings that signature caramelized flavor we all adore.
- Biscoff spread: This sweet, spiced cookie butter gives the pumpkins their incredible flavor; make sure it’s at room temperature for easy mixing.
- Almond flour / blanched almond meal: I find almond flour perfect because it creates a soft dough that shapes beautifully without drying out.
- Pumpkin spice: Totally optional but I love the warm, autumn vibe it adds — adjust to your taste!
- Granulated sugar: For rolling the pumpkins in, which gives just the right hint of crunch and sparkle.
- Dairy-free chocolate chips: These little chips serve as the pumpkin stems once glued on with Biscoff spread.
Variations
One of my favorite things about the Biscoff Pumpkins Recipe is how you can personalize it easily. I’ve tried a few twists, and it’s fun to make the recipe your own with tweaks that suit your taste or dietary needs.
- Dairy-Free & Vegan: Using dairy-free chocolate chips keeps these perfectly vegan-friendly — my plant-based friends love them!
- Spiced Up: When I first made these, I skipped the pumpkin spice, but adding even a small bit gives such a delightful fall flavor.
- Nut-Free Alternative: If you’re avoiding nuts, try oat flour instead of almond flour—just expect a slightly different texture, still tasty!
- Mini vs. Cake Toppers: I usually make smaller pumpkins for cupcakes, but the larger “cake topper” size is fantastic if you want a bolder decoration on a dessert.
How to Make Biscoff Pumpkins Recipe
Step 1: Mix the Dough Gently
Start by adding almond flour, Biscoff spread, and pumpkin spice to a medium bowl. Grab a wooden spoon and stir just until everything is combined. Don’t overmix here—if you do, the oils might start to separate, making the dough too oily. You want a mixture that’s slightly oily to the touch but still holds its shape when pinched into a ball. If it feels a bit wet or too soft, sprinkle in a little more almond flour and mix again.
Step 2: Shape Your Pumpkins
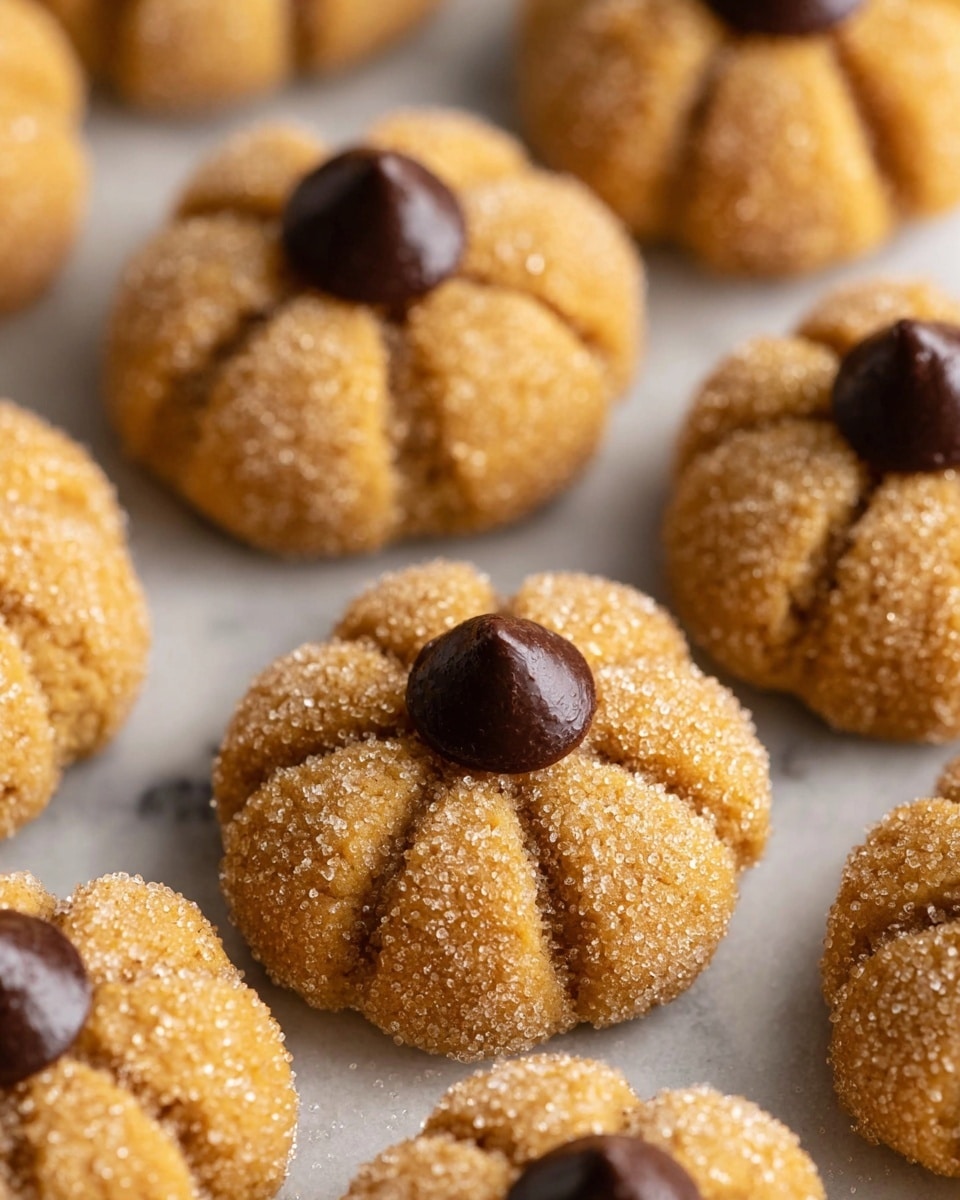
I like to use a tablespoon measure for pumpkin cake toppers, which gives you about 20 balls of dough, each roughly 20 grams. For cupcakes, I go smaller, using a half tablespoon scoop to make around 40 mini pumpkins. Roll each scoop in your hands to form balls, then use the side of a toothpick to gently press tiny crease lines from top to bottom—this mimics pumpkin ribs and is seriously satisfying to do.
Step 3: Optional Sugar Coating
If you want a little extra sparkle and crunch, lightly toss the shaped pumpkins in granulated sugar. This adds a sweet crunch and makes them extra pretty, especially if you plan to use them as cake decorations.
Step 4: Glue On The Chocolate Stem
Here’s a trick I discovered to make the pumpkins look real—the chocolate chip stem. Spread a dab of Biscoff spread on the flat side of each chip like glue, then gently press it on top of every pumpkin. It sticks perfectly and looks like a little pumpkin stalk, bringing these treats to life!
Step 5: Store and Enjoy
Place your Biscoff pumpkins in an airtight container at room temperature for up to five days. I’ve found that while the sugar coating can soften a bit as the oils mingle, the pumpkins never turn sticky or messy. If you want to refresh their sparkle, just toss on a little extra granulated sugar right before serving.
Pro Tips for Making Biscoff Pumpkins Recipe
- Don’t Overmix: I can’t stress this enough—stir until just combined to keep the dough’s oils from separating and ruining the texture.
- Adjust Almond Flour as Needed: Depending on room temperature and your spread’s moisture, you may need to add a touch more almond flour for perfect shaping.
- Use Toothpick Tool: Pressing the ribs with a toothpick gives these pumpkins that authentic look, and it’s super easy once you get the hang of it.
- Keep Them Airtight: To avoid sugar melting into the dough, store pumpkins well sealed at room temp and toss in sugar right before you serve.
How to Serve Biscoff Pumpkins Recipe
Garnishes
I love sprinkling a little cinnamon or nutmeg over the pumpkins for an extra spice kick before serving. Sometimes, I add a tiny mint leaf next to the chocolate stem to freshen up the look and balance the sweetness—just a little flair that makes a big impression!
Side Dishes
These pumpkins are amazing alongside a warm cup of chai tea or pumpkin spice latte. I also enjoy serving them with a scoop of vanilla or cinnamon ice cream, turning a simple dessert into a cozy autumn experience.
Creative Ways to Present
One fall, I arranged a dozen Biscoff pumpkins around the edge of a caramel cheesecake for a spectacular centerpiece. Another time, I placed mini pumpkins atop cupcakes decorated with green buttercream “leaves,” and my family went crazy over the cute details. They make simple desserts instantly festive and impressive.
Make Ahead and Storage
Storing Leftovers
I store leftover Biscoff pumpkins in an airtight container at room temperature. They stay fresh and maintain their shape perfectly for up to five days, making them a great make-ahead snack or party prep item.
Freezing
I’ve frozen these pumpkins a couple of times without issue. Just place them separated on a baking sheet until frozen, then transfer to a freezer-safe container. When you’re ready, thaw at room temperature—perfect for stretching your batch through the season.
Reheating
Because these are no-bake treats, reheating isn’t necessary or recommended. I suggest enjoying them at room temperature so you get that lovely Biscoff texture and flavor at their best.
FAQs
-
Can I use a different type of flour in the Biscoff Pumpkins Recipe?
Absolutely! Almond flour works best because of its smooth texture and moldability, but I’ve also tried oat flour and even finely crushed cookies. Just keep in mind that alternatives might make the dough a bit drier or grittier, so adjust moisture levels accordingly.
-
How long do Biscoff pumpkins last?
Stored in an airtight container at room temperature, they keep well for about 5 days. You can also refrigerate or freeze them if you want to keep them longer, just allow them to come to room temperature before serving.
-
Can I make these pumpkins gluten-free?
Yes! Since almond flour is naturally gluten-free, this recipe is perfect for a gluten-free treat. Just double-check your Biscoff spread and chocolate chips to ensure they’re gluten-free versions.
-
Do I have to use pumpkin spice?
Nope! Pumpkin spice adds a warm fall flavor, but you can skip it or use cinnamon, nutmeg, or even just vanilla extract to make the pumpkins your own.
-
What’s the best way to shape the pumpkins?
After rolling the dough into balls, use the side of a toothpick to gently press vertical lines from top to bottom. This mimics the natural ribs of a pumpkin and really brings the mini treats to life.
Final Thoughts
I absolutely love how these Biscoff pumpkins turn out—both in flavor and cuteness factor. They’re such a crowd-pleaser, and honestly, I find myself making them season after season. If you want a no-fuss recipe that doubles as decor and dessert, I highly recommend giving this Biscoff Pumpkins Recipe a try. You’ll enjoy every bite and impress your guests without breaking a sweat in the kitchen. Happy baking (or should I say “no-baking”)!
Print
Biscoff Pumpkins Recipe
- Prep Time: 45 minutes
- Cook Time: 0 minutes
- Total Time: 45 minutes
- Yield: 20 small pumpkin cake toppers or 40 mini pumpkin cupcake toppers
- Category: Dessert
- Method: No-Cook
- Cuisine: American
- Diet: Vegan
Description
These delightful Biscoff Pumpkins are a charming no-bake treat perfect for autumn-themed parties or as festive cake toppers. Made with almond flour and Biscoff spread, these spiced pumpkin-shaped bites are easy to prepare and naturally dairy-free when paired with dairy-free chocolate chips. Their tender, slightly oily texture mimics pumpkin ribs with creative toothpick detailing, then topped with chocolate chip ‘stems’ adhered with a touch more Biscoff spread. They store well at room temperature, making them an ideal make-ahead decoration or snack.
Ingredients
Base Ingredients
- 120 g (1/2 cup) Biscoff spread plus more as ‘glue’ for the chocolate chips
- 100 g (1 cup) almond flour / blanched almond meal plus more if needed
- 2 teaspoons pumpkin spice (optional, to taste)
- ½ cup (100 g) granulated sugar (optional)
- 20-40 dairy-free chocolate chips
Instructions
- Mix Ingredients: Add the almond flour, Biscoff spread, and pumpkin spice to a medium bowl. Mix gently with a wooden spoon until just combined, taking care not to overmix to prevent the oils from separating. The dough should feel slightly oily and be able to hold its shape when pinched into a ball. If it’s too soft, gradually add more almond flour and mix again.
- Form Pumpkin Balls: Using a tablespoon measure, divide the dough into about 20 balls weighing approximately 20 g each for cake toppers. For smaller cupcake toppers, use a 1/2 tablespoon measure to create around 40 balls of 10 g each.
- Create Pumpkin Ribs: Take a toothpick and gently press from top to bottom around each ball to create creases resembling pumpkin ribs. Repeat on all sides of each ball.
- Add Sugar Coating (Optional): Place the granulated sugar in a shallow bowl. Gently roll the pumpkin balls in the sugar to cover all sides evenly, giving them a glistening finish.
- Attach Chocolate Chip Stems: Spread a little Biscoff spread on the flat side of each chocolate chip to act as glue. Press the chocolate chip gently on top of each pumpkin to serve as its stem.
- Store the Pumpkins: Place the finished pumpkins in a small airtight container. They can be kept at room temperature for up to 5 days or refrigerated or frozen until ready to use. Note that the sugar coating may dissolve slightly over time due to the oils, but they will remain non-sticky and easy to handle. Re-sprinkle sugar before serving if desired.
Notes
- This recipe makes approximately 20 cake-sized pumpkins or 40 mini cupcake pumpkins.
- Almond flour produces the smoothest and easiest-to-shape dough. Alternatives like oat flour, heat-treated all-purpose flour, or crushed cookies can be used but result in a drier and grittier texture.
- If the dough feels too soft or moist, gradually add more almond flour depending on room temperature, measurement accuracy, and mixing; usually up to an additional 25 g (1/4 cup) may be necessary.
Nutrition
- Serving Size: 1 pumpkin topper (approx. 20 g)
- Calories: 95 kcal
- Sugar: 5 g
- Sodium: 10 mg
- Fat: 7 g
- Saturated Fat: 1 g
- Unsaturated Fat: 6 g
- Trans Fat: 0 g
- Carbohydrates: 7 g
- Fiber: 1 g
- Protein: 2 g
- Cholesterol: 0 mg


