
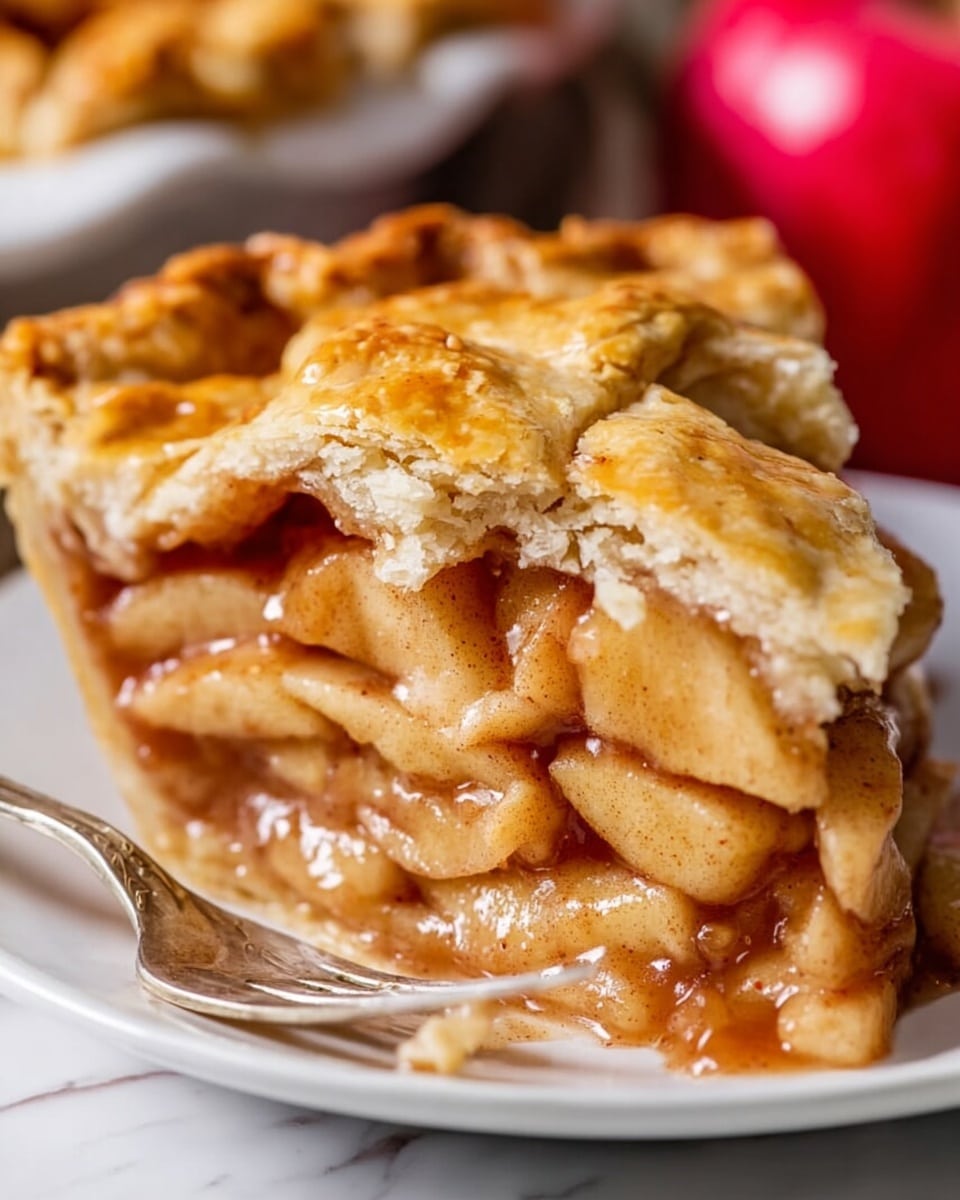
If you’re on the hunt for the perfect dessert to wow your family and friends, I can’t recommend the Best Recipe for Apple Pie Recipe enough. This apple pie isn’t just your everyday fruit-filled treat—it’s the culmination of my years experimenting in the kitchen, and every slice bursts with warm spices, a flaky crust, and perfectly tender apples. Trust me, once you try this, it’ll quickly become your go-to for celebrations or cozy weekend baking sessions.
Why You’ll Love This Recipe
- Flavors That Sing: The blend of cinnamon, nutmeg, and just a hint of cardamom takes the apple filling to the next level.
- Perfect Apple Texture: The apples are tender but still hold their shape, giving you a satisfying bite every time.
- Flaky, Golden Crust: A step to chill the pie before baking ensures your crust turns out beautifully flaky and crisp.
- Made for Sharing: This pie serves a crowd and gets rave reviews wherever it goes!

Ingredients You’ll Need
The magic of the Best Recipe for Apple Pie Recipe comes down to the quality of its ingredients. Using a combination of apple varieties enhances the flavor complexity, and pairing the spices just right makes all the difference. Don’t forget a good homemade or store-bought double pie crust—trust me, it really sets this pie apart.
- Double pie crust: A homemade crust adds rich, flaky layers, but store-bought works too if you’re short on time.
- Lemon zest and juice: These add brightness and keep the apples from browning during prep.
- Apples: I recommend mixing Granny Smith for tartness, Gala for sweetness, and Golden Delicious for softness and balance.
- Brown sugar: Adds a deep caramel flavor to the filling.
- Granulated sugar: Balances the tartness with gentle sweetness.
- All-purpose flour: Helps thicken the juicy apple filling to the perfect consistency.
- Kosher salt: Just a pinch to enhance all the flavors.
- Cinnamon: The essential warm spice for apple pie.
- Nutmeg: Adds a cozy, nutty note that amps up the depth.
- Cardamom (optional): I love this little twist for a unique aroma but feel free to leave it out.
- Vanilla extract: A splash rounds out the spice mix beautifully.
- Milk and beaten egg: Used to brush over the crust for that irresistible golden color and shine.
- Raw sugar: Sprinkled on top for crunch and sparkle.
Variations
This Best Recipe for Apple Pie Recipe comes with plenty of room for personalization! I like to switch up the spices or even the types of apples depending on the season. Don’t be afraid to experiment a little to make it your own.
- Use different apples: I once tried with Honeycrisp and Pink Lady apples for a sweeter, more refreshing pie—delicious for summer!
- Spice it up or down: For a kid-friendly version, reduce the nutmeg and cardamom; for adults, a little extra cinnamon goes a long way.
- Crust styles: Try a lattice crust for eye-catching presentation, or a crumb topping if you want a cozier feel.
- Make it gluten-free: Use a gluten-free pie crust and substitute flour in the filling with cornstarch or a gluten-free thickener.
How to Make Best Recipe for Apple Pie Recipe
Step 1: Prep Your Apples Carefully
I’ve found that peeling and slicing each apple one by one, then tossing it immediately into lemon juice, prevents browning and keeps your filling looking fresh. Use a sharp knife or a good apple peeler if that’s your jam. The slices should be thin—about 1/8 inch—to cook evenly but still hold a little structure.
Step 2: Cook the Filling Gently
Mix your sugars, flour, spices, and salt with the apples in a large, high-sided skillet so nothing bubbles over. Stir gently—this is key—to keep the slices intact. Cover and simmer for about 20 minutes, but peek every few minutes to stir and check the texture. Remember, the apples shouldn’t be falling apart; they’re going to finish cooking in the oven.
Step 3: Chill That Filling
This is my secret for the best apple pie you’ll taste: once your filling is cooled, transfer it to your pie shell and refrigerate before baking. Cooling the filling ensures the crust stays flaky and doesn’t get soggy from hot, juicy fruit.
Step 4: Assemble and Prep for Baking
Once your pie crust is laid in your 9-inch dish, dump in the cooled filling along with every bit of that sticky caramel goodness. Top it with your second crust—lattice or whole—and don’t forget to cut vents if you opt for a solid lid. Chilling your assembled pie for 20-30 minutes helps with an extra flaky crust layer.
Step 5: Bake With Care
Pop a baking sheet into your oven and preheat to a scorching 425°F. Brush the crust with your choice of milk and/or beaten egg, then sprinkle with raw sugar for that hallmark sparkle. Bake the pie at 425°F for 15 minutes, then reduce the heat to 350°F, protect the edges with foil, and bake for an additional 40-45 minutes. This method locks in heat and prevents burning.
Step 6: Patience, My Friend
I know this is the hardest step! Let the pie cool for at least 4 hours to let the filling set up perfectly. Cutting too soon means runny filling—not what you want. Trust me, the wait is so worth it.
Pro Tips for Making Best Recipe for Apple Pie Recipe
- Keep Apples from Browning: Peel and slice each apple directly into lemon juice to keep your filling vibrant and fresh-looking.
- Stir Gently: When cooking the filling, stir gently to avoid turning the apples into mush—texture is everything.
- Chill Before Baking: Cooling the filled pie crust before baking keeps your bottom crust from getting soggy and adds flakiness.
- Use Foil Shields: Protect the edges of your crust with foil after the initial high-heat bake to prevent burning while the center finishes cooking.
How to Serve Best Recipe for Apple Pie Recipe
Garnishes
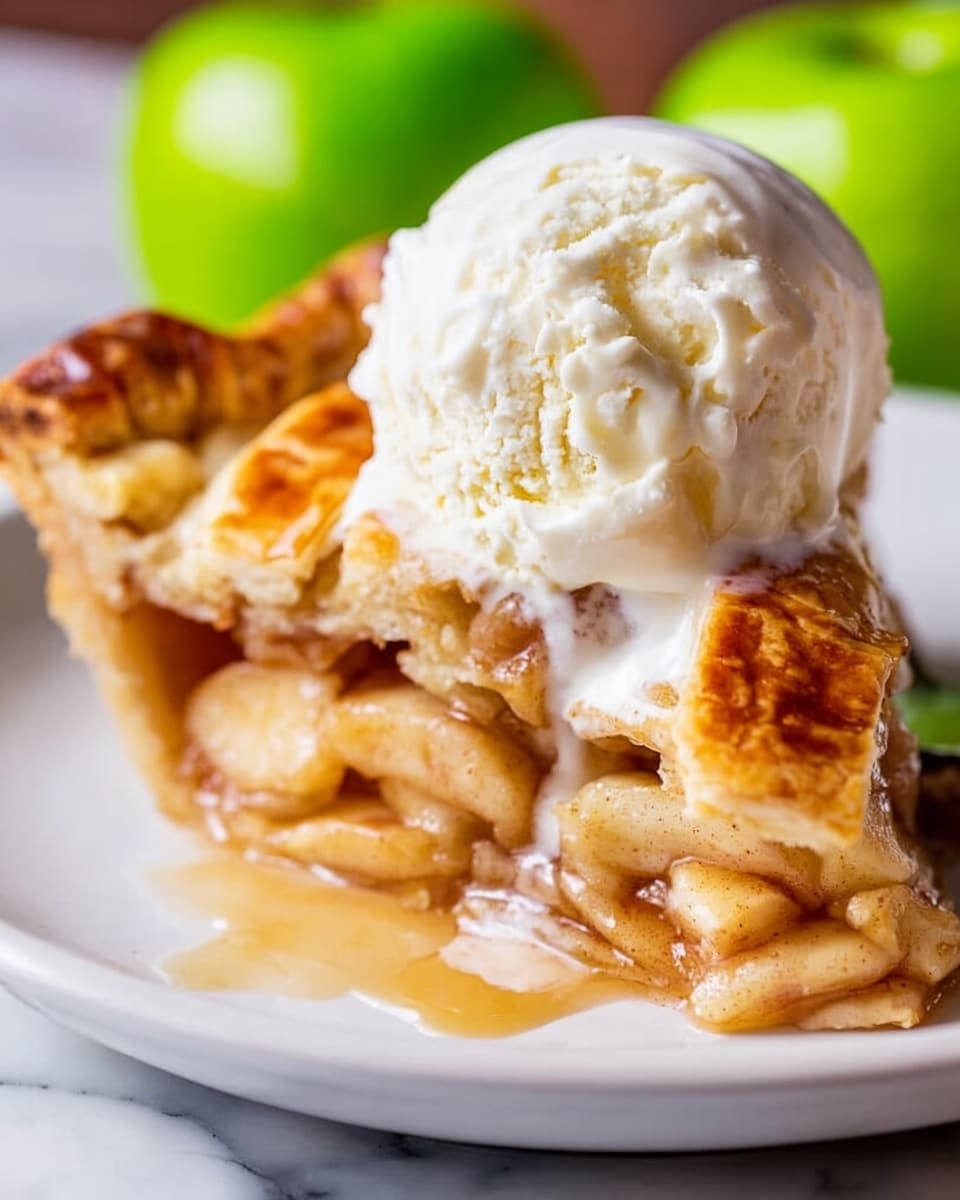
My absolute favorite way to serve this pie is with a big scoop of vanilla ice cream—the classic combo never fails. Sometimes, I drizzle warm caramel sauce on top for an indulgent twist. A sprinkle of chopped toasted pecans or a dusting of powdered sugar can elevate presentation too.
Side Dishes
Apple pie pairs beautifully with simple sides like whipped cream or a salty cheddar cheese slice, which balances the sweetness perfectly. For a full meal feel, try serving it alongside roast chicken or pork—it’s surprisingly delightful!
Creative Ways to Present
For holidays or dinner parties, I love making mini individual apple pies in ramekins—super cute and convenient. Another favorite is layering apple pie filling between puff pastry sheets to make quick apple turnovers. They’re perfect for festive brunches or casual get-togethers.
Make Ahead and Storage
Storing Leftovers
Leftover apple pie keeps well at room temperature for up to 2 days if wrapped tightly in plastic. After that, I recommend refrigerating it to keep everything fresh. Just bring it back to room temp before serving for the best flavor.
Freezing
I freeze leftover filling in ziplock bags for up to 3 months—this way, I can whip up a quick pie or crisp anytime. You can also freeze a fully assembled unbaked pie; just wrap tightly and bake from frozen with an extra 15-20 minutes added.
Reheating
To reheat leftover pie, I pop it in a 350°F oven for about 15 minutes—this refreshes the crust’s crispness and gently warms the filling without making it soggy or mushy.
FAQs
-
Can I use only one type of apple for this recipe?
Absolutely! While I prefer a mix for flavor depth, using only Granny Smith, Honeycrisp, or your favorite tart apple will still result in a delicious pie. Just keep in mind that texture and sweetness may vary, so adjust your sugar accordingly.
-
Do I have to cook the filling before baking the pie?
Cooking the filling first softens the apples slightly and enhances the spices’ flavors without making the pie soggy. It also helps ensure the apples are tender but not mushy after baking. Skipping this step may result in undercooked fruit or a watery pie.
-
How do I prevent the crust edges from burning?
After the first 15 minutes of baking at a higher temperature, cover the crust edges with a foil shield to protect them from burning while the center finishes baking. This keeps the edges nicely browned without becoming too dark or tough.
-
Can I make this pie ahead of time?
Yes! You can prepare the filling up to a day in advance and store it in the fridge. You can even assemble the pie and refrigerate it overnight before baking. Just give it some time to come to room temperature before popping it in the oven.
-
What’s the best way to slice the apples?
Slicing your apples uniformly thin—about 1/8 inch—is key for even cooking. I peel and slice one apple at a time, immediately adding it to the lemon juice to keep them from browning, then continue with the next.
Final Thoughts
This Best Recipe for Apple Pie Recipe has a special place in my heart (and on my table) because it balances tradition and a little bit of magic. Every slice reminds me of cozy family gatherings and shared memories, and I know you’ll find joy in baking it as much as you’ll love eating it. So grab those apples and invite a few friends over, because this pie is meant to be shared and savored!
Print
Best Recipe for Apple Pie Recipe
- Prep Time: 20 minutes
- Cook Time: 1 hour 20 minutes
- Total Time: 5 hours 40 minutes
- Yield: 10 servings
- Category: Dessert
- Method: Baking
- Cuisine: American
Description
This Best Apple Pie recipe features a homemade double crust filled with a perfectly spiced apple mixture that is cooked on the stovetop before baking to ensure tender, flavorful apples that hold their shape. A classic dessert perfect for any occasion, topped with a golden, flaky crust and optional lattice design, ideal served with vanilla ice cream for an indulgent treat.
Ingredients
Pie Crust
- 1 homemade double pie crust, 2 sheets of pie dough
Apple Pie Filling
- 1/4 teaspoon lemon zest
- Juice from half a lemon (about 2 tablespoons)
- 5 pounds apples (Granny Smith, Gala, Golden Delicious), peeled and sliced 1/8 inch thick
- 3/4 cup brown sugar, packed
- 3/4 cup granulated sugar
- 5 tablespoons all-purpose flour
- 1/4 teaspoon kosher salt
- 1 1/2 teaspoons ground cinnamon
- 3/4 teaspoon ground nutmeg
- 1/2 teaspoon ground cardamom (optional)
- 1 teaspoon vanilla extract
For Brushing & Topping
- 1 tablespoon milk
- 1 tablespoon beaten egg (optional)
- 1 tablespoon raw sugar (for topping)
Instructions
- Choose apples. Gather 5 pounds (about 11 large) of a mix of apples such as Granny Smith, Gala, and Golden Delicious for balanced flavor.
- Prepare lemon zest and juice. Use a microplane grater to zest 1/4 teaspoon lemon peel into a large 12-inch skillet. Add juice from half a lemon (around 2 tablespoons) to the skillet.
- Peel and slice apples. Peel apples using a potato peeler, slice into 1/8-inch pieces, and add directly to the lemon juice in the skillet. Stir occasionally to prevent browning and coat evenly.
- Add dry ingredients and spices. Over the apples in the skillet, add brown sugar, granulated sugar, flour, salt, cinnamon, nutmeg, and optional cardamom. Stir gently to combine without breaking the apple slices.
- Cook filling on stovetop. Cover skillet with lid and cook over medium heat for 20 minutes, stirring every 3 minutes to prevent sticking and ensure even softness. Add water sparingly if apples stick to the pan. Apples should become fork tender but maintain shape.
- Finish filling. Remove from heat and stir in 1 teaspoon vanilla extract. Transfer the filling with all juices to a pan with a lip (half sheet pan recommended), spreading to edges.
- Chill filling. Cool filling completely by refrigerating or freezing for approximately 30 minutes to prevent soggy crust during baking.
- Prepare crust for baking. Roll out one pie dough sheet into a 9-inch deep pie dish with excess overhang. Scrape chilled apple filling into pie shell, including all gooey juices.
- Top pie with crust. Place second dough sheet on top, either whole or as a lattice pattern. Fold edges under and crimp to seal. If not lattice, poke vents in the top crust with a sharp knife.
- Chill assembled pie. Refrigerate or freeze assembled pie for 20-30 minutes to promote flakiness of crust during baking.
- Preheat oven and baking sheet. Place a baking sheet on center oven rack and preheat oven to 425°F (220°C) for at least 20-25 minutes to ensure hot heat transfer.
- Brush crust and sprinkle sugar. Before baking, brush pie crust with milk and beaten egg mixture or milk alone for browning and gloss. Sprinkle pie surface with raw sugar for texture and shine.
- Bake pie initially. Place chilled pie on the hot baking sheet and bake at 425°F for 15 minutes to brown edges lightly.
- Protect crust and reduce heat. Create a foil shield with a cutout center to cover the pie edges; loosely fit over crust to prevent burning. Lower oven temperature to 350°F (175°C).
- Continue baking. Bake pie at 350°F for an additional 40-45 minutes until crust is golden brown and filling bubbles (especially visible if lattice crust used).
- Cool pie thoroughly. Remove pie and let cool on wire rack for about 4 hours to allow filling to set and avoid runniness when slicing.
- Serve and store. Slice pie once cooled. Serve optionally with vanilla ice cream or caramel sauce. Store covered at room temperature up to 2 days, then refrigerate.
Notes
- You can freeze the cooled apple pie filling in a large ziplock bag for up to 3 months to use later in pies, cobblers, or crisps.
- Adjust cooking time on stovetop for preferred apple tenderness; apples do not soften further during baking.
- Using a mix of tart and sweet apples adds depth of flavor to the filling.
- Lattice top crust adds visual appeal but is optional.
- Allowing the pie to cool completely before slicing ensures the filling sets properly and prevents juices from running.
Nutrition
- Serving Size: 1 slice (1/10 of pie)
- Calories: 410
- Sugar: 30g
- Sodium: 180mg
- Fat: 15g
- Saturated Fat: 5g
- Unsaturated Fat: 8g
- Trans Fat: 0g
- Carbohydrates: 65g
- Fiber: 5g
- Protein: 3g
- Cholesterol: 25mg

