
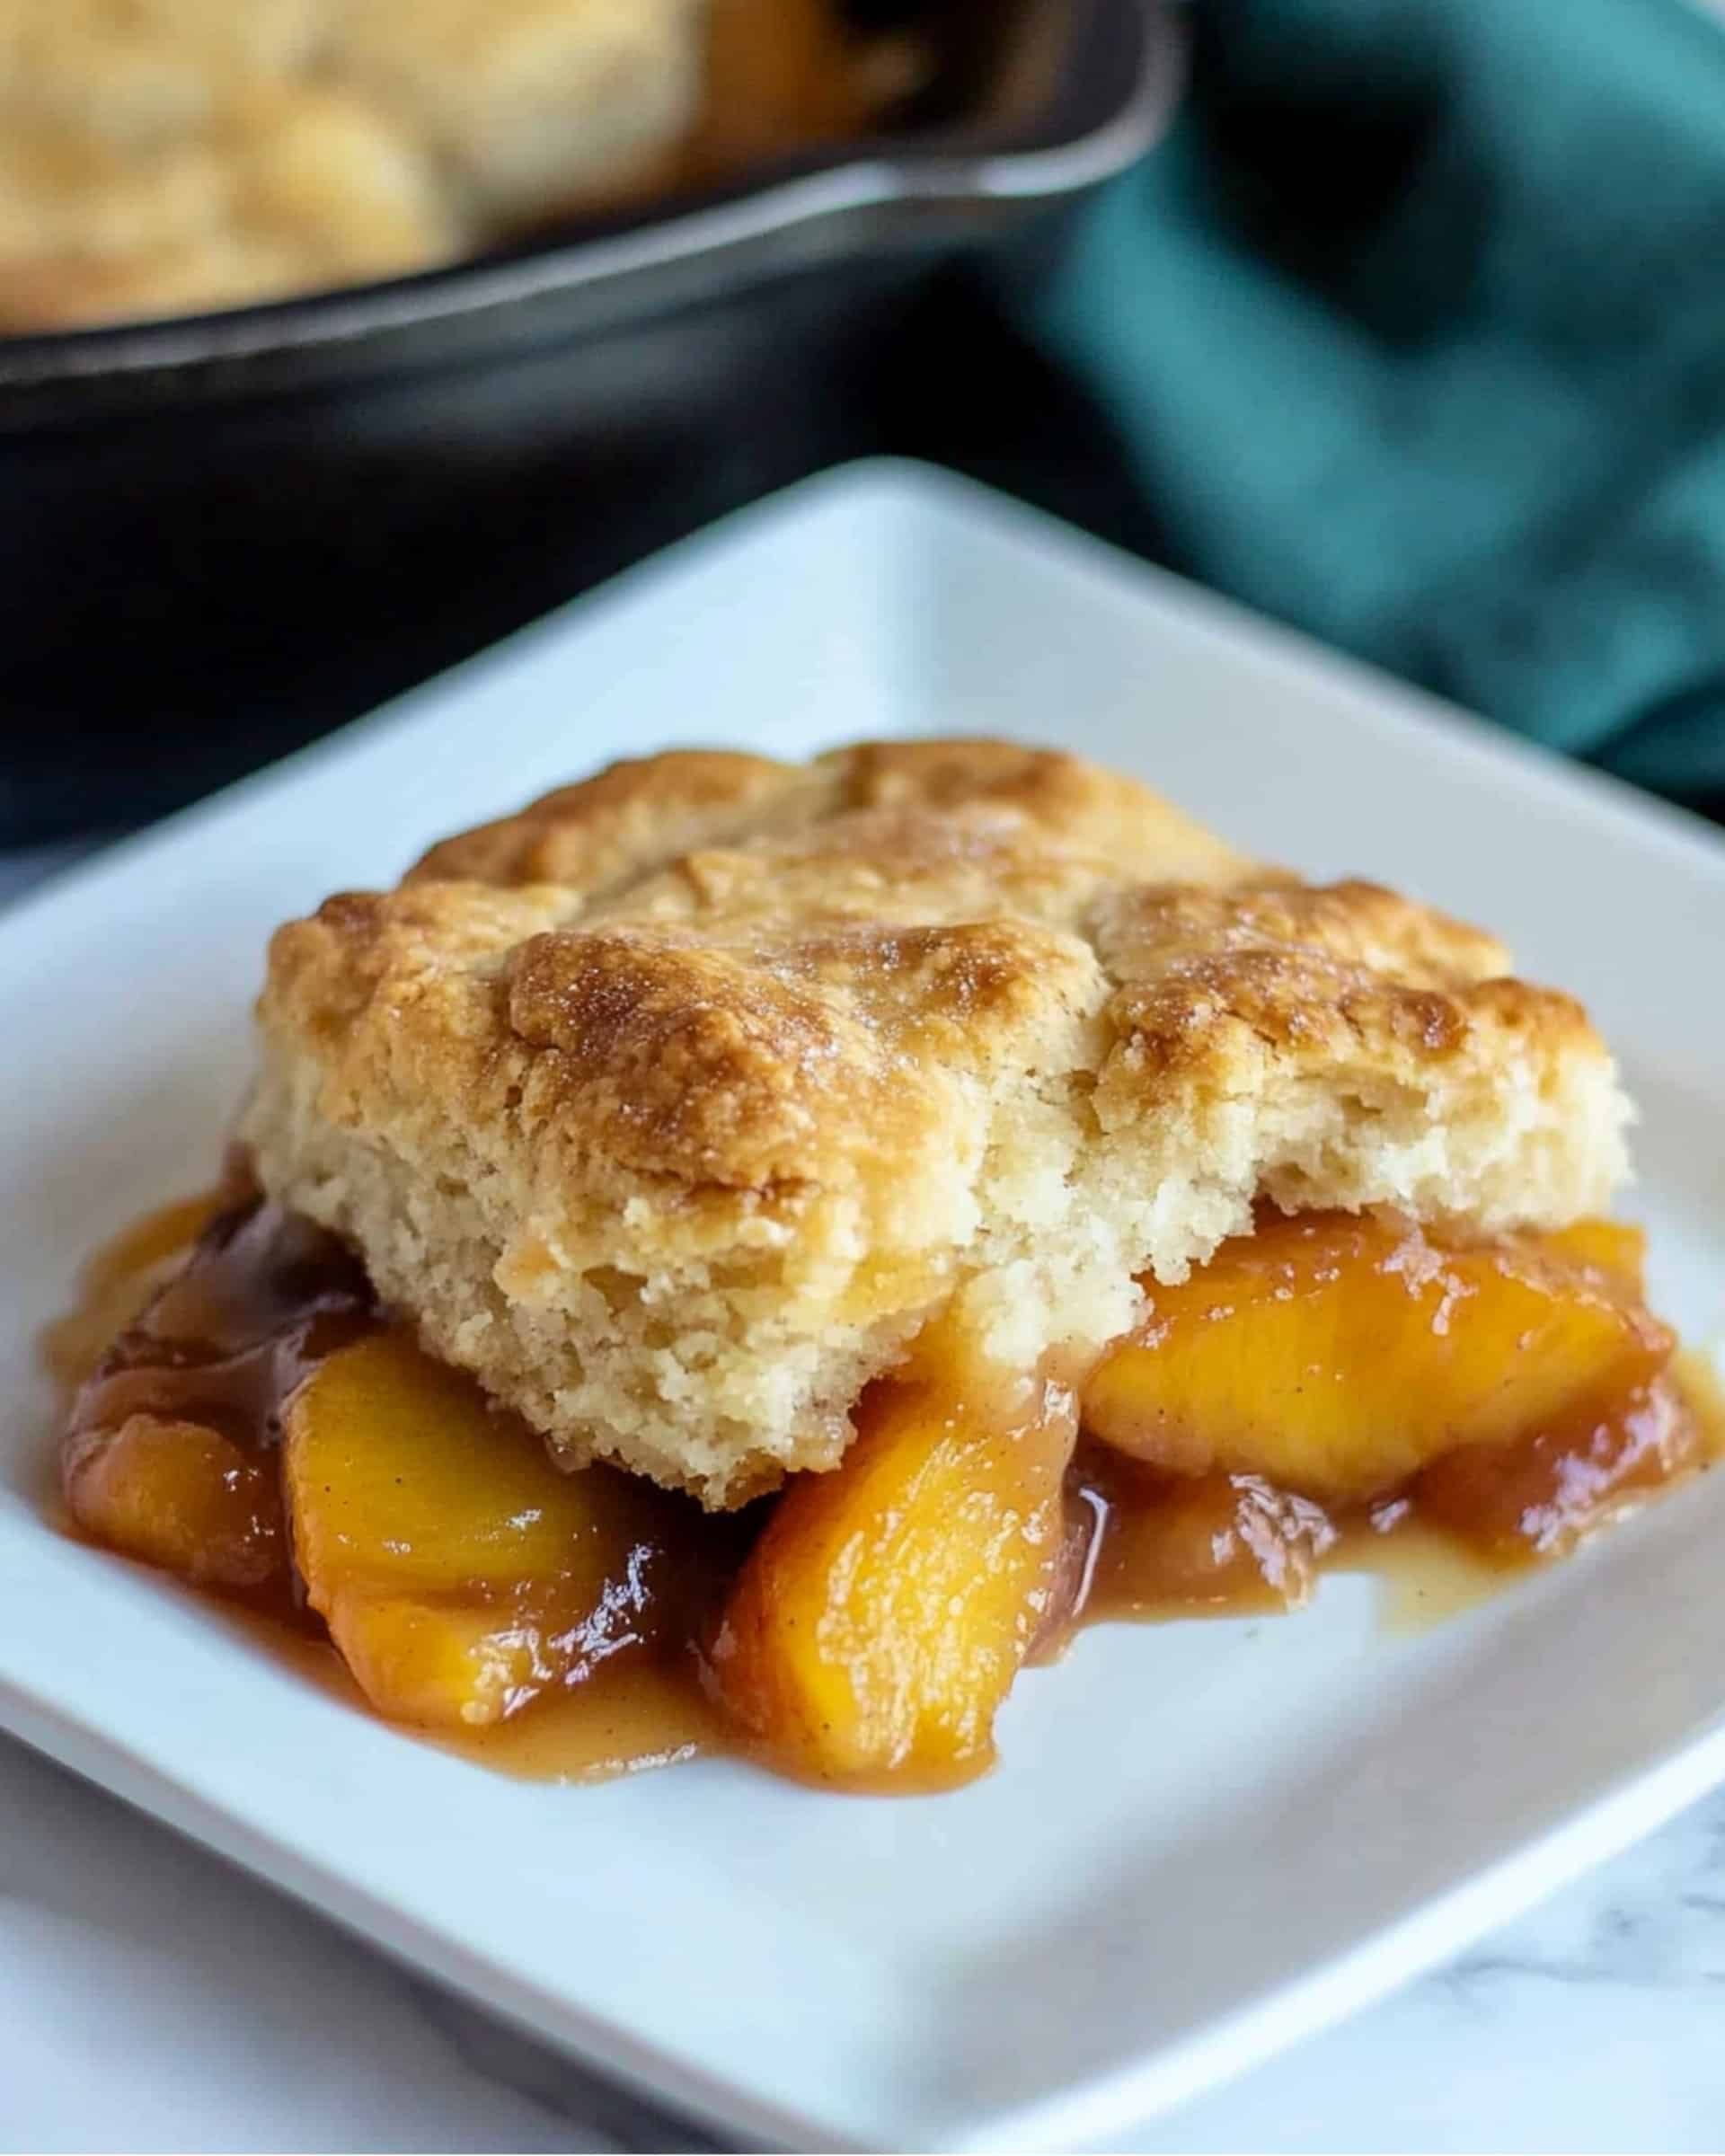
Indulge in the comforting goodness of this Best Peach Cobbler, baked to golden perfection right in your cast iron skillet. This old-fashioned favorite is rich in flavor, beautifully fragrant, and bursts with juicy peaches tucked under a soft, biscuit-like topping. Ready in under 30 minutes, this recipe is a perfect answer when you’re craving something sweet but need it simple and fuss-free. Whether you’re planning a cozy weeknight treat or inviting friends for dessert, you’ll love how effortless and rewarding it is to bring this classic to your own table.
Why You’ll Love This Recipe
- Quick and Simple: There’s nothing complicated here—you can go from craving to cobbler with minimal steps and ingredients, all in under half an hour!
- Amazing Flavors: This cobbler is all about the blend of sweet peaches, warming cinnamon and nutmeg, and that rich buttery base. Each bite brings a comforting soft crust and bursts of juicy fruit.
- One-Skillet Wonder: Fewer dishes mean more time to savor your dessert! Everything comes together in the trusty cast iron pan for unbeatable flavor and texture.
- Adaptable: Whether you have fresh or frozen fruit, extra spices, or a sweeter tooth, this recipe is ready for your personal touch.

Ingredients You’ll Need
- Butter: Melted in the pan first; it helps create that irresistible gooey base and crispy, caramelized edges.
- Brown Sugar: Adds depth and caramel notes to the peach filling, making every bite rich and comforting.
- Cinnamon & Nutmeg: These warming spices elevate the peaches and add a fragrant, bakery-style aroma.
- Frozen Peaches: Convenient and packed at peak ripeness. No peeling or slicing needed, and they deliver that classic summery flavor.
- Flour: Just a touch, to help thicken the peach juices so your cobbler isn’t watery.
- Bisquick Mix: The quickest route to tender, fluffy cobbler topping—no measuring out flour, baking powder, or salt!
- Granulated Sugar: Sweetens the topping just the right amount.
- Milk: Brings the Bisquick together into a luscious batter that bakes up gently golden.
Tip: If you don’t have Bisquick, your favorite baking mix or a homemade version will work beautifully.
Note: You’ll find the complete list of ingredients, along with their exact measurements, in the printable recipe card at the bottom of this post.
Variations
- Fresh Fruit: When peaches are in season, swap frozen for fresh—just peel, slice, and toss in as you would the frozen.
- Berry Boost: Add a handful of raspberries or blueberries for a delicious twist and bright pops of color.
- Nutty Crunch: Stir some chopped pecans or almonds into the topping for a toasty crunch.
- Vegan Option: Use plant-based butter and a non-dairy milk. Choose a vegan baking mix in place of Bisquick.
- Gluten-Free: Opt for a gluten-free baking mix! Everything else remains the same.
How to Make the Best Peach Cobbler in Cast Iron Skillet
Step 1: Preheat and Prep
Start by preheating your oven to 425°F. Meanwhile, place your cast iron skillet on the stove over medium heat.
Step 2: Make the Peach Mixture
Add butter to the skillet and let it melt completely. Sprinkle in the brown sugar, cinnamon, and nutmeg, stirring until everything is well combined and bubbling, creating a gorgeous spiced syrup.
Next, pour in those frozen peaches—no need to thaw! Toss to coat the peaches in all that buttery, sugary goodness. Add flour and stir through; let this cook for a few minutes until the juices thicken slightly and the peaches look glossy.
Step 3: Mix the Topping
In a medium bowl, combine your Bisquick, granulated sugar, and milk. Stir until you have a smooth, thick batter—don’t overmix, just enough to bring it all together.
Step 4: Assemble and Bake
Drop spoonfuls of the biscuit batter over the bubbling peach mixture in the skillet, spreading gently to cover most of the fruit. It doesn’t have to be perfect—the little gaps let the fragrant juices bubble up.
Pop the skillet into the hot oven and bake for 15-18 minutes, until the topping is a beautiful golden brown and the fruit is bubbling around the edges.
Step 5: Serve
Let the cobbler cool for a few minutes after baking. The syrup will thicken a little, and the flavors will settle—if you can wait that long!
Pro Tips for Making the Recipe
- Don’t Overmix the Topping: For the lightest, fluffiest crust, mix just until the ingredients come together.
- Keep the Cobbler Rustic: Don’t worry about spreading the topping perfectly. Those golden, uneven peaks and valleys are part of the charm.
- Taste for Sweetness: Frozen peaches can vary. If yours are particularly tart, sprinkle in a little extra sugar before baking.
- Oven Time May Vary: Check the cobbler at the 15-minute mark; if you like extra browning and bubbly edges, give it another few minutes.
How to Serve
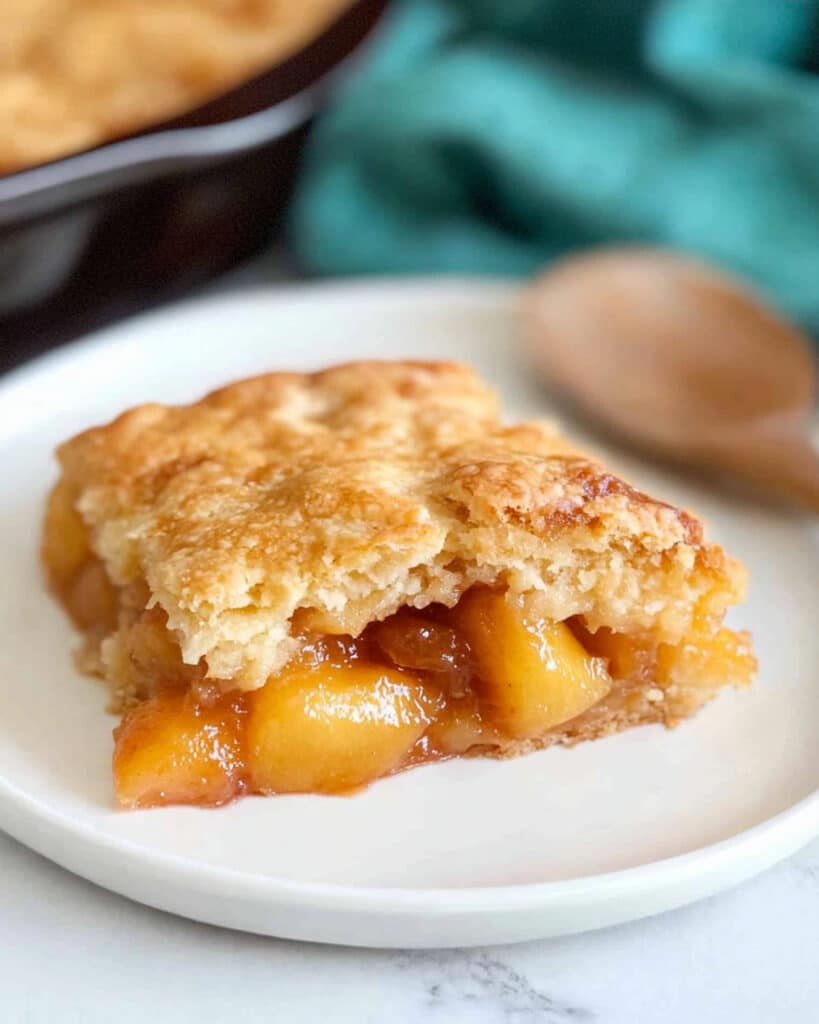
This peach cobbler shines warm from the oven. For an unbeatable finish, top with a scoop of vanilla ice cream, a dollop of whipped cream, or even a drizzle of heavy cream. It also pairs perfectly with a piping hot cup of coffee or sweet iced tea. For a brunch treat, serve with thick Greek yogurt and a sprinkle of toasted nuts. However you enjoy it, this cobbler brings smiles every time.
Make Ahead and Storage
Storing Leftovers
Let any leftover cobbler cool completely, then cover the skillet or transfer to an airtight container. Refrigerate for up to 3 days—the flavors deepen and meld beautifully over time.
Freezing
For longer storage, freeze individual portions or the whole cobbler, tightly wrapped, for up to 3 months. Thaw overnight in the fridge for the best texture.
Reheating
To reheat, cover the skillet loosely with foil and warm in a 350°F oven until heated through, about 15 minutes. Individual servings reheat well in the microwave, but use short increments so the topping stays soft and not chewy.
FAQs
-
Can I use canned peaches instead of frozen?
Absolutely! Just be sure to drain them well if they’re packed in syrup. Canned peaches will be softer, but they work well and make the recipe even speedier. If using canned, you might want to cut back on sugar since they’re often already sweetened.
-
Do I need to thaw frozen peaches before adding them?
No need at all. Frozen peaches go straight from the bag into the skillet. They’ll release a bit more liquid at first, but the flour will help thicken it into a luscious sauce.
-
What if I don’t have a cast iron skillet?
No worries! A heavy, oven-safe baking dish works too. You might miss a touch of that trademark crispy edge, but the flavor will still be delicious and comforting.
-
Can I make the topping from scratch if I don’t have Bisquick?
Yes! Simply mix all-purpose flour, a little baking powder, salt, and a tablespoon of butter. Add milk just until you get a thick batter. It’s a handy substitute and keeps things just as easy.
Final Thoughts
If you’re looking for a no-stress, deeply delicious dessert with soul-soothing flavors, this peach cobbler is your new go-to. It’s simple, fast, adaptable to almost any kitchen, and guaranteed to light up your table on even the busiest of days. Give it a try—you may just find yourself wishing for leftover peaches all year long!
Print
Best Peach Cobbler Recipe in Cast Iron Skillet
- Prep Time: 10 minutes
- Cook Time: 18 minutes
- Total Time: 28 minutes
- Yield: 6 servings
- Category: Desserts
- Method: Baking
- Cuisine: American
- Diet: Vegetarian
Description
This easy and comforting Peach Cobbler recipe is baked in a cast iron skillet for maximum crispiness and flavor. Sweet, spiced peaches are topped with a golden, tender Bisquick crust, making it a crowd-pleasing dessert you can prepare quickly with simple ingredients. Perfect served warm with a scoop of ice cream!
Ingredients
Peach Filling
- 4 tablespoons butter
- 1/2 cup brown sugar
- 1 tablespoon cinnamon
- 1/4 teaspoon nutmeg
- 32-ounce package frozen peaches
- 3 tablespoons flour
Cobbler Topping
- 1 1/2 cup Bisquick mix
- 1/4 cup granulated sugar
- 2/3 cup milk
Instructions
- Preheat the Oven – Set your oven to 425°F (220°C) to ensure it is fully heated by the time your cobbler is ready to bake.
- Cook the Peach Filling – In a cast iron skillet over medium heat, melt 4 tablespoons of butter. Stir in the brown sugar, cinnamon, and nutmeg until combined, then add the frozen peaches and toss to coat them in the spiced mixture. Sprinkle in the flour and cook, stirring occasionally, until the sauce thickens and peaches are fully coated.
- Prepare the Cobbler Topping – In a medium bowl, combine Bisquick mix, granulated sugar, and milk. Stir the mixture until it is just combined and forms a batter.
- Assemble the Cobbler – Pour or spoon the Bisquick mixture evenly over the peach filling in the skillet, spreading gently to cover as much of the surface as possible.
- Bake – Place the skillet in the preheated oven and bake for 15-18 minutes, or until the topping is golden brown and cooked through.
- Serve – Allow the cobbler to cool slightly before serving. Enjoy it warm, optionally topped with whipped cream or vanilla ice cream.
Notes
- If you use fresh peaches, peel and slice about 6-8 peaches as a substitute for frozen.
- Adjust sugar to taste depending on the sweetness of your peaches.
- Best served fresh, but leftovers can be stored refrigerated for up to 3 days and reheated.
- For extra flavor, add a splash of vanilla extract to the filling.
- Cast iron skillet gives a crispier bottom, but you can use any oven-safe skillet or baking dish.
Nutrition
- Serving Size: 1/6 cobbler
- Calories: 310
- Sugar: 27g
- Sodium: 400mg
- Fat: 8g
- Saturated Fat: 4g
- Unsaturated Fat: 3g
- Trans Fat: 0g
- Carbohydrates: 59g
- Fiber: 3g
- Protein: 4g
- Cholesterol: 20mg


