

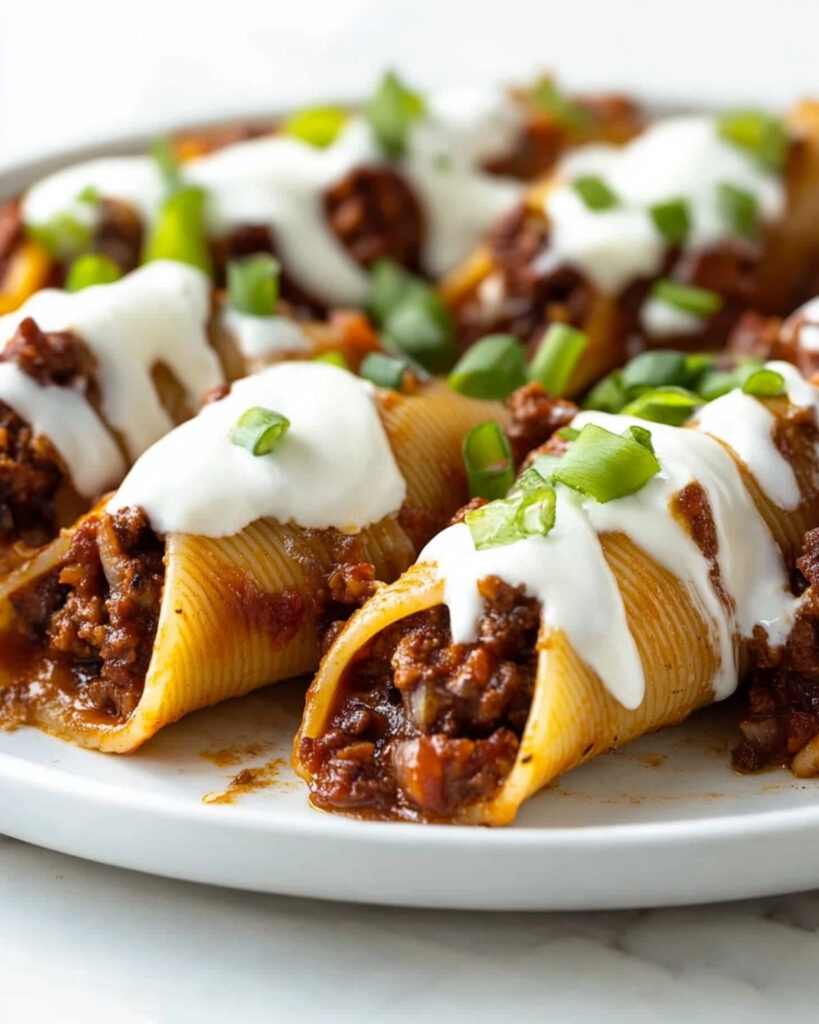
This Chili Cheese Manicotti is the ultimate comfort food mashup – combining the bold flavors of homemade chili with the classic stuffed pasta shells we all adore. Perfect for those nights when you’re craving something hearty and satisfying, this dish delivers an explosion of Tex-Mex flavors wrapped in tender pasta and smothered with melty cheese. Ready in just 35 minutes, it’s a guaranteed family pleaser that’s simple enough for weeknights but impressive enough for company!
Why You’ll Love This Recipe
- Two Favorites in One Dish: This recipe brilliantly combines hearty chili and cheese-stuffed pasta for a truly satisfying meal that offers the best of both worlds.
- Make-Ahead Friendly: You can prepare components ahead of time and assemble when ready, making it perfect for busy weeknights or meal prepping.
- Crowd-Pleaser: The familiar flavors with a unique twist make this dish a hit with both kids and adults – no more cooking separate meals!
- Customizable Heat Level: Easily adjust the spice level to suit your family’s preference while maintaining all the rich, savory flavors.

Ingredients You’ll Need
- Manicotti shells: The perfect vessel for holding our rich chili filling – cook them al dente as they’ll continue cooking in the oven.
- Ground beef: Provides the hearty base for our chili filling. Choose lean ground beef for less fat or substitute ground turkey for a lighter option.
- Yellow onion: Adds essential aromatic flavor to the chili mixture. Dice it finely for the filling and save some for garnishing.
- Chili powder: The star seasoning that gives the dish its signature flavor profile.
- Cumin, cayenne, garlic powder, onion powder: This powerful spice blend creates depth and authentic chili flavor.
- Refried beans: Acts as a thickener and adds creaminess to the filling while providing extra protein.
- Chili beans: Adds texture and enhances the chili flavor profile – don’t drain them, as the sauce adds flavor.
- Tomato paste: Concentrated tomato flavor that thickens the mixture and provides rich umami notes.
- Cornstarch: Works as a thickening agent when mixed with water to create the perfect consistency for the filling.
- Sharp cheddar cheese: Provides the gooey, melty goodness both in the filling and on top. Pre-shredded cheese works but freshly grated melts better.
- Sour cream: The cool, tangy topping provides the perfect contrast to the spicy filling.
Note: You’ll find the complete list of ingredients, along with their exact measurements, in the printable recipe card at the bottom of this post.
Variations
Vegetarian Chili Cheese Manicotti
Substitute the ground beef with a plant-based ground meat alternative or finely chopped mushrooms sautéed with extra spices. Add diced bell peppers and corn for more texture and flavor.
Creamy Chicken Chili Manicotti
Use ground chicken instead of beef and add a block of cream cheese to the filling mixture for an extra creamy version. Top with pepper jack cheese for a different flavor profile.
Breakfast Chili Manicotti
Add scrambled eggs to the filling and top with additional cheese and crumbled bacon for a breakfast-inspired version that’s perfect for brunch.
Spicy Verde Manicotti
Substitute green enchilada sauce for the tomato paste and use white beans instead of chili beans. Fill with shredded chicken and top with Monterey Jack cheese for a completely different flavor profile.
How to Make Chili Cheese Manicotti
Step 1: Prepare the Base
Preheat your oven to 350°F. While it’s heating, cook the manicotti shells according to package directions until they’re al dente – firm enough to stuff without tearing. Drain and set aside on a baking sheet to prevent sticking.
Step 2: Make the Chili Filling
In a large skillet over medium heat, brown the ground beef with diced onion until the meat is no longer pink. Add all your spices – the chili powder, cumin, cayenne, garlic powder, onion powder, salt, and pepper. Stir well to coat the meat evenly with the spice mixture.
Step 3: Create the Sauce Consistency
Pour in the water to help dissolve the spices. Mix the cornstarch with 2 tablespoons of water in a small bowl until smooth, then add this slurry to the skillet. This will help thicken your chili filling to the perfect consistency for stuffing.
Step 4: Add the Beans and Tomato Elements
Add the refried beans, chili beans, and tomato paste to the skillet. Stir continuously until the refried beans and tomato paste are fully incorporated and the mixture is smooth. You’re looking for a thick, rich consistency that will hold its shape when stuffed.
Step 5: Incorporate the Cheese
Gradually fold in 2 cups of the shredded cheddar, stirring until completely melted. Reduce heat to medium-low and let the mixture simmer for about 10 minutes, stirring frequently to prevent burning. This simmering time allows the flavors to meld together beautifully.
Step 6: Assemble and Bake
Spread a cup of the chili mixture on the bottom of a 9×13-inch baking dish. This prevents the manicotti from sticking and adds flavor to the outer pasta. Hold one end of a manicotti shell closed with your fingers and carefully fill from the other end with the chili mixture. Place the filled shells in the baking dish. Top with remaining chili mixture and sprinkle with the reserved cheese.
Step 7: Bake to Perfection
Bake uncovered for 15-20 minutes until the dish is bubbly and the cheese has melted to golden perfection. Let stand for 5 minutes before serving, then top with diced onions and sour cream if desired.
Pro Tips for Making the Recipe
- Don’t overcook the pasta: Keep the manicotti shells slightly firmer than al dente since they’ll continue cooking in the oven.
- Cooling trick: Let the pasta shells cool slightly and pat them dry before filling – this makes them easier to handle and prevents tearing.
- Filling hack: Use a piping bag (or zip-top bag with corner snipped) to fill the manicotti shells quickly and neatly.
- Make it ahead: Prepare the chili filling a day in advance to enhance flavors, then assemble and bake when ready to serve.
- Even cheesier: For cheese lovers, stuff a string cheese stick into each manicotti along with the chili mixture for a surprise cheese pull.
How to Serve
Perfect Pairings
Serve with a crisp garden salad dressed with tangy vinaigrette to balance the richness of the dish. A side of garlic bread makes the perfect vehicle for scooping up any extra sauce.
Family Style
Place the baking dish directly on the table for a casual family dinner. Set out small bowls of additional toppings like sliced jalapeños, chopped cilantro, diced avocado, and extra cheese so everyone can customize their portion.
Festive Presentation
For entertaining, serve individual portions on warmed plates with a dollop of sour cream, a sprinkle of finely sliced green onions, and a side of Mexican rice for a complete meal that impresses guests.
Make Ahead and Storage
Storing Leftovers
Store cooled leftovers in an airtight container in the refrigerator for up to 3 days. The flavors actually improve overnight as everything melds together.
Freezing
This dish freezes beautifully! You can freeze it either before or after baking. To freeze before baking, assemble the dish but don’t bake it. Cover tightly with plastic wrap and then aluminum foil. Freeze for up to 3 months. For after baking, allow the dish to cool completely, then portion into individual servings in freezer-safe containers.
Reheating
For refrigerated leftovers, reheat in the microwave for 2-3 minutes or in a 350°F oven for about 15-20 minutes until heated through. For frozen unbaked manicotti, bake from frozen at 350°F for about 45-50 minutes. For frozen pre-baked portions, thaw overnight in the refrigerator before reheating.
FAQs
-
Can I use regular pasta shells instead of manicotti?
Absolutely! Large pasta shells work wonderfully as an alternative. Cook them al dente, then stuff with the chili mixture using a small spoon. The assembly might be slightly faster since the opening of the shells is larger than manicotti tubes.
-
How can I make this dish less spicy for my kids?
Reduce or eliminate the cayenne pepper and cut the chili powder in half. You can also serve additional hot sauce on the side for adults who prefer more heat. Using mild chili beans instead of spicy ones will also help tone down the heat level.
-
Can I prepare this dish the night before?
Yes! This is a perfect make-ahead meal. Prepare everything up to the baking step, cover with foil, and refrigerate overnight. When ready to bake, remove from the refrigerator 30 minutes before baking and add an extra 10-15 minutes to the baking time since it will be starting cold.
-
What’s the best way to fill the manicotti without breaking the shells?
Let the shells cool slightly after cooking – hot shells tear more easily. Use a piping bag or zip-top bag with the corner snipped off to pipe the filling into the shells. Another method is to split the shells lengthwise, fill them, and then place them seam-side down in the baking dish.
Final Thoughts
This Chili Cheese Manicotti is where comfort food meets creativity in the most delicious way possible. The spicy, savory chili filling wrapped in tender pasta creates a memorable meal that’s sure to become a regular request in your home. Whether you’re feeding a hungry family or looking to impress dinner guests, this dish delivers maximum flavor with minimal fuss. Give it a try the next time you’re craving something hearty and satisfying – your taste buds will thank you!
Print
Chili Cheese Manicotti Recipe
- Prep Time: 15 minutes
- Cook Time: 20 minutes
- Total Time: 35 minutes
- Yield: 8 servings
- Category: Main-course
- Method: Baking
- Cuisine: American
- Diet: Halal
Description
A delicious and hearty Chili Cheese Manicotti recipe that combines the rich flavors of chili-spiced beef, beans, and cheese stuffed inside tender manicotti shells and baked to perfection. An ideal meal for a comforting dinner or a casual get-together.
Ingredients
For the Manicotti Shells:
-
- 1 box manicotti shells, cooked al dente and drained
For the Filling:
-
- 1 pound ground beef
- 1 yellow onion, diced
- 2 tablespoons chili powder
- 2 teaspoons ground cumin
- 1/2 teaspoon cayenne pepper
- 1/2 teaspoon garlic powder
- 1 teaspoon onion powder
- 2 teaspoons salt
- 1/2 teaspoon pepper
- 1 cup water
- 2 tablespoons corn starch, combined with 2 tablespoons water
- 1 can refried beans
- 1 can chili beans
- 1 can tomato paste
- 2 1/2 cups sharp cheddar cheese, shredded and divided
For Toppings:
- 1/4 cup onion, diced
- 1/4 cup sour cream
Instructions
- Preheat the oven: Preheat the oven to 350°F to prepare for baking the manicotti.
- Cook the beef and onions: In a large skillet over medium heat, brown the ground beef along with the diced onion until thoroughly cooked.
- Add the seasonings: Stir in the chili powder, ground cumin, cayenne pepper, garlic powder, onion powder, salt, and pepper, ensuring the beef is well coated with the spices.
- Add water and corn starch: Pour in the water and stir to dissolve the seasonings. In a small bowl, combine the corn starch with 2 tablespoons of water, then add it to the skillet and stir thoroughly.
- Mix in the beans and tomato paste: Add the refried beans, chili beans, and tomato paste to the skillet. Stir continuously until the mixture becomes smooth and uniform.
- Incorporate the cheese: Slowly add 2 cups of shredded cheddar cheese to the skillet, folding it in until fully melted and combined.
- Simmer the mixture: Reduce the heat to medium-low and let the mixture simmer for about 10 minutes, stirring frequently to prevent burning.
- Prepare the baking dish: Spread 1 cup of the beef mixture evenly across the bottom of a 9×13-inch baking dish.
- Stuff the manicotti shells: Fill each cooked manicotti shell by holding one end closed and spooning the mixture into the open end until filled. Arrange the filled shells in the baking dish.
- Layer the remaining mixture and cheese: Top the stuffed shells with any leftover beef mixture and the remaining shredded cheese.
- Bake the manicotti: Place the dish in the preheated oven and bake for 15-20 minutes, or until the cheese is bubbly and fully melted.
- Add the toppings: Optionally, top the baked manicotti with sour cream and diced onions before serving.
Notes
- For a spicier version, increase the amount of cayenne pepper or add diced jalapeños to the filling.
- You can substitute ground beef with ground turkey or chicken for a leaner option.
- Leftovers store well in an airtight container in the refrigerator for up to 3 days.
- This dish pairs wonderfully with a simple side salad or garlic bread.
Nutrition
- Serving Size: 1 stuffed manicotti shell
- Calories: 320
- Sugar: 4g
- Sodium: 780mg
- Fat: 18g
- Saturated Fat: 9g
- Unsaturated Fat: 7g
- Trans Fat: 0g
- Carbohydrates: 22g
- Fiber: 5g
- Protein: 20g
- Cholesterol: 55mg

