
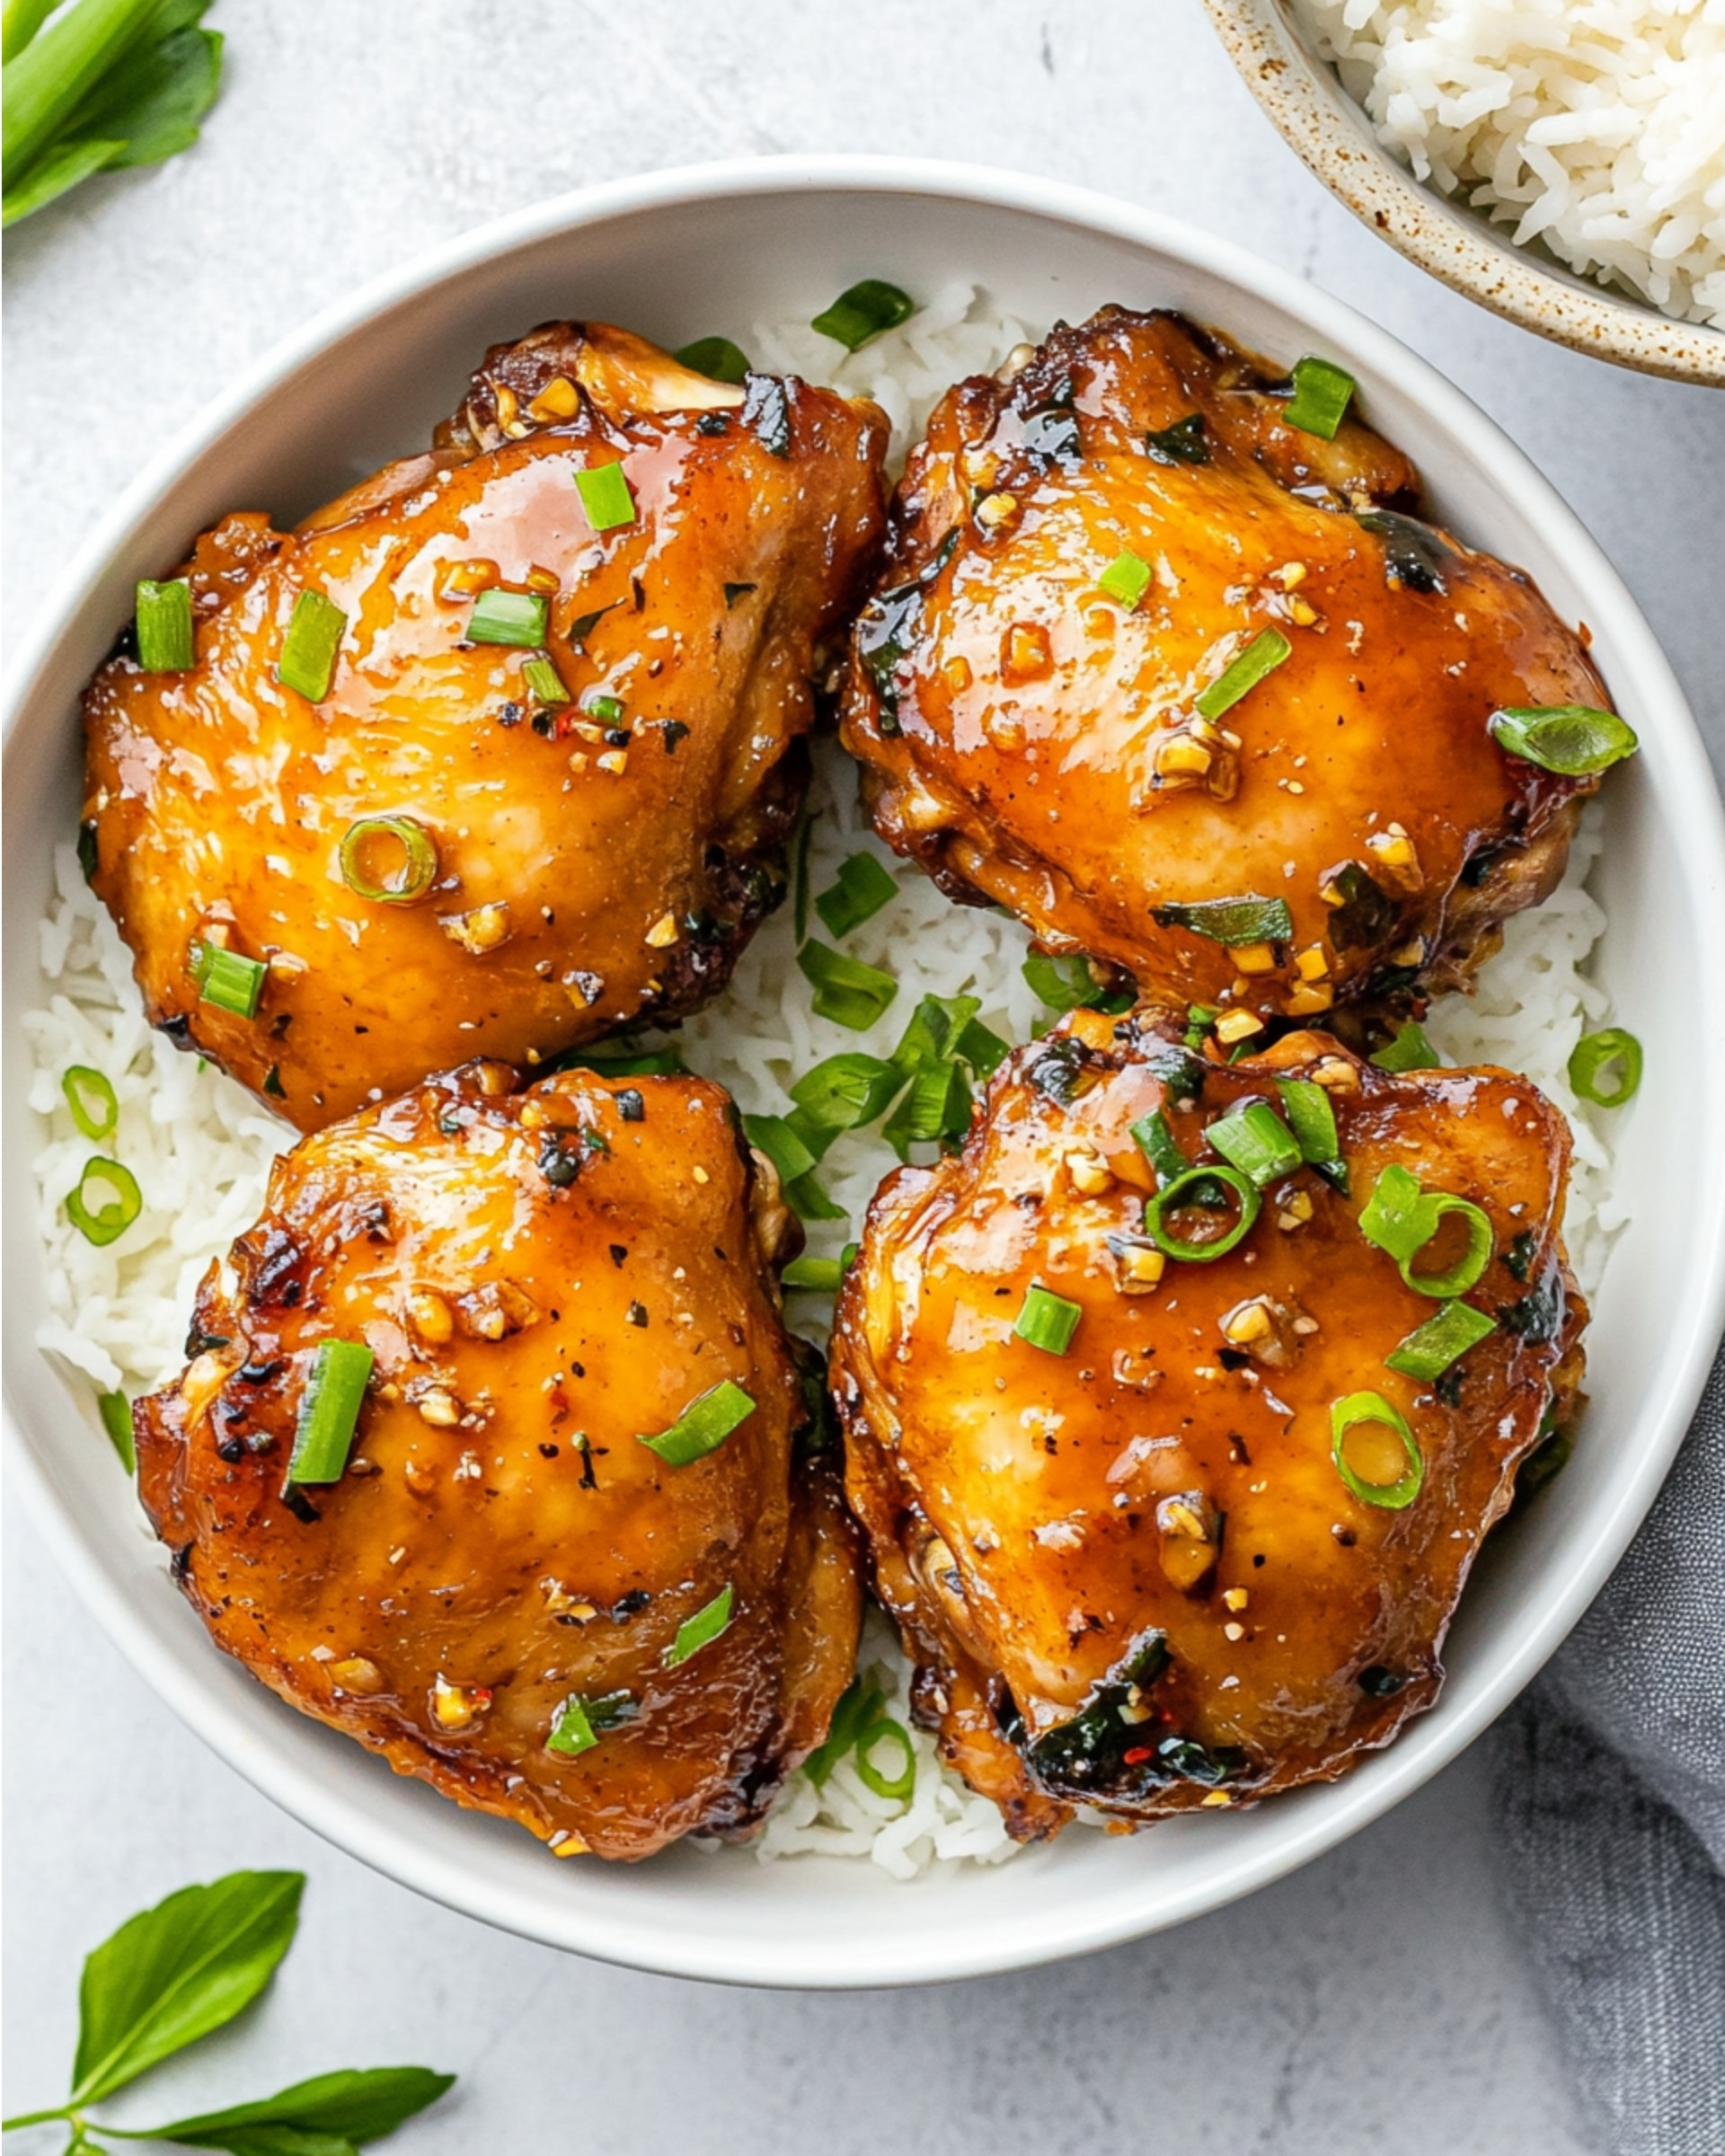
This Instant Pot Maple Glazed Chicken Thighs recipe transforms simple ingredients into a mouthwatering dish in just 30 minutes. The natural sweetness of maple syrup combines with savory garlic and tangy barbecue sauce to create perfectly tender chicken thighs with crispy skin and an irresistible glaze. It’s an effortless weeknight dinner solution that delivers restaurant-quality results right from your pressure cooker!
Why You’ll Love This Recipe
- Incredibly Tender Meat: The pressure cooking method breaks down the collagen in chicken thighs, resulting in meat that practically falls off the bone.
- Crispy Skin + Sticky Glaze: You get the best of both worlds – crispy, golden skin from the initial sauté and a rich, caramelized glaze from the pressure cooking.
- Minimal Hands-On Time: Most of the cooking happens while you do something else – the Instant Pot does the heavy lifting!
- One-Pot Wonder: Everything happens in the Instant Pot, from searing to creating the sauce, meaning fewer dishes and easier cleanup.

Ingredients You’ll Need
- Bone-in, skin-on chicken thighs: The star of the show, providing rich flavor and becoming incredibly tender in the pressure cooker. The bones add flavor and the skin gets deliciously crisp.
- Kosher salt and black pepper: Essential seasonings that enhance the chicken’s natural flavors. Don’t be shy here!
- Garlic: Adds aromatic depth to the glaze. Fresh minced garlic works best for maximum flavor impact.
- Maple syrup: The backbone of our glaze, providing natural sweetness and that distinctive maple flavor. Always use pure maple syrup – the real stuff makes a noticeable difference.
- Barbecue sauce: Adds tangy complexity and helps balance the sweetness of the maple syrup with its savory notes.
- Olive oil: Used for sautéing the chicken thighs to develop that golden crust before pressure cooking.
- Water: Creates the steam needed for pressure cooking and forms the base of our sauce.
- Cornstarch: The thickening agent that transforms the cooking liquid into a luscious, clingy glaze that coats the chicken perfectly.
Note: You’ll find the complete list of ingredients, along with their exact measurements, in the printable recipe card at the bottom of this post.
Variations
Looking to switch things up? Here are some creative twists on this recipe:
- Honey Garlic: Swap the maple syrup for honey and add an extra clove of garlic for a different sweet-savory profile.
- Spicy Maple: Add a tablespoon of sriracha or a teaspoon of red pepper flakes to the sauce for a sweet heat experience.
- Lemon Herb: Add a tablespoon of lemon juice and a teaspoon of dried herbs like thyme or rosemary to the sauce.
- Asian-Inspired: Replace the barbecue sauce with equal parts soy sauce and hoisin, then finish with sesame seeds and green onions.
How to Make Instant Pot Maple Glazed Chicken Thighs
Step 1: Prep the Chicken
Pat the chicken thighs completely dry with paper towels – this is crucial for achieving crispy skin! Season both sides generously with salt and pepper, pressing the seasonings into the meat.
Step 2: Create the Glaze
In a mixing bowl, whisk together the minced garlic, maple syrup, and barbecue sauce until fully combined. This simple mixture will transform into an incredible glaze as it cooks with the chicken.
Step 3: Sear the Chicken
Turn on your Instant Pot’s sauté function and add the olive oil. When the display reads “hot” (this is important!), carefully place the chicken thighs skin-side down. Let them cook undisturbed for about 4 minutes until the skin turns a beautiful golden brown. Flip and brown the other side for 2-3 minutes, then remove to a plate.
Step 4: Deglaze the Pot
Add water to the hot Instant Pot and use a wooden spoon to scrape up all those flavorful browned bits from the bottom. This step is crucial to prevent the dreaded “burn” notice!
Step 5: Pressure Cook
Cancel the sauté mode, then pour in your maple-barbecue mixture and stir to combine with the water. Return the chicken thighs to the pot, arranging them skin-side up. Close the lid, set the valve to “sealing,” and pressure cook on high for 5 minutes.
Step 6: Natural Release
Allow the pressure to release naturally for 10 minutes – this resting period keeps the chicken juicy. Then carefully perform a quick release for any remaining pressure.
Step 7: Thicken the Sauce
Remove the perfectly cooked chicken to a serving plate. Switch back to sauté mode and whisk your cornstarch slurry into the sauce. Let it simmer for 1-2 minutes until thickened into a gorgeous glaze. Pour this liquid gold over your chicken thighs and prepare for compliments!
Pro Tips for Making the Recipe
- Dry Chicken = Crispy Skin: Really take time to thoroughly pat those thighs dry before seasoning. This makes all the difference in achieving crispy skin.
- Hot Pot Before Adding Chicken: Make sure your Instant Pot is fully heated before adding the chicken to prevent sticking and ensure proper browning.
- Don’t Skip the Searing: The initial sauté step develops flavor compounds that transform the entire dish – worth every minute!
- Deglaze Thoroughly: Scrape the bottom of the pot completely when deglazing to prevent the burn warning during pressure cooking.
- Sauce Thickness Control: If you prefer a thicker sauce, you can increase the cornstarch slightly or reduce the sauce longer during the final step.
How to Serve

This versatile chicken dish pairs beautifully with so many sides:
Simple Sides:
Serve with fluffy mashed potatoes, steamed rice, or buttered egg noodles to soak up that incredible sauce.
Vegetables:
Roasted asparagus, green beans, or a simple side salad provide the perfect fresh contrast to the rich chicken.
Bread Options:
Crusty bread or warm dinner rolls are perfect for mopping up every last bit of the maple glaze.
Presentation Tip:
For an impressive presentation, place the chicken thighs on a serving platter, drizzle with the thickened sauce, and sprinkle with fresh herbs like thyme or parsley.
Make Ahead and Storage
Storing Leftovers
These chicken thighs store beautifully! Keep them in an airtight container in the refrigerator for up to 3 days. The flavor actually develops overnight, making them possibly even better the next day.
Freezing
Freeze cooked chicken thighs in a freezer-safe container for up to 3 months. For best results, freeze the chicken and sauce separately.
Reheating
For crispy skin, reheat thighs in a 350°F oven for 15-20 minutes. For quick meals, microwave with a splash of water until heated through (about 2 minutes) – just know the skin won’t stay crispy.
FAQs
-
Can I use boneless, skinless chicken thighs instead?
Absolutely! Boneless thighs work wonderfully in this recipe, but they’ll cook even faster. Reduce the pressure cooking time to just 3 minutes with a 5-minute natural release. You’ll miss the crispy skin element, but the meat will still be tender and flavorful with that amazing maple glaze.
-
Why did my Instant Pot give me a burn notice?
This typically happens when there’s not enough liquid or when bits of food are stuck to the bottom of the pot. Make sure you properly deglaze the pot after searing the chicken, scraping up every browned bit. Also, ensure your maple syrup doesn’t have additives that might burn easily.
-
Can I double this recipe for a larger crowd?
Yes, you can double all ingredients while keeping the cooking time the same. Just make sure not to fill your Instant Pot beyond the maximum fill line, and you might need to sear the chicken in batches to avoid overcrowding.
-
Is this recipe too sweet for a main dish?
Not at all! While maple syrup is sweet, the garlic and barbecue sauce balance it perfectly, creating a savory-sweet profile rather than a dessert-like sweetness. The saltiness from the seasoned chicken further balances the sweetness for a perfectly harmonious main dish.
Final Thoughts
This Instant Pot Maple Glazed Chicken Thighs recipe proves that incredible flavor doesn’t require complicated techniques or hours in the kitchen. With just 30 minutes and everyday ingredients, you’ve got a meal that tastes like you spent all day on it. The combination of crispy skin, tender meat, and that irresistible sticky-sweet maple glaze makes this a recipe you’ll return to again and again. Give it a try tonight – your family will think you’ve been holding out on them!
Print
Instant Pot Maple Glazed Chicken Thighs Recipe
- Prep Time: 5 minutes
- Cook Time: 25 minutes
- Total Time: 30 minutes
- Yield: 6 servings
- Category: Main-course
- Method: Instant Pot
- Cuisine: American
- Diet: Gluten Free
Description
This Instant Pot Chicken Thighs recipe is a delicious, tender, and juicy dish made with simple ingredients and cooked to perfection. The savory and sweet sauce, made with maple syrup, barbecue sauce, and garlic, coats the crispy chicken thighs beautifully, creating a delightful meal perfect for dinner. It’s quick, easy, and packed with flavor, making it ideal for both weeknight dinners and special occasions.
Ingredients
Chicken
- 2 pounds bone-in, skin-on chicken thighs
- Kosher salt, to taste
- Freshly ground black pepper, to taste
Sauce
- 4 cloves garlic, minced
- 1/3 cup pure maple syrup
- 2 tablespoons barbecue sauce
Cooking
- 1 1/2 tablespoons olive oil
- 1/4 cup water
- 1/2 tablespoon cornstarch + 1 tablespoon water (for slurry)
Instructions
- Prepare the Chicken
Pat the chicken thighs dry with a paper towel, then season both sides generously with kosher salt and freshly ground black pepper. This step ensures the chicken is flavorful and ready to crisp up properly in the Instant Pot. - Mix the Sauce
In a medium bowl, whisk together the minced garlic, maple syrup, and barbecue sauce until well combined. Set aside the sauce mixture to use later. - Sauté the Chicken
Turn the Instant Pot to the sauté setting. Pour the olive oil into the pot and allow it to heat up. Once hot, add the chicken thighs skin-side down. Cook for about 4 minutes or until the skin turns golden brown. Flip the chicken thighs and cook the other side until golden brown as well. Remove the chicken from the pot and set it aside. - Deglaze the Pot
Add the water to the Instant Pot and scrape up any browned bits from the bottom of the pot using a wooden spoon. These bits add incredible flavor to the sauce. - Add the Sauce and Chicken
Cancel the sauté setting, then pour in the prepared sauce and stir to combine with the liquid in the pot. Add the browned chicken thighs back into the pot, skin-side up. Stir gently to coat the chicken evenly with the sauce. - Pressure Cook
Secure the Instant Pot lid and set it to pressure cook on high for 5 minutes. Once the cooking cycle is complete, allow the pressure to naturally release for 10 minutes. Then, manually release any remaining pressure and carefully open the lid. - Thicken the Sauce
Remove the cooked chicken thighs from the pot and set them aside. Turn the Instant Pot back to the sauté setting. Stir in the cornstarch slurry (½ tablespoon cornstarch mixed with 1 tablespoon water) to the sauce and bring it to a simmer. Continue cooking until the sauce thickens, then turn off the Instant Pot. - Serve and Enjoy
Spoon the thickened sauce over the chicken thighs before serving. Enjoy this savory and sweet dish with your favorite sides!
Notes
- Substitutions: You can substitute honey for maple syrup for a slightly different flavor.
- Tips: Ensure the Instant Pot is nice and hot before adding the chicken thighs to prevent sticking.
- Storage: Store the cooked chicken thighs in an airtight container in the refrigerator for up to 3 days or in the freezer for up to 3 months. Ensure the sauce is stored separately if freezing for optimal texture.
Nutrition
- Serving Size: 1 serving
- Calories: 280
- Sugar: 7g
- Sodium: 370mg
- Fat: 18g
- Saturated Fat: 4g
- Unsaturated Fat: 14g
- Trans Fat: 0g
- Carbohydrates: 9g
- Fiber: 0g
- Protein: 20g
- Cholesterol: 75mg


