

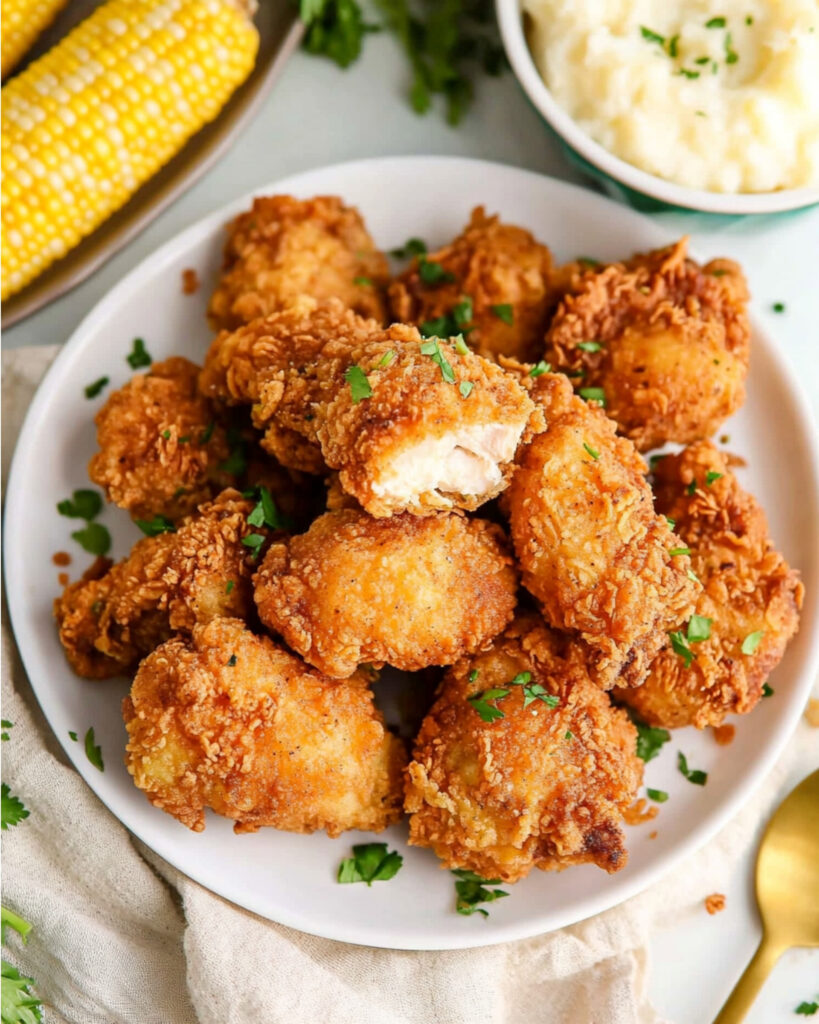
This irresistibly crispy Buttermilk Fried Chicken is the ultimate comfort food that brings restaurant-quality flavor right to your kitchen table. With a perfectly seasoned buttermilk marinade and a flavorful flour coating, this chicken fries up golden and crunchy on the outside while staying juicy and tender inside. It’s surprisingly simple to make but delivers that wow-factor taste that will have everyone asking for seconds!
Why You’ll Love This Recipe
- Incredibly Flavorful: The buttermilk marinade tenderizes the chicken while infusing it with herbs and spices that create layers of flavor in every bite.
- Perfect Texture: That magical combination of crispy, crunchy exterior with moist, tender meat inside makes this chicken absolutely craveable.
- Versatile: Works beautifully with any chicken pieces you prefer – thighs, drumsticks, wings, or even boneless cuts.
- Make-Ahead Friendly: You can marinate the chicken overnight, which not only saves prep time but actually improves the flavor!
- Crowd-Pleaser: This is the kind of recipe that creates food memories – whether for a family dinner, picnic, or special occasion.

Ingredients You’ll Need
- Chicken pieces: Thighs and drumsticks work best because they stay juicy during frying, but you can use any cuts. The skin helps create that amazing crispy exterior, but skinless works too!
- Buttermilk: The secret weapon that tenderizes the meat while adding tangy flavor. The acidity breaks down proteins for maximum tenderness.
- Herbs and spices for marinade: Salt, pepper, garlic powder, dried mustard, paprika, and sage create a flavorful base that penetrates the chicken during marination.
- Flour: The foundation of your crispy coating. All-purpose flour creates the perfect texture.
- Baking powder: This unexpected ingredient creates tiny air bubbles in the coating for extra crispiness.
- Seasoning blend for flour coating: An aromatic mix of salt, garlic powder, paprika, dried basil, dried thyme, onion powder, and cayenne pepper gives the coating depth and complexity.
- Vegetable oil: Choose a neutral oil with a high smoke point for frying. You’ll need enough to reach 1-2 inches deep in your pan.
Note: You’ll find the complete list of ingredients, along with their exact measurements, in the printable recipe card at the bottom of this post.
Variations
Spice Level Adjustments
Reduce or increase the cayenne pepper depending on how much heat you prefer. For extra kick, add a dash of hot sauce to the buttermilk marinade.
Herb Variations
Try adding rosemary, oregano, or a poultry seasoning blend to the flour mixture for different flavor profiles.
Gluten-Free Option
Substitute the all-purpose flour with a gluten-free flour blend. The texture might be slightly different, but still delicious.
Honey Drizzle Finish
For a sweet-savory combo, drizzle hot chicken with a little honey right after frying.
Nashville Hot Style
After frying, brush chicken with a mixture of hot oil, cayenne pepper, brown sugar, paprika, and garlic powder for a Nashville hot chicken experience.
How to Make Buttermilk Fried Chicken
Step 1: Season and Marinate the Chicken
Place chicken pieces in a large bowl and season with salt, pepper, garlic powder, dried mustard, paprika, and sage. Mix thoroughly to coat each piece evenly. Pour buttermilk over the seasoned chicken, stirring to ensure everything is well-coated. Cover and refrigerate for at least 1 hour, though overnight marination will yield the most tender results.
Step 2: Prepare the Flour Dredge
In a shallow dish, whisk together the flour, baking powder, salt, garlic powder, paprika, dried basil, dried thyme, onion powder, and cayenne pepper until well combined. This seasoned flour mixture is what creates that flavorful, crispy coating.
Step 3: Heat the Oil
Pour vegetable oil into a deep, heavy-bottomed frying pan or Dutch oven until it’s 1-2 inches deep. Heat the oil to approximately 340°F. Using a candy thermometer helps maintain the right temperature, which is crucial for perfect fried chicken.
Step 4: Dredge the Chicken
Take each piece of chicken from the buttermilk marinade, allowing excess to drip off, and place it in the flour mixture. Coat thoroughly, pressing the flour into the chicken to create a thick, even coating. For extra crispiness, you can double-dredge by dipping back in the buttermilk and then into the flour again.
Step 5: Fry to Golden Perfection
Carefully place 4-5 chicken pieces into the hot oil, being careful not to overcrowd the pan. Fry for about 15 minutes, turning occasionally, until the coating is golden brown and crispy. The internal temperature should reach 170°F for dark meat pieces.
Step 6: Drain and Rest
Transfer the cooked chicken to a wire rack set over a baking sheet. This allows excess oil to drain while keeping the coating crispy (placing directly on paper towels can create steam and soggy chicken).
Pro Tips for Making the Recipe
- Temperature Control: Maintaining a steady oil temperature is crucial. If it’s too hot, the outside burns before the inside cooks; too cool, and the chicken absorbs excess oil and becomes greasy.
- Test Piece: Fry a small piece first to check if your oil temperature is right and adjust as needed.
- Don’t Crowd the Pan: Frying too many pieces at once lowers the oil temperature and results in soggy chicken.
- Buttermilk Substitute: No buttermilk? No problem! Mix 2 tablespoons of lemon juice with 2 cups of regular milk and let sit for 10 minutes.
- Season in Layers: Season both the chicken directly and the flour mixture for flavor that goes all the way through.
- Rest Before Serving: Let the chicken rest for 5-10 minutes after frying to allow juices to redistribute for maximum tenderness.
How to Serve
Perfect Pairings
Serve this golden fried chicken alongside creamy mashed potatoes, buttery corn on the cob, or flaky buttermilk biscuits for a classic comfort meal. A crisp coleslaw or tangy potato salad provides refreshing contrast to the rich chicken.
Dipping Sauces
Elevate your chicken with honey mustard, ranch dressing, or homemade gravy. For something different, try a spicy maple syrup drizzle or buffalo sauce.
Family-Style Presentation
Arrange the chicken on a large platter with fresh herbs as garnish and lemon wedges for squeezing. This makes for an impressive yet casual presentation perfect for family gatherings.
Make Ahead and Storage
Storing Leftovers
Allow chicken to cool completely, then store in an airtight container in the refrigerator for 3-5 days. For best results, don’t stack pieces as this can damage the crispy coating.
Freezing
Fried chicken freezes surprisingly well! Place cooled chicken pieces on a baking sheet in a single layer and freeze until solid. Then transfer to freezer bags and store for up to 3 months.
Reheating
For the crispiest results, reheat in a 325°F oven for 10 minutes or until heated through. An air fryer works wonderfully too – just 5 minutes at 325°F will revive the crunch. Avoid microwaving if possible as it makes the coating soggy.
FAQs
-
How do I know when the oil is at the right temperature without a thermometer?
Try the wooden spoon test – place the handle of a wooden spoon into the oil. If bubbles form around the wood and gently float up, your oil is ready. If the oil bubbles vigorously, it’s too hot. If only a few bubbles appear, it needs more time to heat.
-
Why is my chicken burning on the outside but still raw inside?
Your oil temperature is likely too high. Turn the heat down and allow the oil to cool slightly. Remember that maintaining a steady temperature around 340°F is key – the oil temperature will drop when you add the chicken, so you may need to adjust the heat accordingly.
-
Can I use this recipe with boneless chicken breasts?
Absolutely! Boneless pieces will cook faster, usually in about 8-10 minutes. Keep a close eye on them and check the internal temperature, which should reach 165°F for white meat.
-
Is there a way to make this chicken less spicy but still flavorful?
Certainly! Simply reduce or omit the cayenne pepper in the flour mixture. The other herbs and spices will still provide wonderful flavor without the heat. You can also increase the garlic powder and paprika for more flavor dimension without spiciness.
Final Thoughts
This Buttermilk Fried Chicken recipe brings that perfect combination of crispy, juicy, and flavorful that makes fried chicken so beloved. Don’t be intimidated by frying – with these simple steps and tips, you’ll be amazed at how restaurant-quality chicken can come from your own kitchen. The buttermilk marinade is truly the secret to tender, flavorful meat, while the well-seasoned flour coating creates that irresistible crunch. Give yourself the gift of making this classic comfort food from scratch – the smiles around your table will be worth every minute spent!
Print
Buttermilk Fried Chicken Recipe
- Prep Time: 15 minutes
- Cook Time: 45 minutes
- Total Time: 2 hours
- Yield: 4 servings
- Category: Main-course
- Method: Frying
- Cuisine: Southern American
Description
This Buttermilk Chicken recipe produces irresistibly crispy, tender, and flavorful fried chicken with a southern twist. The buttermilk marinade ensures the chicken stays juicy while infusing it with a blend of aromatic spices. The flavorful flour dredge creates a perfectly golden and crunchy crust that pairs beautifully with the succulent meat inside. It’s a recipe that’s sure to become a family favorite for gatherings, game days, or comfort food dinners.
Ingredients
Buttermilk Marinade
- 8 pieces chicken (skin on – thighs and drumsticks are best, approximately 3 pounds)
- 1 teaspoon salt
- 1 teaspoon ground black pepper
- 1 teaspoon garlic powder
- 1 teaspoon dried mustard
- 1/2 teaspoon paprika
- 1/2 teaspoon dried sage
- 2 cups buttermilk
Flour Dredge
- 2 cups all-purpose flour
- 1 Tablespoon baking powder
- 1 1/2 teaspoon salt
- 1 1/2 teaspoon garlic powder
- 1 1/2 teaspoon paprika
- 1 1/2 teaspoon dried basil
- 1 1/2 teaspoon dried thyme
- 1 1/2 teaspoon onion powder
- 1 teaspoon cayenne pepper
- Vegetable oil (enough to fill a deep pan 1-2 inches deep)
Instructions
- Prepare the Marinade
Place the chicken pieces in a large bowl. Add the salt, pepper, garlic powder, dried mustard, paprika, and sage. Stir to ensure the chicken is evenly coated in the spices. Pour the buttermilk over the seasoned chicken and stir well to coat completely. - Marinate the Chicken
Cover the bowl and refrigerate for at least 1 hour. For best results, let the chicken marinate overnight. This step allows the chicken to tenderize and absorb the flavorful spices. - Prepare the Flour Dredge
In a shallow dish, whisk together the flour, baking powder, salt, garlic powder, paprika, basil, thyme, onion powder, and cayenne pepper. The mixture should be even and free from clumps. - Heat the Oil
Heat vegetable oil in a deep frying pan to about 340°F. The oil should bubble gently when tested with a wooden spoon, indicating it’s at the right temperature. This ensures the chicken will fry golden brown on the outside and cook through without burning. - Coat the Chicken
Remove the chicken from the marinade one piece at a time. Shake off any excess marinade, then place the chicken into the flour dredge. Toss to thoroughly coat each piece, ensuring no spots are left uncovered. - Fry the Chicken
Carefully place the coated chicken pieces into the hot oil. Fry 4-5 pieces at a time, ensuring the pan isn’t overcrowded. Turn the chicken as necessary and fry for about 15 minutes per piece, until golden brown and the internal temperature reaches 170°F. - Drain and Serve
Remove the chicken from the oil and place it on a wire rack to drain. This helps maintain its crispy texture. Repeat the frying process for the remaining pieces of chicken. Serve hot and enjoy!
Notes
- Oil Temperature Tip: Use a candy thermometer to monitor the oil temperature. Adjust the heat as needed to keep the oil around 340°F, ensuring the chicken is cooked evenly.
- Buttermilk Substitute: Mix 2 tablespoons of lemon juice with enough milk to reach 2 cups. Let it sit for 10 minutes before using.
- Storage: Leftover chicken can be refrigerated for 3-5 days. Reheat in the oven at 325°F for 10 minutes or in an air fryer for 5 minutes at 325°F for a crispier texture. Chicken can also be frozen for up to 3 months.
- Avoid Burning: If the chicken browns too quickly on the outside but isn’t fully cooked inside, reduce your oil temperature.
- Nonstick Crust Option: If baking in the air fryer, spray the coated chicken with oil and air fry at 360°F for about 15 minutes, flipping halfway.
Nutrition
- Serving Size: 1 piece
- Calories: 480 kcal
- Sugar: 4g
- Sodium: 980mg
- Fat: 24g
- Saturated Fat: 5g
- Unsaturated Fat: 19g
- Trans Fat: 0g
- Carbohydrates: 28g
- Fiber: 2g
- Protein: 30g
- Cholesterol: 110mg
