

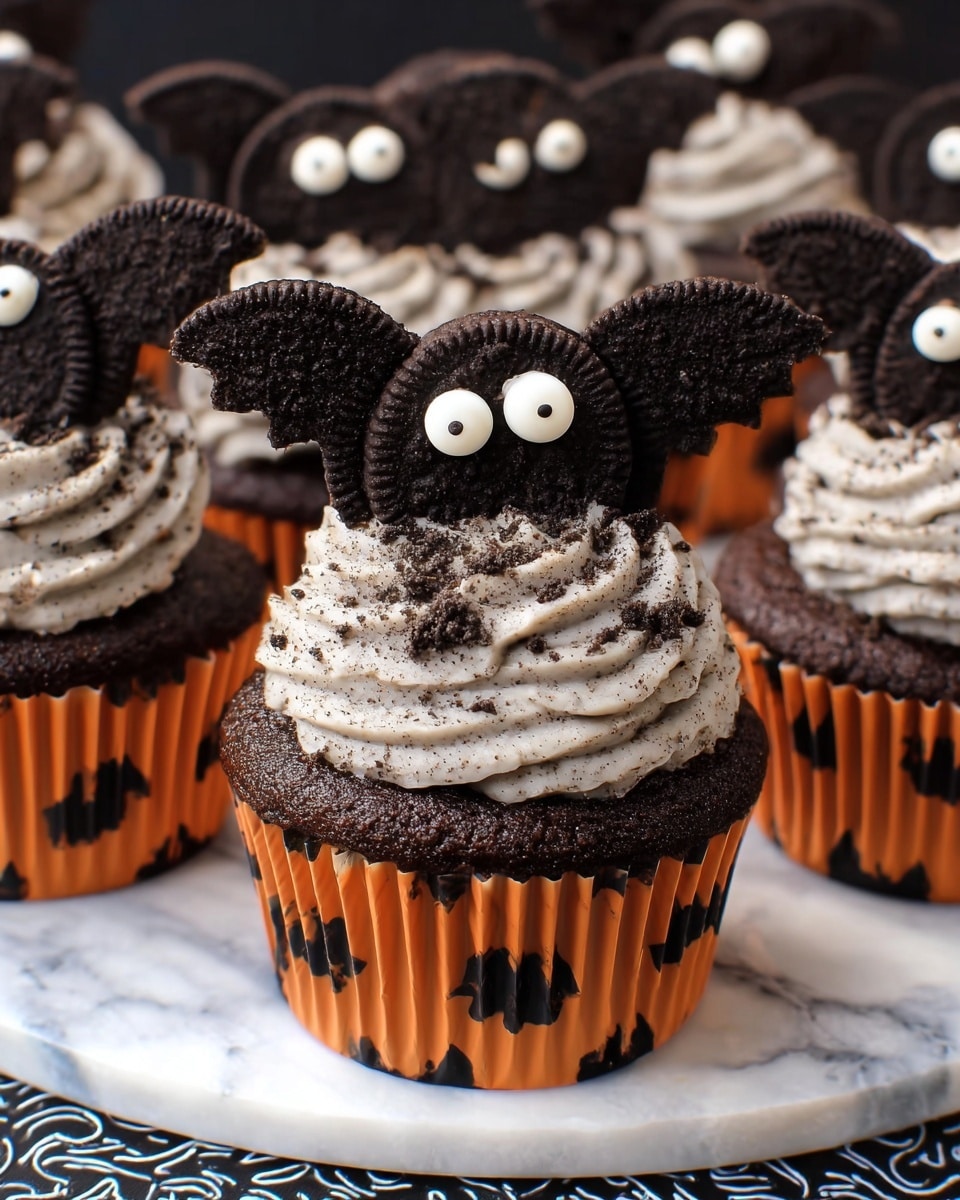
If you’re looking for a fun, spooky treat to make for Halloween or just want to surprise the kiddos with something adorable and delicious, this Oreo Bats Recipe is an absolute winner. I first made these little guys a few years ago, and ever since, they’ve become a go-to whenever I want to impress friends with minimal effort but maximum charm. They combine the classic Oreo crunch with creamy chocolate and cute candy eyes, and you’ll find that once you try this recipe, it’s hard to stop at just one bat!
Why You’ll Love This Recipe
- Simplicity: It’s super easy to make but looks impressively detailed.
- Kid-Friendly: Little helpers will love assembling the bats and picking candy eyes.
- Perfect for Parties: These Oreo bats are an instant conversation starter and crowd-pleaser.
- Customizable: You can swap out chocolates or candy decorations to fit your personal style.

Ingredients You’ll Need
All the ingredients here work beautifully together to create that cute bat silhouette with a yummy chocolatey punch. Nothing fancy or hard to find, plus a couple of easy tips to keep this process stress-free.
- Oreo Cookies: Regular or Double Stuffed work, but I love using Double Stuffed to skip mixing cream fillings.
- Hershey Bars (snack-sized): Great for easy cutting into bat ears—sharp knife recommended.
- Chocolate Melting Wafers: These help glue the pieces together securely and add extra chocolaty goodness.
- Candy Eyes: You can find these at most craft or baking stores—they give personality to your bats!
Variations
I love mixing up this Oreo Bats Recipe depending on the occasion or what I have in the pantry. It’s fun to get creative and make it your own, so don’t hesitate to try a few tweaks!
- Peanut Butter Twist: Slather a thin layer of peanut butter on the Oreo cream for a rich, nutty flavor that my family absolutely adores.
- White Chocolate Ears: Use white chocolate bars instead of Hershey’s for a striking contrast and more festive look.
- Spooky Colors: Swap candy eyes with tiny gummy spiders or edible googly eyes for a creepier effect.
- Gluten-Free Option: Use gluten-free chocolate sandwich cookies to keep this dessert accessible.
How to Make Oreo Bats Recipe
Step 1: Shape the Chocolate Ears
Start by unwrapping your snack-sized Hershey bars and cutting each into four smaller bars. Then, using a sharp knife, carefully cut three tiny triangles from each smaller bar to form the bat ears. This step can feel a bit delicate, so take your time—you want nice, clean ears that will stand out on your bats.
Step 2: Prepare Your Oreo Wings and Cream
Separate your Oreo cookies carefully. If you’re using regular Oreos, here’s a neat trick I discovered: take the cream from half the cookies and press it onto the other half to get a thicker filling—that way your bats look extra luscious. If you’re using Double Stuffed Oreos, you can skip this because the filling is already perfect.
Next, grab 12 Oreo cookie sides without cream and slice them in half using a serrated knife. These halves will become the bat wings. Keep a few extras handy in case some break while cutting. I remember the first time I tried this, I didn’t prepare extras and ended up a little frustrated—lesson learned!
Step 3: Assemble Your Bats
Press two small chocolate ears into the top of the cream filling on each Oreo carefully. Then, gently push two cookie halves into the sides of the Oreo at a slight angle to form the bat wings. If they don’t stick well on their own, melt some chocolate wafers and use a dab to ‘glue’ the wings in place—this little step really makes a difference.
Next, add a small drop of melted chocolate to the center of each cookie, then place another cookie without filling on top, pressing very gently to secure the bat body. Use a toothpick or small brush to dab melted chocolate on the backs of the candy eyes and stick them onto the front of each bat. Watching these little creatures come to life always makes me smile!
Pro Tips for Making Oreo Bats Recipe
- Use a Serrated Knife: It makes cutting the Oreo halves for wings much cleaner and prevents crumbs everywhere.
- Warm Your Chocolate Slowly: Melting wafers too fast can cause them to seize—low and slow in short bursts works best.
- Assembly Station: Lay out all pieces before assembling so you can work quickly and keep the chocolate from hardening prematurely.
- Freshness Counts: Make your bats the same day you plan to serve to avoid soggy cookies or dried-up cream.
How to Serve Oreo Bats Recipe
Garnishes
I usually keep things simple with just the candy eyes, but sometimes I’ll add a light dusting of edible glitter or a few sprinkles around the platter for a shimmer effect that really pops under party lights. You can even pipe on little mouths or fangs with black or white icing to give your bats personality!
Side Dishes
These Oreo bats are sweet enough on their own, but I love pairing them with a big punch bowl of creamy hot chocolate or a frothy pumpkin spice latte. If it’s a kids’ party, a simple strawberry milk or vanilla milkshake fits perfectly. For adult gatherings, dark coffee cuts the sweetness nicely.
Creative Ways to Present
One Halloween, I arranged the Oreo bats flying around a glowing pumpkin centerpiece on a dark platter—talk about a showstopper! They also look adorable placed on mini cupcake liners or displayed on a tiered glass stand. When serving at a kids’ party, let little ones “adopt” a bat from a decorated box with tissue paper—makes it so interactive!
Make Ahead and Storage
Storing Leftovers
If you have leftovers (which rarely happens at my house!), store them in an airtight container at room temperature. Keep them away from heat and humidity to preserve the crisp cookies and bright candy eyes. They stay good for up to 3 days, but honestly, they’re best eaten fresh.
Freezing
I tried freezing these once because I wanted to prep in advance, but I noticed the cookies lost their crunch and the candy eyes became a bit dull after thawing. If you do freeze them, store flat in a single layer in an airtight container and defrost at room temperature for about 30 minutes before serving.
Reheating
These are best served cold or at room temperature, so reheating isn’t really needed. If your chocolate melts a bit, just pop them in the fridge for 10 minutes to reset. Avoid microwaving as that can cause the Oreo cream to get too soft and the candy eyes to melt or warp.
FAQs
-
Can I use other cookies instead of Oreos for this Oreo Bats Recipe?
While the classic Oreo flavor and cream filling lend themselves perfectly to this recipe, you can experiment with similar sandwich cookies that have a creamy center. Just make sure the cookies aren’t too fragile, as the wings and ears need a firm base to hold together well.
-
What can I substitute for candy eyes if I can’t find them?
If candy eyes aren’t available, you could use small chocolate chips, tiny white icing dots piped on with royal icing, or edible marker pens to draw eyes directly on the cream. I once used mini M&Ms with a dot of white icing for pupils—it worked surprisingly well!
-
Is melted chocolate necessary to secure the bat wings and ears?
Using melted chocolate to secure the wings and ears really helps keep everything in place, especially if you’re transporting the bats or want them to last longer. If you don’t have melting wafers, any good-quality chocolate chip melted slowly will do the trick too.
-
How long does this Oreo Bats Recipe take to prepare?
From start to finish, it typically takes about 30 minutes. Most of the time is prepping pieces and carefully assembling. It’s a leisurely activity that’s perfect for an afternoon craft session with kids!
Final Thoughts
I absolutely love how this Oreo Bats Recipe turns out every single time. It’s one of those recipes that’s simple enough to whip up last-minute, but eye-catching enough to make people ask where you bought such professional-looking treats! I hope you enjoy making these as much as I do—and trust me, once you start, there’s no stopping the fun (or the snacking). Get your cookie and chocolate game on and make your next party or Halloween gathering truly memorable!
Print
Oreo Bats Recipe
- Prep Time: 30 minutes
- Cook Time: 0 minutes
- Total Time: 30 minutes
- Yield: 12 bats
- Category: Dessert
- Method: No-Cook
- Cuisine: American
Description
Delightful and spooky Oreo Bats that are perfect treats for Halloween or any fun occasion. These no-bake desserts combine Oreo cookies, Hershey’s chocolate bars, and candy eyes to create adorable bat shapes with chocolate ears and wings. Easy to assemble and guaranteed to impress kids and adults alike!
Ingredients
Bat Body
- 24 Oreo cookies
Bat Ears
- 2-3 snack-sized Hershey bars
Adhesive and Decoration
- ½ cup chocolate melting wafers
- 24 candy eyes
Instructions
- Prepare the Chocolate Ears: Unwrap 2 to 3 snack-sized Hershey bars and cut each into four smaller bars. Carefully use a sharp knife to cut three small triangles from each smaller bar to create the bat ears.
- Prepare the Oreo Cookies: Separate all 24 Oreo cookies. To have more filling on 12 cookies, scrape the cream filling off the other 12 cookies and add it to them. If using Double Stuffed Oreos, this step can be skipped because they already have plenty of cream filling.
- Cut the Bat Wings: Using a serrated knife, cut 12 of the Oreo cookie halves without cream frosting in half. These halves will serve as the bat wings. Have an extra 12 cookie halves ready in case some break during cutting.
- Assemble the Bat Shape: Press two small chocolate ears into the top of the cream filling on each filled cookie. Next, gently press two cookie halves into the sides of the Oreo at a slight angle to resemble bat wings. Use melted chocolate to secure the wings and ears if needed.
- Seal the Bat: Add a drop of melted chocolate in the center of the cream filling, then place one unfrosted Oreo cookie on top and press gently to sandwich together.
- Add the Eyes: Use a toothpick to dab melted chocolate on the back of each candy eye, then attach two eyes onto the front of each bat to complete the look.
Notes
- Double Stuffed Oreos can simplify assembly by providing extra cream filling, eliminating the need to transfer cream between cookies.
- If any cookie halves break while cutting wings, use the extra halved cookies as replacements.
- Keep the assembled Oreo bats refrigerated if not serving immediately to keep the chocolate solid and the shape intact.
- You can substitute candy eyes with mini chocolate chips if candy eyes are not available.
- Use a gentle touch when pressing the wings and ears into the cream to avoid breaking the cookies.
Nutrition
- Serving Size: 1 bat
- Calories: 180
- Sugar: 18g
- Sodium: 120mg
- Fat: 9g
- Saturated Fat: 5g
- Unsaturated Fat: 3g
- Trans Fat: 0g
- Carbohydrates: 24g
- Fiber: 1g
- Protein: 2g
- Cholesterol: 5mg


