
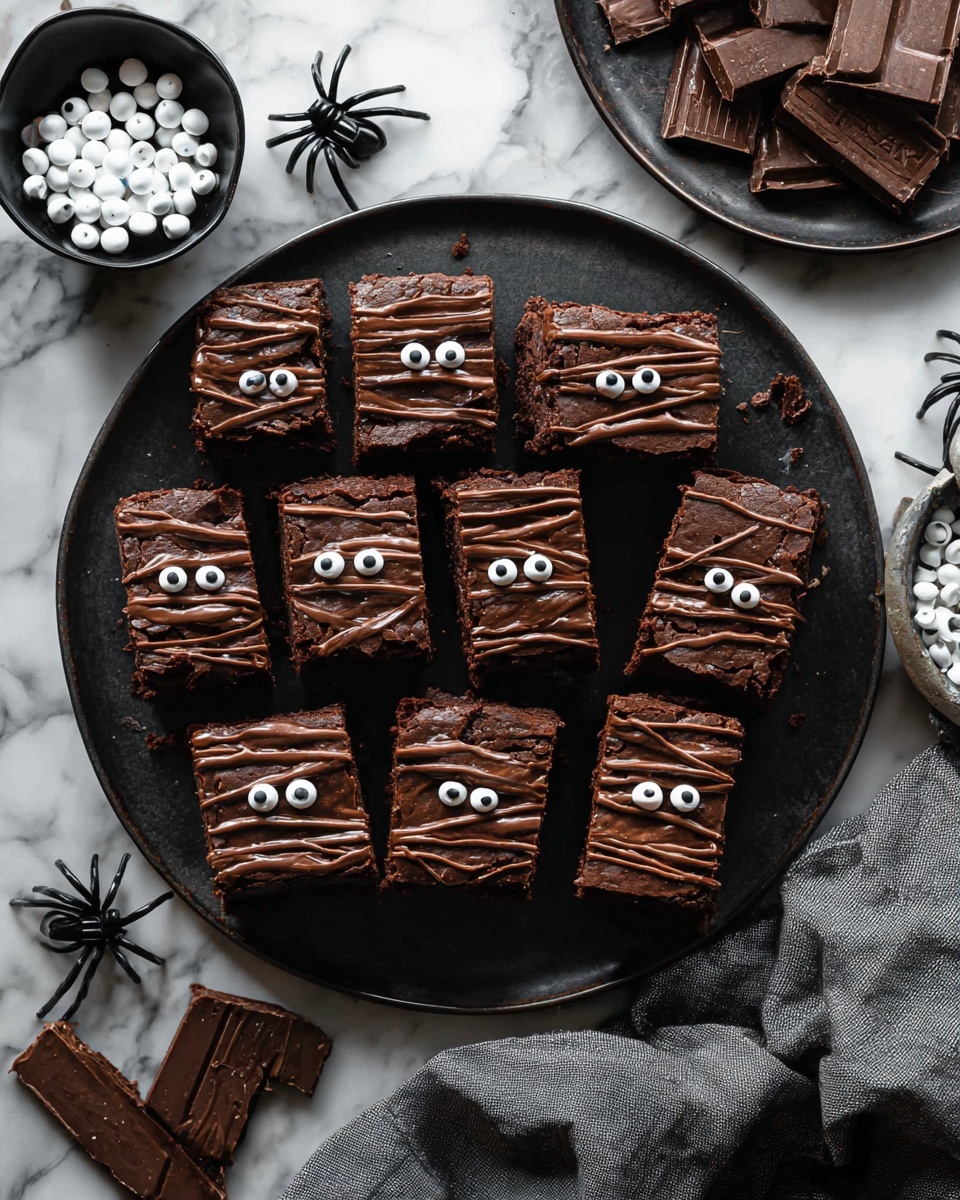
If you’re looking to add a fun, spooky twist to your Halloween treats this year, you’ve got to try my Mummy Halloween Brownies Recipe. These brownies are not only rich and fudgy, but they’re also irresistibly cute with that mummy wrap design and candy eyeballs staring back at you. I absolutely love how this recipe brings a festive vibe without complicating baking. Stick with me, and I’ll walk you through everything so your brownies come out perfect and spooky-fun every single time!
Why You’ll Love This Recipe
- Fudgy Texture: These brownies strike the perfect balance between rich and moist — no dry bites here.
- Simple Decoration: The ganache “mummy wraps” are easy to pipe and foolproof, even if you’re not a decorating pro.
- Family Favorite: My kids and their friends go absolutely crazy over these at every Halloween party.
- All-In-One Treat: No need to buy pre-made decorations — the candy eyeballs add just the right creepy pop!

Ingredients You’ll Need
The foundation of these mummy brownies is classic, fudgy chocolate paired with a smooth ganache for decoration—no weird ingredients, just quality basics that come together beautifully. Pick up the candy eyeballs at your local party store or online to complete the spooky look.
- Unsalted Butter: Using unsalted lets you control the saltiness in the brownies perfectly.
- Dark Chocolate: I use good-quality dark chocolate because it amps up the rich flavor better than chips.
- Granulated Sugar: Divided into two parts to mix well with the chocolate and eggs separately.
- Large Eggs: These help give structure and a lovely soft crumb texture.
- All-Purpose Flour: Stick to this for the best fudgy but stable brownie texture.
- Kosher Salt: Just a pinch balances all the sweetness beautifully.
- Heavy Cream: Essential for the ganache’s silky smooth finish.
- Candy Eyeballs: The star of the decoration — adds instant spooky fun!
Variations
One of the things I love most about the Mummy Halloween Brownies Recipe is how easy it is to tweak for your personal taste or dietary needs. Feel free to get creative with the decorations or the base brownie recipe!
- Alternative Chocolate: I’ve tried using milk chocolate for a sweeter version that kids adore — just make sure to adjust sugar slightly.
- Nut-Free Version: These brownies as-is are naturally nut-free, but double-check your chocolate and candy eyeballs if allergies are a concern.
- Vegan Swap: I experimented with egg replacers and plant-based butter once — while delicious, the texture is a bit less fudgy but still great for vegan friends.
- Spiced Brownies: Adding a pinch of cinnamon or chili powder gives a subtle kick that pairs surprisingly well with the chocolate.
How to Make Mummy Halloween Brownies Recipe
Step 1: Get Your Pan and Oven Ready
Preheat your oven to 350°F (175°C). I always line my 9×9-inch pan with parchment paper — it’s a lifesaver for lifting the brownies out later without breaking them. Don’t forget to spray the parchment with cooking spray so nothing sticks. Trust me, this step makes cleanup way easier.
Step 2: Melt the Butter and Chocolate
Set up a double boiler or just place a heatproof bowl over simmering water. Melt the butter and chopped dark chocolate together slowly, stirring occasionally. When I first tried this, I rushed it and ended up scorching the chocolate — slow and steady wins here! Once melted, remove from heat and stir in 1 cup of sugar until smooth.
Step 3: Combine Eggs and Sugar, Then Add Chocolate
In a large bowl, whisk the eggs with the remaining 1 cup sugar until the mixture is smooth and slightly thickened. While whisking, slowly pour the warm chocolate mixture into the eggs. This technique keeps your eggs from scrambling and ensures an even texture throughout.
Step 4: Fold in the Flour and Salt
Use a rubber spatula to gently fold in the flour and kosher salt—just until combined. I learned that overmixing here leads to cakier brownies, and since I’m all about that fudgy goodness, I stop as soon as I don’t see big flour streaks.
Step 5: Bake and Cool
Pour batter into your prepared pan and bake for 35 to 40 minutes. Check by inserting a toothpick – it should come out with just a few moist crumbs, not wet batter. The first time I nailed this timing, my brownies were perfectly fudgy and held together beautifully for decorating. Once out of the oven, transfer to a wire rack and let cool completely—this patience pays off when you decorate.
Step 6: Make the Ganache
While brownies cool, heat heavy cream in a small pot until just simmering. Pour over chopped dark chocolate and whisk gently until smooth. Pop the ganache into the fridge for about 30 minutes until it’s firm enough to pipe. You’ll want it thick but still smooth, so watch it closely!
Step 7: Decorate Your Mummy Brownies
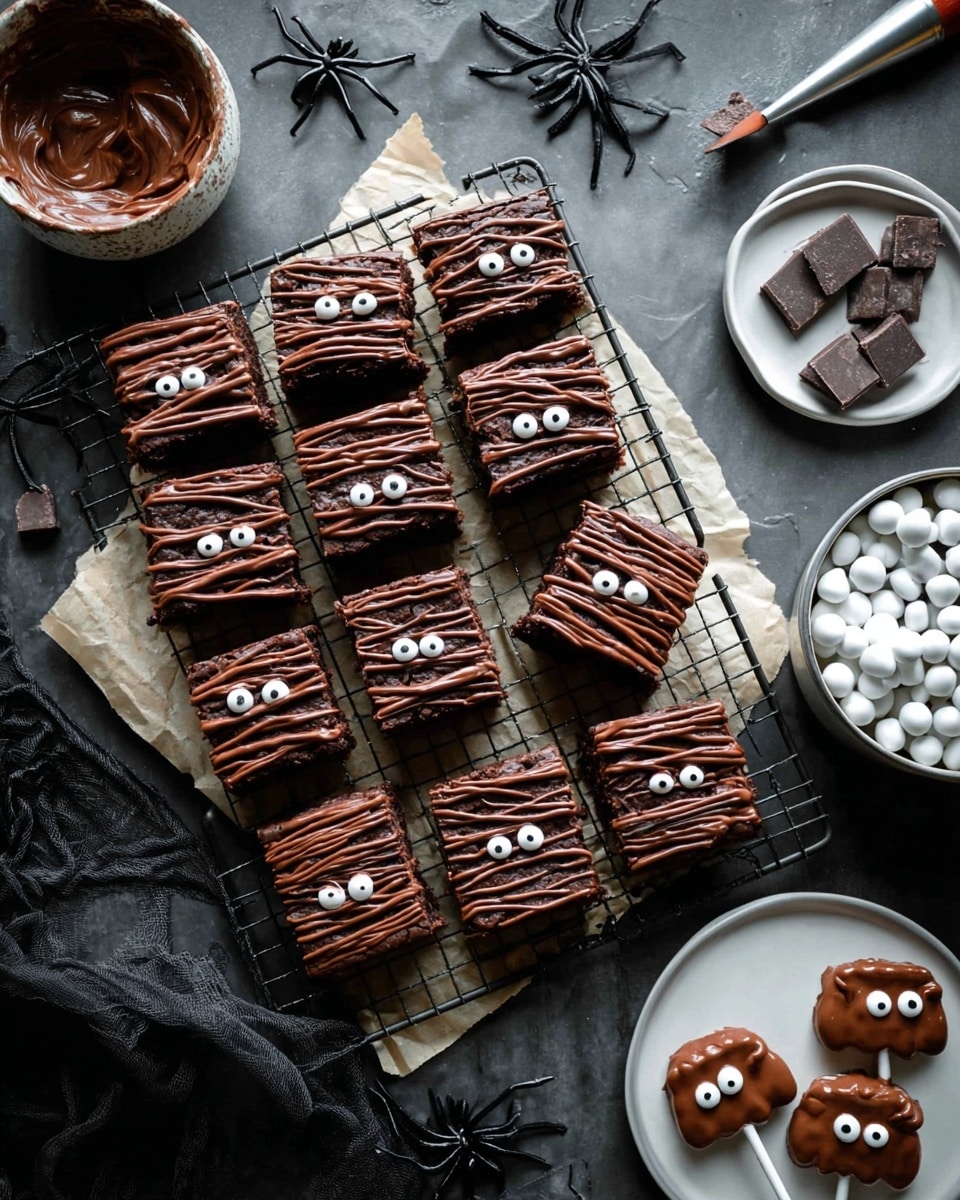
Use parchment paper to lift your cooled brownies out of the pan, then peel off the paper. Cut into 18 thin, rectangular brownies (6 rows by 3 rows). Whisk the chilled ganache gently, transfer to a piping bag or a Ziploc with a tiny corner cut, and pipe horizontal stripes across each brownie to mimic mummy wraps. Press two candy eyeballs into the ganache on each for that classic spooky stare. Voilà — instant mummy magic!
Pro Tips for Making Mummy Halloween Brownies Recipe
- Don’t Rush Cooling: The ganache pipes best when brownies are completely cool, so resist the temptation to decorate too soon.
- Use a Sharp Knife: I like to dip my knife in hot water and wipe it dry before cutting — helps achieve clean lines without tearing.
- Perfect Piping Pressure: Start slow and build gentle pressure to make nice even ganache stripes, especially if you use a Ziploc bag.
- Eyeball Placement: Press candy eyes on while ganache is still soft; if it sets too much, the eyes won’t stick well.
How to Serve Mummy Halloween Brownies Recipe
Garnishes
I usually keep garnishes simple—those adorable candy eyeballs say it all! Sometimes I sprinkle a little edible glitter or orange sanding sugar onto the ganache for some extra sparkle. If you want to get fancy, a light dusting of powdered sugar “spider webs” adds a great Halloween vibe.
Side Dishes
For a full Halloween spread, I love pairing these brownies with creamy pumpkin spice dip, or for adults, a sharp cheddar cheese platter balances out the sweetness nicely. Hot apple cider or a rich, dark coffee can also turn this treat into a cozy delight.
Creative Ways to Present
Here’s a fun tip I discovered: arrange the brownies on a large tray with fake spider webs and plastic spiders for an instant party centerpiece. Another favorite is wrapping each brownie in a little parchment pouch tied with orange ribbon—great for handing out to trick-or-treaters or party favors!
Make Ahead and Storage
Storing Leftovers
I store leftover mummy brownies in a single layer in an airtight container at room temperature for up to 3 days. This keeps the ganache fresh and the brownies delightfully fudgy. If stacking is inevitable, place parchment paper between layers to avoid sticking.
Freezing
I’ve frozen these brownies successfully before decorating — wrap the cooled brownies tightly in plastic wrap and foil to avoid freezer burn. When ready to serve, thaw completely and then pipe the ganache for freshest texture. Freezing after decorating can cause the candy eyes to separate, so I recommend decorating fresh.
Reheating
If you want warmed brownies, I find reheating a single piece in the microwave for 10-12 seconds works well, but skip the ganache warming — it melts quickly! For parties, serve at room temperature to keep your mummy wraps looking their best.
FAQs
-
Can I use milk chocolate instead of dark chocolate for this Mummy Halloween Brownies Recipe?
Absolutely! Milk chocolate will make the brownies sweeter and slightly lighter in flavor. Just be aware you might want to reduce the sugar a bit to balance the sweetness. The texture will remain fudgy and delicious.
-
How do I avoid crackly ganache when piping the mummy wraps?
Let your ganache chill until it’s firm but still pipeable — if it’s too cold, it might crack when piped. Also, whisking it gently before piping helps smooth out any lumps for clean lines.
-
Can I make these brownies gluten-free?
You can substitute all-purpose flour with a gluten-free flour blend in a 1:1 ratio. Just choose blends that contain xanthan gum for best texture. Baking time might vary slightly, so keep an eye on them.
-
What’s the best way to pipe the ganache if I don’t have a piping bag?
No worries if you don’t own one! Use a sturdy gallon-size Ziploc bag and cut a small corner off to create a makeshift piping bag. It’s a simple hack that works perfectly well.
Final Thoughts
All in all, this Mummy Halloween Brownies Recipe has become a staple in my Halloween baking lineup because it’s both adorable and incredibly tasty. I love sharing these at parties where they always wow the crowd with their spooky charm and decadent flavor. If you’re looking to bring smiles (and maybe a little playful fright) to your next Halloween celebration, these brownies will do just that. Give them a try — I think you’ll agree they’re just as fun to make as they are to eat!
Print
Mummy Halloween Brownies Recipe
- Prep Time: 45 minutes
- Cook Time: 35 minutes
- Total Time: 1 hour 50 minutes
- Yield: 18 brownies
- Category: Dessert
- Method: Baking
- Cuisine: American
Description
This festive Mummy Halloween Brownies recipe combines rich, fudgy chocolate brownies with a luscious dark chocolate ganache, decorated with candy eyeballs and ganache piping to mimic spooky mummy wrappings. Perfect for Halloween parties, these brownies are both delicious and visually fun, offering a perfect balance of moist texture and intense chocolate flavor.
Ingredients
For the Brownies:
- Nonstick cooking spray
- 2 sticks unsalted butter (8 ounces), cut into tablespoons
- 6 ounces dark chocolate, roughly chopped
- 2 cups granulated sugar, divided
- 4 large eggs
- 1 cup all-purpose flour
- 1 teaspoon kosher salt
For the Ganache:
- ½ cup heavy cream
- 4 ounces dark chocolate, roughly chopped
For Decoration:
- 36 small candy eyeballs
Instructions
- Make the Brownies: Preheat oven to 350 degrees F. Line a 9 x 9-inch baking pan with parchment paper and spray the parchment with nonstick cooking spray to prevent sticking.
- Melt Butter and Chocolate: Using a double boiler, gently melt the unsalted butter and dark chocolate over medium-low heat, stirring occasionally until smooth. Remove from heat once fully melted.
- Combine Sugar and Chocolate Mixture: Stir in 1 cup of granulated sugar into the melted chocolate mixture, whisking until smooth and evenly combined.
- Whisk Eggs and Remaining Sugar: In a large bowl, whisk together the 4 large eggs and the remaining 1 cup of granulated sugar until the mixture is smooth and slightly fluffy.
- Incorporate Chocolate into Eggs: Slowly pour the chocolate mixture into the egg mixture while whisking continuously to combine without cooking the eggs. Mix until just combined.
- Add Flour and Salt: Gently fold in the all-purpose flour and kosher salt with a rubber spatula until the batter is just combined, being careful not to overmix.
- Bake: Pour the batter into the prepared pan and bake in the preheated oven for 35 to 40 minutes, or until a toothpick inserted near the center comes out with just a few moist crumbs attached. Remove from oven and place on a cooling rack to cool completely.
- Make the Ganache: In a small saucepan, heat the heavy cream over medium heat until it gently simmers. Remove from heat immediately to prevent boiling. Add the chopped dark chocolate and whisk until the mixture is smooth and glossy.
- Chill Ganache: Transfer the ganache to the refrigerator and chill for about 30 minutes or until it reaches a firm enough consistency to pipe.
- Prepare Brownies for Decorating: Use the parchment paper to lift the cooled brownies out of the pan. Peel away the parchment and cut the brownies into 6 rows by 3 rows, creating 18 long, thin brownies.
- Decorate: Whisk the chilled ganache briefly until smooth. Transfer it to a piping bag fitted with a small flat tip or use a gallon Ziploc bag with a small hole cut in the corner. Pipe the ganache in back-and-forth stripes over each brownie to imitate mummy wrappings. Place 2 candy eyeballs onto each brownie, pressing gently into the ganache to secure.
- Serve and Store: Serve the brownies immediately, or store them in a single layer inside an airtight container at room temperature for up to 3 days.
Notes
- Ensure the ganache is sufficiently chilled and firm before piping to get clean, defined mummy wrapping lines.
- Use a sharp knife and clean it between cuts for neat brownie edges.
- For extra flavor, add a teaspoon of vanilla extract to the brownie batter or a pinch of espresso powder to enhance the chocolate intensity.
- Store brownies in a single layer to prevent decorations from smudging.
- These brownies can be made a day ahead of time; decorate just before serving for best appearance.
Nutrition
- Serving Size: 1 brownie (approximately 1/18th of the batch)
- Calories: 280
- Sugar: 26g
- Sodium: 110mg
- Fat: 18g
- Saturated Fat: 11g
- Unsaturated Fat: 6g
- Trans Fat: 0.2g
- Carbohydrates: 30g
- Fiber: 3g
- Protein: 3g
- Cholesterol: 70mg


