

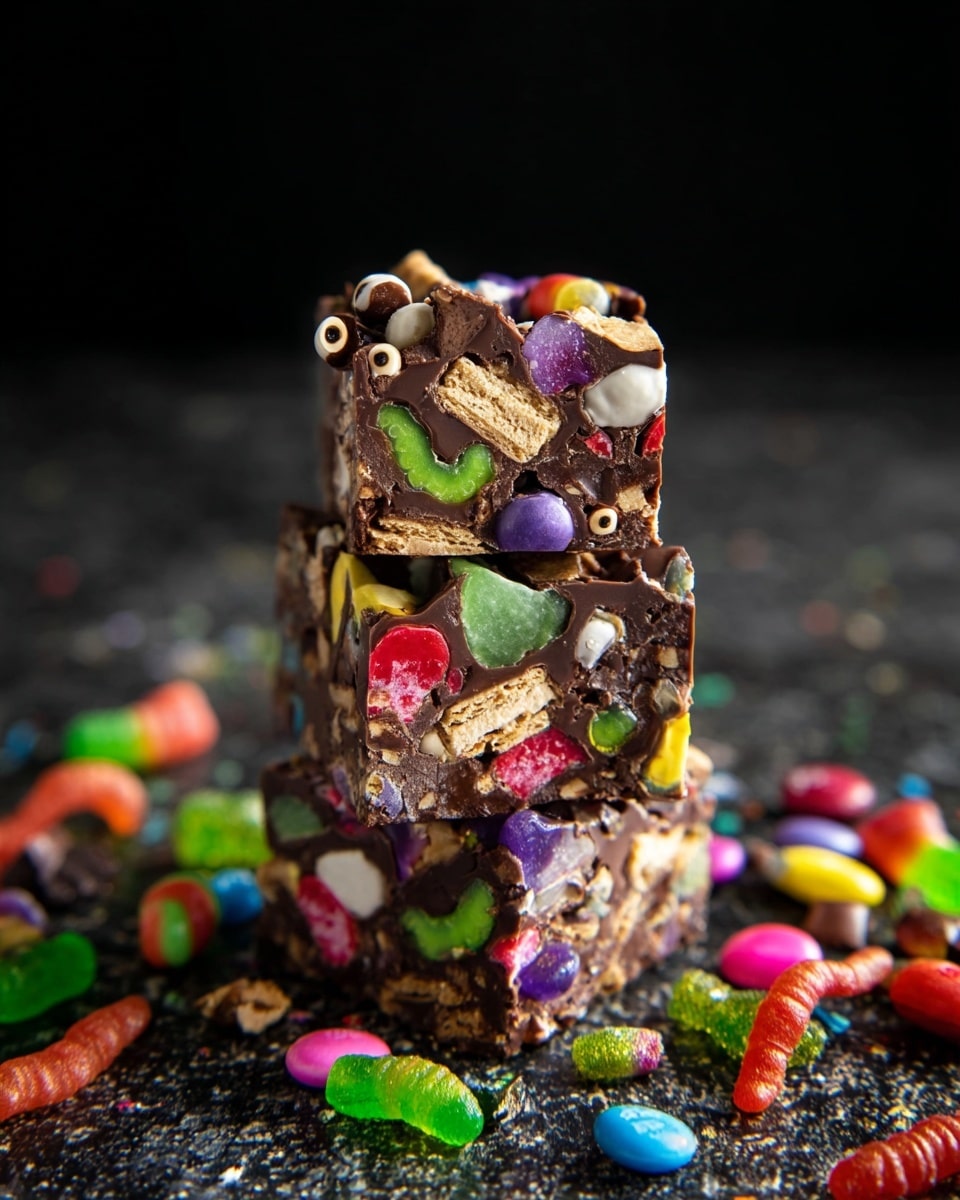
If you’re searching for a fun, festive treat that’s super easy to whip up and absolutely pops with Halloween spirit, you’re going to adore this Halloween Rocky Road Slices Recipe. It’s one of those recipes that feels fancy but doesn’t demand hours in the kitchen—perfect for last-minute party treats or a sweet snack to satisfy your spooky-season cravings. Trust me, once you dig into these slices, you’ll understand why my family goes crazy for them every October!
Why You’ll Love This Recipe
- Easy to Make: You don’t need to be a baking pro to get this perfect on your first try.
- Customizable Candy Mix: Use your favorite Halloween and chocolate treats to make it truly yours.
- Festive & Fun: The colorful swirls and spooky decorations brighten up any party table.
- Crowd-Pleaser: Every bite offers a perfect combo of crunchy, chewy, and chocolaty goodness.

Ingredients You’ll Need
The beauty of this Halloween Rocky Road Slices Recipe is how simple yet flavorful the ingredients are. I love using semi-sweet chocolate and buttery goodness as the base, then layering in fun seasonal candies for color and texture. Here’s what you’ll want to grab at the store.
- Semi-sweet chocolate chips: This gives the slice a rich, classic chocolate flavor without being too sweet.
- Butter: Adds smoothness and helps the chocolate set perfectly.
- Salt: Just a pinch to balance the sweetness.
- Roasted peanuts: For crunch and a salty contrast that cuts through the sugary mix.
- Mini marshmallows: I love using pink and orange ones for a festive touch, but classic vanilla works just as well.
- Kit Kat bars: Break them into bite-sized pieces—the wafer center adds a lovely texture.
- Candy melts: Pick two fun Halloween colors like purple and orange; they give the rocky road that swirly, colorful flair.
- Gummy worms: For the ultimate spooky vibe, regular or sour both work great.
- M&M candy Ghoul mix: These bring a burst of color and a satisfying crunch.
- Candy eyes: Mix sizes for that creepy-cute look on top.
- Halloween sprinkles: To sprinkle some festive fun on every piece.
- Extra melted semi-sweet chocolate: Useful for securing decorations.
Variations
I personally like to switch things up a bit depending on who I’m making these for and what candies are in season. It’s the perfect recipe for getting creative—try swapping out some ingredients or adding new flavors to make it your own!
- Nut-Free Version: I swapped out roasted peanuts with toasted sunflower seeds once, and my nephews still loved it—plus no nut allergies to worry about.
- Extra Chocolatey: Adding white chocolate chunks or drizzling white chocolate on top gives this rocky road an eye-catching contrast and extra creamy bite.
- Spooky-Themed Candies: Once, I used Halloween-themed gummy spiders and candy pumpkins instead of worms—super fun and totally adorable.
- Vegan Adaptation: Use dairy-free chocolate chips and vegan butter, then load up on dried fruits and nuts for a similar texture and flavor experience.
How to Make Halloween Rocky Road Slices Recipe
Step 1: Melt the Chocolate Base
Start by lining your pan with parchment paper—I use an 8-inch pan for thicker slices because they feel more indulgent. Then, pop your butter, semi-sweet chocolate chips, and a pinch of salt into a large bowl. Heat it in 30-second bursts in the microwave, stirring well in between, until it’s completely smooth and glossy. This is where I discovered that stirring often prevents burning and gives you a silky finish every time.
Step 2: Prepare the Candy and Mix-Ins
Melt your candy melts separately in the microwave—if you’re going for multiple colors, keep each in its own bowl and stir every 20-30 seconds until smooth. This part is fun because you get to pick your favorite spooky colors! I like to cut my Kit Kat bars in half to make bite-sized chunks, but you can also chop other candy bars to your liking.
Step 3: Combine and Layer
Once your chocolate base has cooled slightly (so it’s not too hot to melt your candies), fold in the roasted peanuts and candy bars gently. It’s okay if the chocolate coating melts a little because it just adds to the gooey goodness. Now stir in the mini marshmallows last—adding these earlier risks melting them, and that’s a texture you’ll want to avoid!
Step 4: Swirl Your Candy Melts & Press
Pour your rocky road mix into the prepared pan, then dollop the melted candy melts on top. Take an offset spatula or the back of a spoon and swirl those colors around to create cool, spooky effects. After swirling, gently press the mixture down to fill every corner of the pan evenly.
Step 5: Decorate Like You Mean It
Before you dive into the decorating, I’ve found it super helpful to mark your cut lines on the surface with the tip of a knife. This way, you can arrange your gummy worms, candy eyes, and M&Ms without interfering with where you’ll slice later on. Scatter the gummy worms first, gently pressing them in so they stick well. Then fill in the gaps with the candy eyes and ghoul M&Ms, finishing with festive sprinkles. If any bits feel loose, a dab of melted chocolate helps keep everything in place.
Step 6: Chill and Cut
Pop the whole pan in the fridge overnight—the waiting is the hardest part! The next day, lift the slice out by the parchment paper and use a sharp knife warmed in hot water to cleanly slice along your marked lines. This little trick makes cutting neater and prevents cracking.
Pro Tips for Making Halloween Rocky Road Slices Recipe
- Frequent Stirring While Melting: I learned that stirring every 30 seconds keeps the chocolate silky and avoids burning—trust me, it makes a huge difference!
- Mark Your Cutting Lines Upfront: It saves so much frustration when decorating and slicing; you won’t accidentally slice through cute candy eyes or worms.
- Use an Offset Spatula: It helps spread the rocky road evenly without breaking the candy pieces inside.
- Warm Knife for Cutting: Warming your knife under hot water and drying it keeps slices clean and prevents cracking.
How to Serve Halloween Rocky Road Slices Recipe
Garnishes
I absolutely love to add a few extra candy eyes on top just before serving to give them a fresh, playful pop. Sometimes I dust a light sprinkle of edible glitter for a magical, eerie shimmer that kids and adults both rave about!
Side Dishes
These rocky road slices pair wonderfully with a scoop of vanilla ice cream or a cup of hot chocolate, making them the perfect cozy treat after a night of Halloween fun. For a party, I like to place them alongside some salty popcorn and pumpkin-shaped cookies to balance sweet and savory.
Creative Ways to Present
For Halloween parties, I’ve shaped the rocky road in a thin layer on a cookie sheet and then cut into irregular “bat wing” shapes with cookie cutters—sprinkled with edible eyes and placed on a platter decorated with fake spiderwebs. It’s a big hit that kids go nuts over every time!
Make Ahead and Storage
Storing Leftovers
Store your Halloween Rocky Road Slices in an airtight container in the fridge, and they’ll stay fresh for up to a week. I usually separate layers with parchment paper so they don’t stick together or lose their shape.
Freezing
I’ve frozen these slices successfully for up to a month—just wrap them individually in plastic wrap and place them in a freezer-safe container. When you’re ready to enjoy, thaw in the fridge overnight to keep their chewy, crunchy texture intact.
Reheating
I personally prefer them cold or at room temperature, but if you want a melty, gooey vibe, briefly warm individual slices in the microwave for 10-15 seconds. Just be careful not to overheat, or you’ll lose that satisfying rocky road bite.
FAQs
-
Can I use different chocolates instead of semi-sweet chips?
Absolutely! I’ve tried this recipe with dark or milk chocolate chips, and it still turns out amazing. Just be mindful of sweetness levels—dark chocolate is less sweet, so you might want to add a touch more candy for balance.
-
What’s the best way to prevent the marshmallows from melting?
The key is to add marshmallows after the chocolate base has cooled slightly but hasn’t hardened. If you add them while it’s too hot, they’ll melt and become gooey, which changes the texture dramatically.
-
Can I make these slices without nuts?
Yes! If you have nut allergies or prefer to avoid nuts, substitute roasted peanuts with seeds like pumpkin or sunflower seeds for crunch or simply increase the candy bars and marshmallows.
-
How long should I chill the rocky road before cutting?
Chilling overnight is ideal to get a firm set, but if you’re pressed for time, at least 3-4 hours will work. Just ensure the chocolate is fully set to avoid smudged slices.
Final Thoughts
I genuinely can’t recommend this Halloween Rocky Road Slices Recipe enough if you want a no-fuss, show-stopping treat. Every year, it becomes the centerpiece at our Halloween gatherings, sparking oohs and aahs while disappearing faster than I can say “trick or treat!” It’s comforting knowing I can whip these up easily, customize them with whatever candy I have on hand, and always wow my friends and fam. So go ahead, grab your favorite chocolates and candies, and let’s make this year’s Halloween just a little sweeter!
Print
Halloween Rocky Road Slices Recipe
- Prep Time: 15 minutes
- Cook Time: 3 minutes
- Total Time: 8 hours 18 minutes
- Yield: 25 slices
- Category: Dessert
- Method: No-Cook
- Cuisine: American
Description
These Halloween Rocky Road Slices are a festive and delicious treat featuring a rich semi-sweet chocolate base loaded with roasted peanuts, mini marshmallows, and chopped Kit Kat bars. Swirled with vibrant candy melts and topped with gummy worms, candy eyes, M&M Ghoul mix, and Halloween sprinkles, these slices are perfect for a spooky celebration. They set with a quick chill in the fridge and make for colorful, indulgent bite-sized snacks.
Ingredients
Chocolate Base
- 340 g semi-sweet chocolate chips (2¼ cups)
- 170 g butter (¾ cup, 1½ sticks)
- Generous pinch of salt
Additions to the Rocky Road Slices
- 150 g roasted peanuts (about 1¼ cups)
- 75 g mini marshmallows (about 1½ cups; mini pink and orange or vanilla)
- 10 mini Kit Kat bars (or 5 regular bars, chopped)
- 115 g candy melts in each color (about 1 cup; purple, green, or orange—use no more than 2 colors)
Decoration
- Gummy worms (regular or sour)
- M&M candy Ghoul mix
- Candy eyes (small and large)
- Halloween sprinkles
- Extra melted semi-sweet chocolate (for sticking candies)
Instructions
- Prepare Pan: Line an 8 or 9 inch square pan with parchment paper; use 8 inch for thicker slices and 9 inch for thinner slices. Set aside.
- Melt Chocolate Base: In a large bowl, combine butter, semi-sweet chocolate chips, and a pinch of salt. Microwave in 30-second intervals, stirring between each, until completely melted and smooth.
- Melt Candy Melts: In separate bowls (if using multiple colors), melt the candy melts in 20 to 30-second intervals in the microwave, stirring until smooth. Set aside.
- Chop Candy Bars: Cut Kit Kat bars into pieces (halving wafers works well). Prepare any other candy bars by chopping to similar sizes.
- Combine Rocky Road Mix: Let the chocolate base cool slightly, then stir in roasted peanuts and chopped candy bars, allowing the candy bar chocolate coating to melt slightly.
- Add Marshmallows: Gently fold in mini marshmallows last to prevent melting into the warm chocolate mixture.
- Assemble in Pan: Pour the rocky road mixture into the prepared pan. Add dollops of melted candy melts on top, and use an offset spatula to swirl colors and evenly distribute the mixture, pressing gently to fill edges.
- Mark Cut Lines: Use a knife tip to lightly score the chocolate surface into 5×5 (25 pieces) or 4×4 (16 pieces) squares to guide cutting and avoid placing decorations on these lines.
- Decorate: While the chocolate is still wet, carefully place gummy worms on the surface, gently pressing to adhere. Fill spaces with M&M Ghoul mix, candy eyes, and Halloween sprinkles, avoiding scored lines.
- Secure Decorations: Use extra melted semi-sweet chocolate to help stick the candies if desired.
- Chill: Refrigerate the pan overnight until fully set.
- Cut and Serve: Remove from fridge the next day, lift the rocky road out by parchment, and cut following the marked lines with a sharp knife warmed in hot water for clean slicing. Store slices in an airtight container in the fridge until serving.
Notes
- Use an 8-inch pan for thicker slices or a 9-inch pan for thinner slices based on preference.
- Allow the chocolate base to cool slightly before adding marshmallows to prevent melting.
- Use a warm knife to cut the rocky road cleanly without cracking.
- Mark slices before decorating to avoid placing candies where cuts will be made.
- Store in airtight container refrigerated to maintain freshness and texture.
- Feel free to substitute other candy bars for customization.
Nutrition
- Serving Size: 1 slice (approximate)
- Calories: 220
- Sugar: 20 g
- Sodium: 50 mg
- Fat: 14 g
- Saturated Fat: 8 g
- Unsaturated Fat: 5 g
- Trans Fat: 0 g
- Carbohydrates: 24 g
- Fiber: 2 g
- Protein: 3 g
- Cholesterol: 15 mg


