

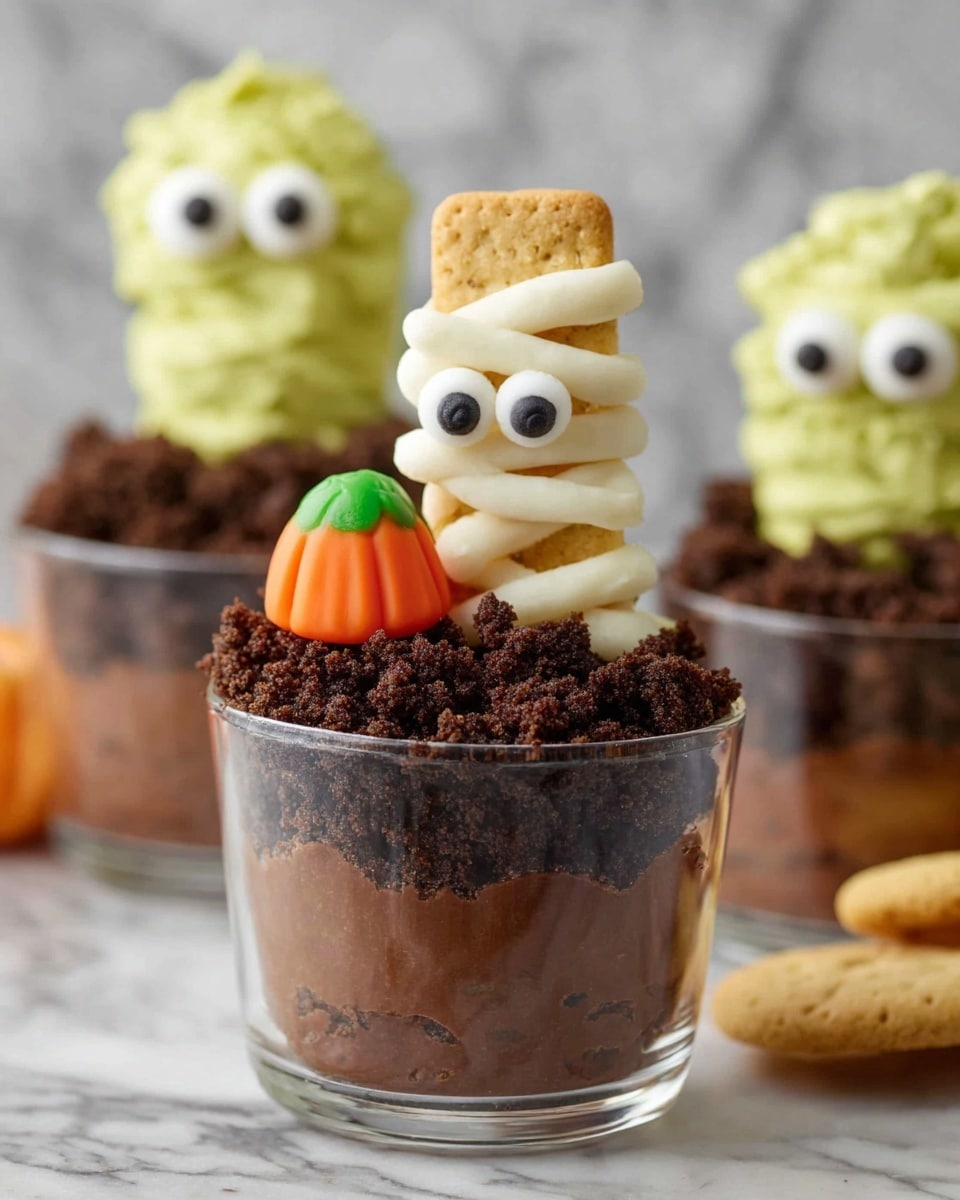
If you’re looking for a spooky, fun treat that’s as easy to make as it is to devour, you’re going to flip over my Mummy and Monster Dirt Cups Recipe. This is one of those desserts that feels special enough for Halloween, but honestly, my family begs for it year-round. I absolutely love how the creamy chocolate pudding, crumbly cookie dirt, and festive mummy and monster decorated shortbread cookies come together to create a playful, delicious dessert everyone can enjoy.
Why You’ll Love This Recipe
- Super Fun and Festive: Decorating shortbread cookies as mummies and monsters brings a playful vibe that’s perfect for kids and adults alike.
- Easy and Quick: You can whip up the pudding and decorate the cookies in under an hour — no intimidating skills required!
- Make-Ahead Friendly: Prepare most components ahead, making your party prep stress-free.
- Crowd-Pleaser: My family goes crazy for this every time, and your guests will too!

Ingredients You’ll Need
The magic behind this Mummy and Monster Dirt Cups Recipe really comes down to simple pantry staples paired with a few fun additions. Shopping for the right cookie and candy melts helps the mummies and monsters stand out perfectly.
- Walkers Shortbread Fingers: Their classic buttery crunch is perfect as a base to decorate like mummies and monsters.
- White Candy Melts or Almond Bark: These melt smoothly and make great “mummy bandages” when piped over cookies.
- Green Candy Melts: Ideal for creating those spooky monster looks.
- Sugar Eyeballs: No eerie creature is complete without eyes—grab some ready-made eyeballs for easy decorating.
- Instant Chocolate Pudding Mix: For an easy, creamy pudding layer that everyone loves.
- Cold Nonfat Milk: This activates the pudding mix perfectly without adding extra fat.
- Crushed Chocolate Cookies (like Walkers Scottie Dogs): These create the “dirt” layer that makes the dirt cups so fun and delicious.
Variations
One of the best parts about this Mummy and Monster Dirt Cups Recipe is how easy it is to swap things to fit your style or dietary preferences. I like to experiment with different “monster” colors or even add more spooky toppings to keep things interesting.
- Colorful Candy Melts: I once switched out green for vibrant purple candy melts to make “monsters” that popped off the plate—kids loved the color surprise!
- Dairy-Free Pudding: Use a coconut milk-based instant pudding mix to make this dessert friendly for those avoiding dairy.
- Cookie Swap: Try crushed Oreos instead of Walkers Scottie Dogs if you want a more classic chocolate dirt flavor.
- Extra Toppings: Mini gummy worms or edible glitter can add an exciting twist for Halloween parties.
How to Make Mummy and Monster Dirt Cups Recipe
Step 1: Decorate Your Mummies and Monsters
First things first, lay your Walkers Shortbread Fingers on a cookie sheet lined with parchment or wax paper. Then melt your white and green candy melts separately, following the package instructions. I like to add just a teaspoon of vegetable oil if the melts seem too thick—that helps them pipe smoother. Transfer the melted candy to sandwich bags, snip off a tiny corner, and have fun piping—you’ll create mummy “bandages” with the white melts by zigzagging stripes, and form monster designs with the green melts. Don’t forget to press on the sugar eyeballs before the candy sets! Pop the decorated cookies into the fridge to firm up the candy coating, about 15-20 minutes. This step is seriously rewarding because the cookies look super festive and fun once set.
Step 2: Make the Chocolate Pudding
Next, prepare your instant chocolate pudding according to the box instructions, using cold nonfat milk for a lighter texture. Stir well to avoid lumps and let it thicken for a couple of minutes. I always chill the pudding a bit in the fridge before assembling to keep everything nice and cool.
Step 3: Assemble the Dirt Cups
Spoon the pudding into clear serving cups or glasses, which make it easy to see the layers. Sprinkle a generous layer of crushed chocolate cookies on top to mimic the “dirt.” Finally, add a decorated mummy or monster cookie leaning on the side — this little touch brings the whole dessert to life! Keep the assembled dirt cups refrigerated until ready to serve, and I recommend adding the cookies just before serving to keep them crisp.
Pro Tips for Making Mummy and Monster Dirt Cups Recipe
- Candy Melts Consistency: If your candy melts feel thick, adding a tiny bit of shortening or neutral oil can make piping easier and smoother.
- Eye Placement: Press sugar eyeballs gently but firmly so they stick well without cracking the candy coating.
- Cookie Crush Texture: For “dirt,” crush cookies coarsely unless you want finer crumbs—varied texture adds interest.
- Assemble Last Minute: Keep cookies separate until you’re ready to serve to maintain their crunch and avoid sogginess.
How to Serve Mummy and Monster Dirt Cups Recipe
Garnishes
I usually finish these dirt cups with an extra sprinkle of crushed cookies right before serving, and sometimes add a little edible glitter or mini gummy worms for an extra spooky touch — my kids love hunting for the worms in their “dirt.” If you want to keep things simple and classic, just the sugar eyeballs on the cookies really make the presentation pop.
Side Dishes
These dirt cups work wonderfully as a standalone Halloween treat, but if you’re serving a full spread, try pairing them with some salty snacks like popcorn or caramel-coated nuts to balance the sweetness. A light fruit platter also complements the richness nicely.
Creative Ways to Present
Once, I served these in mini mason jars with Halloween-themed tags tied around the lid for a party favor effect. Another time, I used clear plastic cups, layered the pudding and crumbs, then added little plastic shovels as spoons—such a hit with kids! Don’t be afraid to mix it up with your favorite festive containers and add props like mini pumpkins or spider rings around your serving tray. It makes the experience even more memorable.
Make Ahead and Storage
Storing Leftovers
I like to store the pudding and crushed cookie “dirt” separately in airtight containers in the fridge if I’m prepping in advance. The shortbread cookies decorated as mummies and monsters keep best in a sealed container at room temperature. Once assembled, dirt cups are best eaten within 24 hours to keep cookies crisp and pudding fresh.
Freezing
This recipe doesn’t freeze well because the pudding texture changes when thawed and cookies lose their crunch. I recommend making it fresh or prepping components ahead and assembling just before serving.
Reheating
Since this dessert is served chilled, reheating isn’t necessary. Just remove the assembled dirt cups from the fridge about 10 minutes before serving to take the chill off slightly and enhance the flavors.
FAQs
-
Can I use different cookies for the dirt layer?
Absolutely! While I prefer Walkers Scottie Dogs for their flavor and texture, crushed Oreos, chocolate graham crackers, or even cookie crumbs from your favorite chocolate cookies work great. Just make sure they’re finely crushed enough to mimic dirt.
-
How long will the decorated cookies last?
The decorated shortbread cookies keep well for about 3-4 days stored in an airtight container at room temperature. Just avoid humid places to keep the candy coating from softening.
-
Can I make the pudding from scratch?
You can, of course! Homemade chocolate pudding can be a great twist, but the instant pudding mix saves so much time and is foolproof, which is why I love it for this recipe.
-
What if I don’t have candy melts?
You can substitute regular white and green chocolate or almond bark, but candy melts are specially designed to melt smoothly and harden quickly, making decorating easier.
Final Thoughts
I can’t recommend this Mummy and Monster Dirt Cups Recipe enough if you want a dessert that’s playful, approachable, and totally delicious. It’s become a staple at our Halloween gatherings, but I catch my kids sneaking these treats off the shelves long before October! The best part is how simple it is to pull off, so you get maximum fun for minimal fuss. So go ahead—grab those shortbread fingers and candy melts, and make some memories with this adorable dessert that everyone will adore.
Print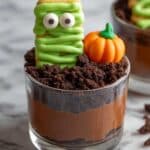
Mummy and Monster Dirt Cups Recipe
- Prep Time: 30 minutes
- Cook Time: 0 minutes
- Total Time: 1 hour 30 minutes
- Yield: 6 servings
- Category: Dessert
- Method: No-Cook
- Cuisine: American
Description
These fun and festive Mummy and Monster Dirt Cups combine creamy instant chocolate pudding with crunchy crushed cookies and spooky decorated shortbread cookies for a delightful Halloween treat. Perfect for parties or family gatherings, they feature adorable candy-coated monster and mummy cookies perched atop pudding ‘dirt’ cups, making them both delicious and visually appealing.
Ingredients
Monster and Mummy Cookies
- 8 Walkers Shortbread Fingers
- 1 cup White candy melts or almond bark (for mummies)
- 1 cup Green candy melts (for monsters)
- 16 Sugar eyeballs
Dirt Cups
- 1 (3.4 ounce) box instant chocolate pudding mix
- 2 cups cold nonfat milk
- 9 Crushed chocolate cookies (1 box Chocolate Walkers Scottie Dogs or similar)
Instructions
- Prepare the Cookie Base: Lay the Walkers Shortbread Fingers out on a parchment paper or wax paper-lined cookie sheet to get ready for decorating.
- Melt Candy Coatings: Melt the white candy melts or almond bark for the mummies and the green candy melts for the monsters according to the package directions. Add a small amount of shortening or oil if needed to help with melting and achieve a smooth consistency.
- Decorate Cookies: Place the melted candy into sandwich bags, cut off a small tip, and pipe the candy over the shortbread fingers to create monster or mummy designs. Add sugar eyeballs as desired to enhance the creepy look.
- Chill Cookies: Allow the decorated cookies to chill in the refrigerator until the candy coating sets and hardens, about 1 hour.
- Make Pudding: Prepare the instant chocolate pudding mix by combining it with 2 cups of cold nonfat milk, following the package instructions. Whisk until thickened and smooth.
- Assemble Dirt Cups: Spoon the prepared pudding into serving cups or glass dishes. Top each with crushed chocolate cookies to resemble dirt.
- Add Decorated Cookies: Place one chilled monster or mummy cookie on top of each dirt cup just before serving. Avoid placing the cookies in the pudding too early to keep them crisp.
- Store Properly: Keep the assembled cups refrigerated until ready to serve to maintain freshness.
Notes
- Adding a bit of shortening or oil when melting candy melts helps create a smoother texture for easier piping.
- Use parchment or wax paper when decorating to prevent sticking and make cleanup easier.
- The decorated cookies should be added to the pudding cups right before serving to prevent sogginess.
- This recipe yields about 6 servings, depending on cup size.
- Use plastic cups for easy cleanup if desired, especially when serving to children.
Nutrition
- Serving Size: 1 cup with 1 decorated cookie
- Calories: 320
- Sugar: 25g
- Sodium: 180mg
- Fat: 12g
- Saturated Fat: 6g
- Unsaturated Fat: 5g
- Trans Fat: 0g
- Carbohydrates: 45g
- Fiber: 2g
- Protein: 4g
- Cholesterol: 5mg


