

If you’re hunting for an unforgettable, festive dessert that’s both adorable and delicious, you’re in for a treat with this Ghost Cake Recipe. I absolutely love how this cake blends classic pumpkin spice flavors with a whimsical ghostly design, making it perfect for Halloween or any spooky celebration. Stick around because I’m about to share not just the recipe but all the tips and tricks I’ve picked up to make this ghostly confection a breeze to pull off—your friends will think you’re a cake wizard!
Why You’ll Love This Recipe
- Perfect Seasonal Flavor: The pumpkin and warming spices make this cake cozy and comforting for fall and Halloween.
- Fun and Festive Design: Shaping and decorating the ghost is easier than it looks—plus, it’s a fantastic conversation starter!
- Make Ahead Friendly: The layers and frosting freeze beautifully, so you can prep in advance and save time on the big day.

Ingredients You’ll Need
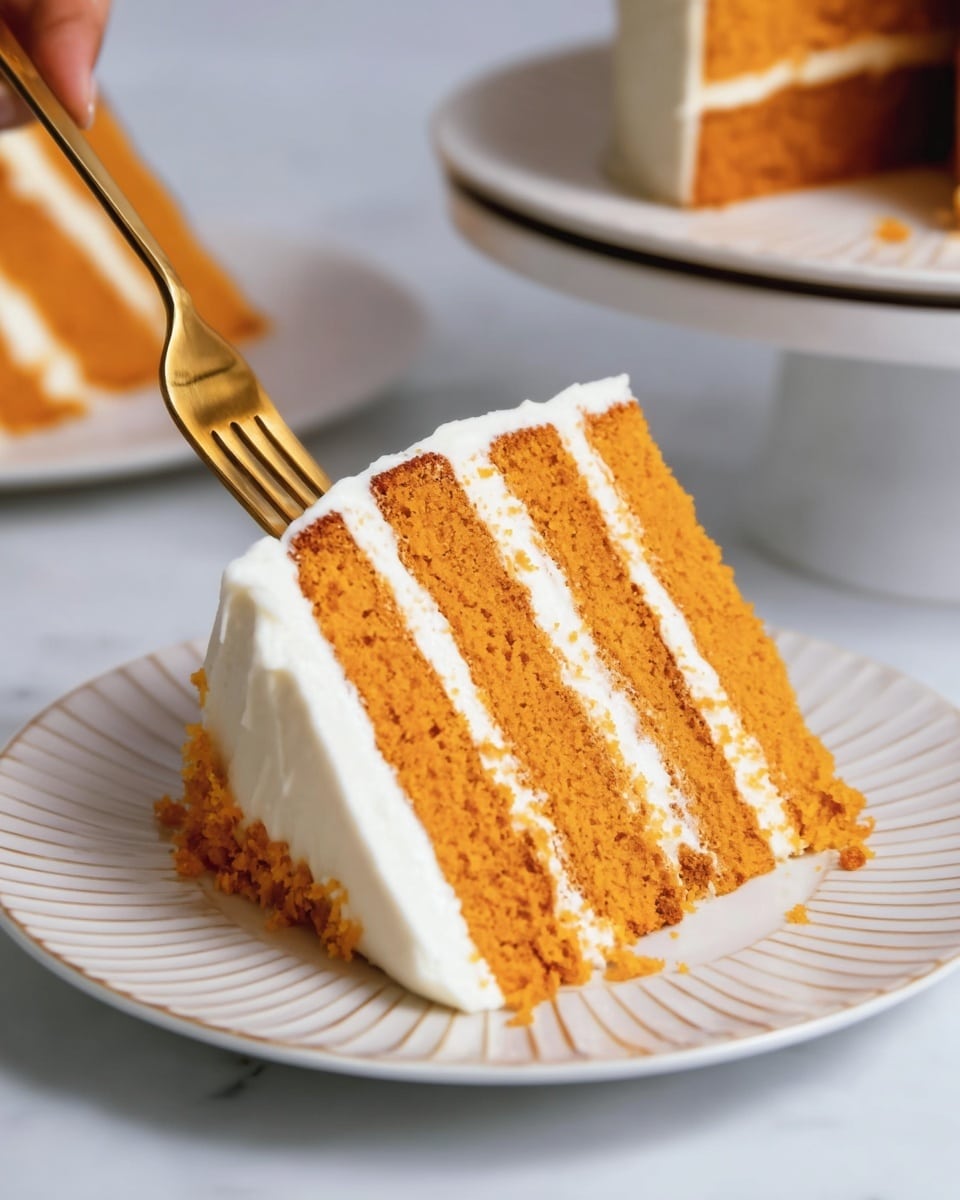
The magic of this Ghost Cake Recipe lies in the harmony between the moist pumpkin layers spiced just right, and the creamy vanilla buttercream that ties it all together. I recommend using fresh, room-temperature ingredients—they blend better and make for a smoother batter and frosting.
- All-purpose flour: Spoon and level your flour for accuracy; it’s the backbone of your cake’s structure.
- Granulated sugar: Essential for sweetness and moisture balance in the cake layers.
- Baking powder: Gives your cake those lovely light, fluffy layers.
- Fine salt: Enhances flavor and balances sweetness.
- Ground cinnamon, ginger, nutmeg: Classic warm spices that bring out the pumpkin’s richness perfectly.
- Unsalted butter: Make sure it’s softened to room temp for smooth mixing and a rich flavor.
- Egg whites: Using egg whites keeps the cake light while adding structure; make sure they’re room temp.
- Pumpkin puree: Use pure pumpkin, not pie filling, for best texture and flavor.
- Full-fat sour cream: Adds moisture and tang that really elevates the pumpkin cake.
- Vanilla extract or vanilla bean paste: Adds that warm depth of flavor.
- Powdered sugar: Needed for the buttercream’s smooth sweetness.
- Heavy whipping cream: Makes the frosting silky and helps adjust consistency.
- Gel food coloring (black, pink, orange, green, brown): For decorating your adorable ghost and pumpkin details.
Variations
I love experimenting a bit with this Ghost Cake Recipe depending on the occasion. Don’t hesitate to customize the flavors or even the cake size to fit your party vibe!
- Different Cake Sizes: I’ve made this as four 6-inch layers for a taller ghost, but switching to three 8-inch layers is great if you want a wider, shorter cake.
- Sheet Cake Version: When I’m short on time, making this as two 9×13 inch layers works wonderfully, baked for about 30-35 minutes.
- Flavor Swaps: You could add a touch of molasses for deeper spice notes or try a cream cheese frosting for tangy contrast.
- Coloring the Cake Layers: Adding a splash of orange gel coloring to the batter really makes the pumpkin pop in the finished cake.
How to Make Ghost Cake Recipe
Step 1: Prep Your Pans and Preheat
Always start by preheating your oven to 350°F (175°C). Then line four 6-inch cake pans with parchment rounds and spray them with non-stick cooking spray. This ensures easy release later—a little baking tip I picked up after many stubborn cakes stuck to the pan! If you don’t have four pans, just bake as many layers at a time as your oven allows; the batter stays good on the counter for a few hours.
Step 2: Mix Your Dry Ingredients
Using a stand mixer or hand mixer fitted with a paddle attachment, whisk together the flour, sugar, baking powder, salt, cinnamon, ginger, and nutmeg until they’re fully combined. This makes sure your spices and leavening are evenly spread throughout the batter—crucial for that perfectly balanced flavor.
Step 3: Cream in the Butter
Add the softened butter slowly on low speed to the dry mix. Keep mixing until the mixture looks like moist sand with no big chunks of butter—this step is key for that tender crumb in your cake. Patience here pays off!
Step 4: Incorporate the Wet Ingredients
Pour in your egg whites and pumpkin puree next, mixing just enough to combine. Then add sour cream and vanilla extract on low speed. This step blends all those creamy, moist ingredients without overmixing—which can toughen your cake layers. If you want a festive pop of color, add a small squirt of orange gel food coloring here just like I do—it really brightens up the layers!
Step 5: Beat for a Soft Texture
Scrape down the bowl sides, then mix on medium speed for about a minute. This little aerobicizes the batter and lightens up the texture, giving your cake an airy crumb you’ll love.
Step 6: Bake and Cool
Divide the batter evenly among your prepared pans and bake for 34-38 minutes. You’ll know they’re done when a toothpick inserted comes out with just a few moist crumbs. After baking, let them cool for 10 minutes and then carefully run an offset spatula around the edge to loosen. For best results, pop the pans into the freezer for 45 minutes—this cool-down shortcut helps you remove the layers without crumbling.
Step 7: Shape Your Ghost
Once fully cooled, level three layers with a serrated knife, leaving one layer domed on top. Trim the sides of the rounded layer into a soft dome shape, then stack the layers and taper the sides slightly to create that ghostly silhouette. If you’re prepping ahead, wrap and freeze the layers at this point—it makes assembly a snap.
Step 8: Make the Vanilla Buttercream Frosting
Cream the butter on medium-high speed until light and fluffy—this can take about 4-5 minutes. Then add vanilla and salt on low speed. Gradually mix in powdered sugar, adding heavy cream halfway through to keep the frosting soft and spreadable. Adjust with more cream or sugar until you get the perfect consistency. I always stir by hand at the end to smooth out any air bubbles—makes frosting application so much easier!
Step 9: Assemble and Crumb Coat
Using an 8-inch cake board, stick down your first leveled cake layer with a dab of frosting. Spread an even layer of frosting on each cake layer as you stack them, finishing with the domed layer on top. Cover the outside of the cake with a thin crumb coat and smooth it with an offset spatula and acetate sheet if you have one. Chill in the fridge for about 30 minutes or freezer for 10 minutes until the frosting firms up. This step makes the final frosting layers look flawless!
Step 10: Decorate Your Ghost
Divide some buttercream into small bowls and tint with your gel food colors: orange for pumpkins, pink for cheeks, green for leaves, brown for pumpkin stumps, and black for facial features. Pipe your ghost’s face using black buttercream or fondant if you prefer. Finish with ruffles at the base of the cake to give that whimsical ghostly effect. Trust me, this part is so fun to do—you’ll feel like an artist creating your spooky masterpiece!
Pro Tips for Making Ghost Cake Recipe
- Room Temperature Ingredients: I always make sure butter, egg whites, and sour cream are room temp—it really helps everything blend smoothly without overmixing.
- Chill Between Steps: Freezing cake layers before assembly gives me cleaner, more stable slices and smoother frosting application.
- Crumb Coat Magic: Don’t skip the crumb coat! It traps loose crumbs and makes the final frosting layer sleek and professional-looking.
- Frosting Consistency Check: If your buttercream feels too thick or thin, adjusting with cream or powdered sugar one tablespoon at a time saved me multiple times from frosting disasters.
How to Serve Ghost Cake Recipe
Garnishes
I often add a pinch of edible shimmer dust on my ghost cake to give it an ethereal glow that catches the light beautifully. Tiny fondant pumpkins or candy eyes are also charming if you want to add extra personality. I’ve found that simple piped buttercream cheeks and pumpkin details are enough to bring this ghost to life, and they make it all taste delicious too!
Side Dishes
This cake pairs wonderfully with a cup of hot spiced cider or a dollop of whipped cream on the side. I also love serving it alongside lightly salted caramel sauce or a scoop of vanilla bean ice cream to complement the pumpkin flavors.
Creative Ways to Present
For Halloween parties, try placing your ghost cake on a rotating cake stand surrounded by faux cobwebs or mini pumpkins for a spooky display. Another time, I used black cake boards and wrapped autumn-themed ribbon around the base to make it extra festive. You can also get creative by adding glow-in-the-dark edible paint or themed cake toppers to really wow your guests.
Make Ahead and Storage
Storing Leftovers
If you have leftovers (and you probably will!), I wrap the cut cake tightly with plastic wrap and store it in an airtight container in the fridge. Covering exposed frosting edges with an extra dab of buttercream helps keep it moist and fresh for up to a week—perfect for sneaky late-night bites.
Freezing
Once assembled and frosted, this ghost cake freezes very well for up to a month. I like to slice it into portions, freeze them individually wrapped in foil and plastic wrap, and then thaw them overnight in the fridge for a quick, ready-made dessert when needed.
Reheating
Since this cake is best served chilled or at room temp, reheating isn’t usually necessary. But if you want to warm a slice slightly, let it sit at room temp for 30 minutes or pop it in the microwave for 10 seconds on a low setting—just watch carefully so the frosting doesn’t melt!
FAQs
-
Can I use canned pumpkin for the pumpkin puree?
Absolutely! Just make sure it’s pure pumpkin purée, not pumpkin pie filling, which contains added sugars and spices that can throw off the flavor balance in your cake.
-
What if I don’t have gel food coloring?
You can use liquid food coloring, but gel colors are more concentrated and won’t thin out your frosting or batter. If you only have liquid, add it sparingly and be prepared for slightly different coloring intensity.
- Can I make this cake dairy-free?
You can substitute dairy-free butter and sour cream alternatives, but the texture may be a bit different. I recommend testing ahead if you need a fully dairy-free version.
- How do I transport the cake safely?
Chill the frosted cake well, then place it in a sturdy cake box with a non-slip mat underneath. Keep it cool during transport to prevent melting and shifting. Bringing along a small spatula for touch-ups also helped me once or twice!
- What’s the best way to level my cake layers?
I use a long serrated knife or a cake leveler to trim the domed tops off. Moving the blade gently back and forth while rotating the cake ensures an even, flat surface for stacking.
Final Thoughts
This Ghost Cake Recipe is one of my favorite ways to bring a little magic to any gathering. It’s got that perfect mix of seasonal flavors and playful design, and with the tips I shared, you’ll find it surprisingly easy to make even if cake decorating isn’t your everyday thing. I can’t wait for you to try it—your family and friends are going to go crazy for this spooky, sweet treat!
Print
Ghost Cake Recipe
- Prep Time: 15 minutes
- Cook Time: 35 minutes
- Total Time: 1 hour 50 minutes
- Yield: 24 servings
- Category: Dessert
- Method: Baking
- Cuisine: American
Description
This Ghost Cake is a whimsical and festive pumpkin cake perfect for Halloween celebrations. It features moist pumpkin cake layers, rich vanilla buttercream frosting, and delightful ghost and pumpkin decorations piped with colorful buttercream. The cake layers are baked in 6-inch pans for a tall, sculpted ghost shape, and the frosting is layered and smoothed for a professional finish. This recipe also includes tips for making, storing, and decorating the cake to achieve an impressive and tasty centerpiece.
Ingredients
Pumpkin Cake Layers
- 3 cups all-purpose flour (375g)
- 3 cups granulated sugar (600g)
- 2 1/2 tsp baking powder (10g)
- 1 tsp fine salt (6g)
- 2 tsp ground cinnamon (6g)
- 1 tsp ground ginger (3g)
- 1/2 tsp ground nutmeg (2g)
- 1 cup unsalted butter, room temperature (226g)
- 1/2 cup egg whites or 4 large egg whites, room temperature (120g)
- 2/3 cup pumpkin puree (165g)
- 1 1/2 cups full-fat sour cream, room temperature (360g)
- 2 tsp vanilla extract or vanilla bean paste (8g)
Vanilla Buttercream Frosting
- 2 cups unsalted butter, room temperature (452g)
- 1 Tbsp vanilla extract or vanilla bean paste (12g)
- 1/2 tsp fine salt (3g)
- 7 cups powdered sugar (875g)
- 1/4 cup heavy whipping cream, room temperature (60g)
Ghost Cake Decorations
- 4 x 6-inch cake pans
- Spinning cake stand
- 8-inch cake board
- Offset spatula
- Acetate sheet
- 5 small piping bags
- 1 large piping bag
- 4 small round piping tips (e.g., Wilton 10)
- 1 small leaf piping tip (e.g., Wilton 352)
- Black, pink, orange, green, and brown gel food coloring
Instructions
- Prepare Cake Pans and Preheat Oven: Preheat oven to 350°F (175°C). Line four 6-inch round pans with parchment and grease with non-stick spray. If making larger layers, you can use 3 8-inch pans, but the ghost shape will be shorter.
- Mix Dry Ingredients: Combine flour, sugar, baking powder, salt, cinnamon, ginger, and nutmeg in a mixer with a paddle attachment until evenly mixed.
- Cream Butter into Dry Ingredients: Slowly add room temperature unsalted butter on low speed, mixing until the mixture resembles moist sand with no large butter chunks.
- Add Wet Ingredients: Pour in egg whites and pumpkin puree, mixing on low until incorporated. Then add sour cream and vanilla extract, continuing to mix gently. Optionally, add orange gel food coloring at this stage.
- Beat Batter: Scrape down bowl sides and beat on medium for about one minute to lighten the batter’s texture.
- Fill Pans and Bake: Evenly divide batter into prepared pans. Bake 34-38 minutes, or until a toothpick comes out with moist crumbs. Cool pans for 10 minutes, then run an offset spatula around edges.
- Freeze to Cool Faster: Place pans in the freezer for 45 minutes to fully cool the layers. Carefully remove cakes from pans and peel off parchment.
- Level and Shape Layers: Using a serrated knife, level three layers flat and leave one rounded. Trim the rounded layer to a gentle dome shape. Stack layers and taper sides slightly to get ghost shape. Freeze wrapped if not assembling immediately.
- Make Vanilla Buttercream: Beat butter on medium-high until smooth and lighter in color. Mix in vanilla and salt on low. Gradually add powdered sugar and cream while mixing slowly. Adjust consistency with more cream or sugar as needed. Stir by hand to eliminate air bubbles. Cover to prevent crusting.
- Stack and Frost Cake: On an 8-inch cake board, place the first leveled cake layer and fix with a frosting dab. Alternate layers with frosting spread evenly between each. Top with domed layer. Apply a thin crumb coat of frosting around the entire cake, smooth with offset spatula and acetate, then chill the cake for 30 minutes in fridge or 10 minutes in freezer until firm.
- Prepare Colored Frosting for Decoration: Tint small amounts of buttercream with orange, pink, green, brown, and black gel food colors, placing each colored frosting into separate small piping bags with appropriate tips (round or leaf).
- Final Frosting Layer and Piping: Using the remaining white buttercream in a large piping bag, add a second thick layer of frosting. Pipe squiggly ruffles around the base to simulate ghostly draping. Smooth the final coat with offset spatula and acetate.
- Decorate the Ghost Face and Pumpkin: Lightly mark face and pumpkin placement with a toothpick. Pipe facial features with black frosting. Add rosy cheeks with pink buttercream. Pipe an orange pumpkin below the face and a small bow on one side of the ghost’s head. Pipe white arms of the ghost, then use brown and green frosting to add pumpkin details like a stump and leaf. Enjoy your festive ghost cake!
Notes
- Measure flour properly by spooning into the cup and leveling or use a kitchen scale for accuracy.
- Ensure all ingredients are at room temperature for better mixing and texture.
- Chill cake layers in the freezer before assembling for easier stacking and frosting.
- Crumb coat and chill the cake before applying the final frosting layer for a neat finish.
- Adjust buttercream consistency as needed for smooth spreading and precise piping.
- Make the cake layers and frosting ahead of time; freeze layers and refrigerate or freeze frosting.
- Store frosted cake in fridge up to one week or freeze up to one month; thaw in fridge before serving to prevent condensation.
- Use leftover frosting to seal cut surfaces and keep cake moist for up to a week.
Nutrition
- Serving Size: 1 slice (1/24 of cake)
- Calories: 380
- Sugar: 44g
- Sodium: 180mg
- Fat: 20g
- Saturated Fat: 12g
- Unsaturated Fat: 7g
- Trans Fat: 0.2g
- Carbohydrates: 49g
- Fiber: 1.5g
- Protein: 4g
- Cholesterol: 55mg
