

If you’re on the hunt for a fun and festive treat this season, I’ve got something you’re going to adore. This Easy Halloween Hand Pies Recipe is one of my absolute favorites to make with friends and family – it’s quick, cute, and crazy delicious. You’ll find these hand pies are perfect for parties, kids’ snacks, or even a whimsical dessert that everyone will remember. Trust me, once you try them, you’ll get why I keep coming back to this recipe every October!
Why You’ll Love This Recipe
- Simplicity: Made with store-bought pie crust and jam, it’s ready in under 30 minutes.
- Customizable: You can swap jams or nuts for your favorite flavors and allergens.
- Perfectly Themed: The cute hand shape makes them an instant Halloween hit.
- Family Favorite: My kids go wild over these, plus they love “helping” with the decorating.

Ingredients You’ll Need
The magic of this Easy Halloween Hand Pies Recipe comes from simple ingredients you likely already have or can easily swing by the store to grab. I especially love using store-bought pie crust because it saves so much time but still bakes up flaky and buttery.
- All-purpose flour: For dusting your work surface so the dough doesn’t stick while you roll and cut.
- Store-bought pie crust: Two crusts come in most packages, perfect for layering and shaping the hand pies.
- Raspberry or strawberry jam: I often alternate between these jams because their tart sweetness balances the buttery crust perfectly.
- Large egg: Whisked with a little water for a glossy egg wash that gives your pies that beautiful golden color.
- Sliced almonds: Used to create ‘nails’ on the hand pies – they add a fun texture and look fantastic.
Variations
I love mixing things up with this Easy Halloween Hand Pies Recipe depending on the mood or who I’m baking for. Don’t be afraid to get creative—the recipe is forgiving and great for personalization.
- Jam swaps: I’ve used apricot, blueberry, and even spiced pumpkin butter with great results – it all depends on your seasonal cravings.
- Nut-free: If you’re serving kids or friends with allergies, you can skip the sliced almonds or swap in chopped dried cranberries for nails.
- Vegan version: Use a plant-based pie crust and swap the egg wash for a mixture of almond milk and maple syrup for that golden finish.
- Extra fun: Use food coloring on some of the jam to create “bloody fingers,” which always makes the kids giggle.
How to Make Easy Halloween Hand Pies Recipe
Step 1: Prepare Your Baking Station and Shapes
Begin by preheating your oven to 425°F and lining two baking sheets with parchment paper—trust me, parchment is a game-changer for baking and cleanup. Lightly flour your work surface so your pie crust doesn’t stick when you unroll it. I find using a sharp knife or a hand-shaped cookie cutter makes cutting out the little “hands” a breeze and keeps the edges crisp. Don’t worry if the scraps pile up; you can easily re-roll those to cut out plenty more pies!
Step 2: Add the Jam and Seal Your Hands
Place half of the hand shapes on your prepared baking sheets, leaving at least 2 inches between each. Add a spoonful of your chosen jam right in the center of each hand – this makes sure every bite gets that fruity sweet surprise. Then carefully place another hand shape on top. I like to press gently to seal the edges without bursting the jam inside. Using a fork, crimp around the palm area for an airtight seal – the fingers don’t need to be crimped, just pressed together lightly.
Step 3: Add Details and Bake
Now for the fun part: take a paring knife and create small slits at the fingers’ knuckles to help steam escape while baking. Brush the pies all over with your egg wash, which gives them that irresistible shiny golden look. Bake for around 10 to 15 minutes based on the size, until they’re beautifully golden and cooked through. You’ll want to keep an eye on them near the end to avoid over-browning.
Step 4: Decorate the Nails
Right after pulling the hand pies from the oven, add a little dab of jam at the tip of each finger and gently press a sliced almond on top to create ‘nails’. This simple touch makes such a charming difference and is a definite crowd-pleaser (especially with my kids).
Pro Tips for Making Easy Halloween Hand Pies Recipe
- Keep things cool: If your pie dough warms up too much, it gets sticky and hard to handle—pop it in the fridge for 10 minutes before rolling again.
- Use good quality jam: I’ve learned that a flavorful jam really makes these pop, so pick one you love to eat by the spoonful.
- Don’t overfill: A small spoonful of jam works best to avoid mess and keep your hand pies sealed perfectly.
- Seal edges thoroughly: Press and crimp well around the palm to prevent leaks—this tip saved me from sticky baking trays plenty of times!
How to Serve Easy Halloween Hand Pies Recipe
Garnishes
Personally, I stick with the cute almond “nails” and a little extra jam for a sweet finishing touch. If you want to get festive, a light dusting of powdered sugar or a drizzle of melted dark chocolate adds an elegant (and tasty) layer too. It’s fun to customize based on the vibe you want!
Side Dishes
These hand pies are pretty much a grab-and-go treat, but I love serving them alongside a warm cup of apple cider or pumpkin spice latte during fall gatherings. They also pair nicely with a scoop of vanilla ice cream if you’re after an indulgent dessert vibe.
Creative Ways to Present
When hosting Halloween parties, I like to plate these hand pies on a platter surrounded by mini pumpkins, autumn leaves, and even some creepy spider rings for a spooky touch. You can stack them like a “graveyard” or arrange them like reaching fingers coming out of the table. My kids love helping with these setups – their imagination makes the experience even more fun!
Make Ahead and Storage
Storing Leftovers
Once cooled completely, I store leftover hand pies in an airtight container at room temperature for up to two days. I find this keeps the crust crisp enough without drying out the filling. If you live in a warmer climate, storing them in the fridge is a safer bet but just know the crust won’t be as flaky.
Freezing
This is a wonderful recipe to freeze! I freeze my hand pies before baking—arranged on a baking sheet, frozen solid, then transferred to a zip-top bag for up to two months. When you’re ready, just bake them straight from frozen, adding a few extra minutes to the baking time. Fresh-baked hand pies whenever you want? Yes, please!
Reheating
To warm up leftover hand pies, I pop them in a 350°F oven for about 8-10 minutes. This keeps the crust flaky and the filling yummy without turning them soggy like microwaving can. If you’re in a hurry, you can microwave for about 20 seconds, but honestly, the oven method is worth the wait!
FAQs
-
Can I use homemade pie crust for this Easy Halloween Hand Pies Recipe?
Absolutely! Homemade pie crust will work beautifully, and you’ll get that extra fresh flavor. Just make sure it’s rolled out evenly and kept cool to make cutting and sealing easier. The store-bought dough is a great shortcut, but homemade adds a lovely personal touch.
-
What are the best jams or fillings for these hand pies?
Berry jams like raspberry and strawberry are classic choices because their slight tartness balances the sweetness beautifully. But you can experiment with apricot, cherry, or even pumpkin butter for a unique twist. Just avoid overly runny fillings that may leak during baking.
-
How do I make sure my hand pies don’t leak during baking?
The key is proper sealing. Use the fork to crimp edges around the palm area firmly and press the fingers gently. Don’t overload the filling—one heaping teaspoon is plenty. Egg wash helps seal the dough, too, so don’t skip this step.
-
Can I make these hand pies ahead of time?
Definitely! You can assemble them and keep them refrigerated for a few hours before baking or freeze them unbaked for longer storage. Bake them fresh from the fridge or freezer for best results.
Final Thoughts
I absolutely love how this Easy Halloween Hand Pies Recipe brings a little playful charm and big flavors to the kitchen without any complicated steps. It’s one of those recipes I keep going back to because it’s simple enough for weeknight fun but fancy enough to impress guests. So grab your pie crusts and jam, and make these spooky little hand pies your next must-bake. Your friends and family will thank you – and honestly, you’ll enjoy the baking process as much as the eating!
Print
Easy Halloween Hand Pies Recipe
- Prep Time: 10 minutes
- Cook Time: 15 minutes
- Total Time: 25 minutes
- Yield: 8 (4-inch) hand pies
- Category: Dessert
- Method: Baking
- Cuisine: American
- Diet: Vegetarian
Description
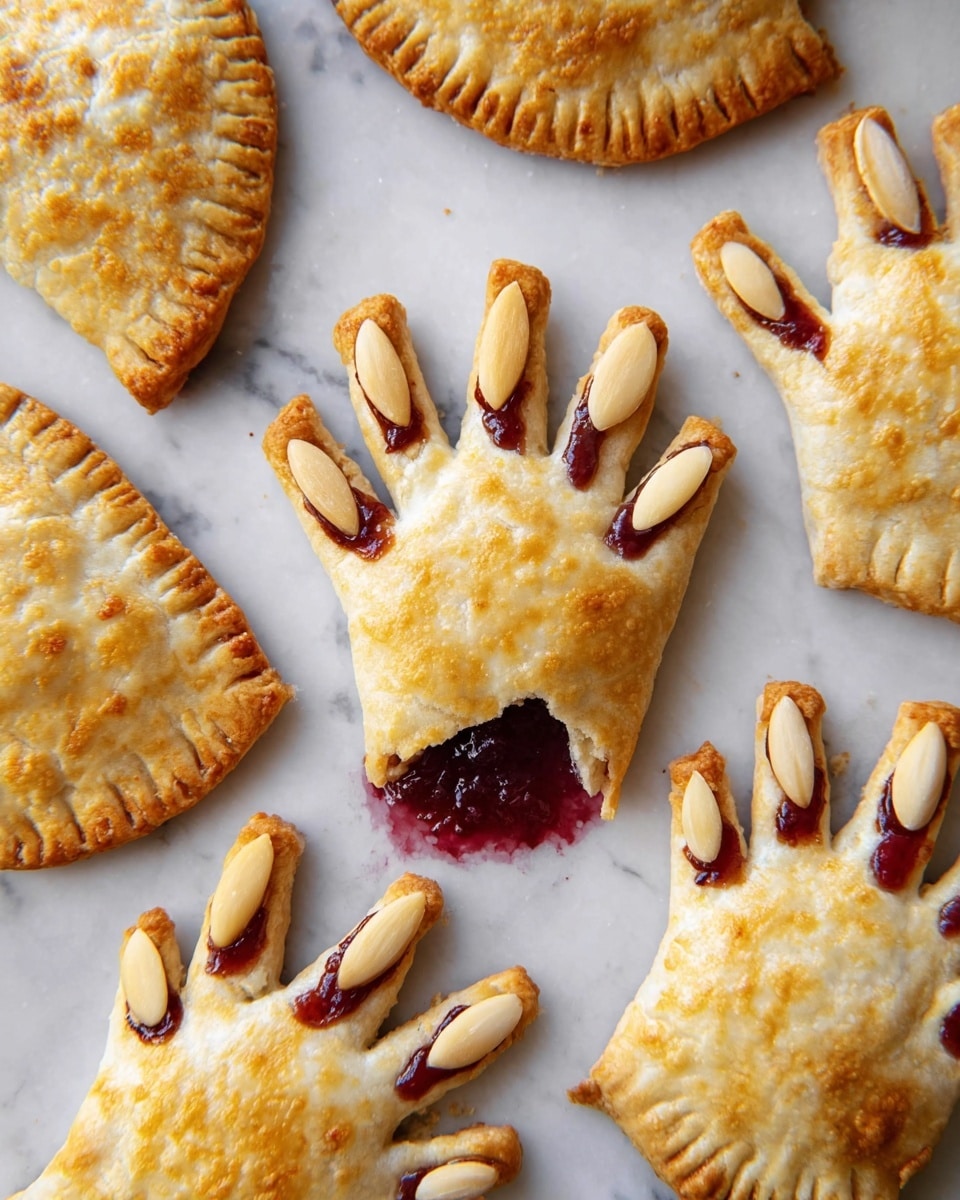
These Easy Halloween Hand Pies are a fun and festive treat perfect for celebrating the spooky season. Made with flaky store-bought pie crust and filled with sweet raspberry or strawberry jam, these hand-shaped pastries are simple to assemble and bake. Finished with almond ‘nails’ and a glossy egg wash, they make an adorable and delicious addition to any Halloween party or snack time.
Ingredients
Dough
- All-purpose flour, for rolling out dough
- 1 (14.1-oz.) package store-bought pie crust (2 crusts total)
Filling
- 1/3 cup raspberry or strawberry jam, plus more for decorating
Egg Wash and Decoration
- 1 large egg, whisked with 1 Tablespoon water
- Sliced almonds
Instructions
- Preheat and Prepare Baking Sheets: Preheat your oven to 425°F (220°C). Line two baking sheets with parchment paper to prevent sticking.
- Roll Out and Cut Dough: Lightly flour your work surface and unroll the two pie crusts. Using a sharp knife, carefully trace around a hand cut-out or use a hand-shaped cookie cutter to cut out hand shapes. Arrange half of the cut-out hands on the prepared baking sheets, spacing them at least 2 inches apart. Re-roll any dough scraps to 1/4-inch thickness to cut out additional hand shapes.
- Add Jam Filling: Spoon a portion of the raspberry or strawberry jam into the center of each hand on the baking sheets. Be careful to concentrate the filling in the palm area, avoiding the fingers.
- Seal the Hand Pies: Place a second hand-shaped piece of dough on top of each filled hand. Press gently around the edges to seal. Use a fork to crimp the edges around the palms, ensuring the filling stays inside. For the fingers, lightly press the edges together without crimping since these areas have no filling.
- Create Vent Slits: With a paring knife, cut small slits on the fingers where the knuckles would be to allow steam to escape during baking.
- Apply Egg Wash and Bake: Brush the entire surface of each hand pie with the egg wash made from the beaten egg and water. Bake in the preheated oven for 10 to 15 minutes or until the hand pies are golden brown and cooked through, adjusting time depending on the size of the pies.
- Decorate Nails: Remove the baked hand pies from the oven. Add a small dollop of jam at the tip of each finger, then press a sliced almond onto each dollop to resemble fingernails.
- Serve or Store: Serve the hand pies immediately for best flavor and texture, or store them in an airtight container at room temperature for later enjoyment.
Notes
- Use a sharp knife or hand-shaped cookie cutter to create clean edges on the hand pies.
- Be careful not to overfill with jam to prevent leaking during baking.
- You can substitute the jam with other fruit preserves if desired.
- For a dairy-free option, use egg wash alternatives like aquafaba.
- Hand pies are best eaten fresh but can be reheated in a warm oven for a few minutes.
Nutrition
- Serving Size: 1 hand pie
- Calories: 220
- Sugar: 12 g
- Sodium: 180 mg
- Fat: 10 g
- Saturated Fat: 3 g
- Unsaturated Fat: 6 g
- Trans Fat: 0 g
- Carbohydrates: 28 g
- Fiber: 1 g
- Protein: 3 g
- Cholesterol: 30 mg


