

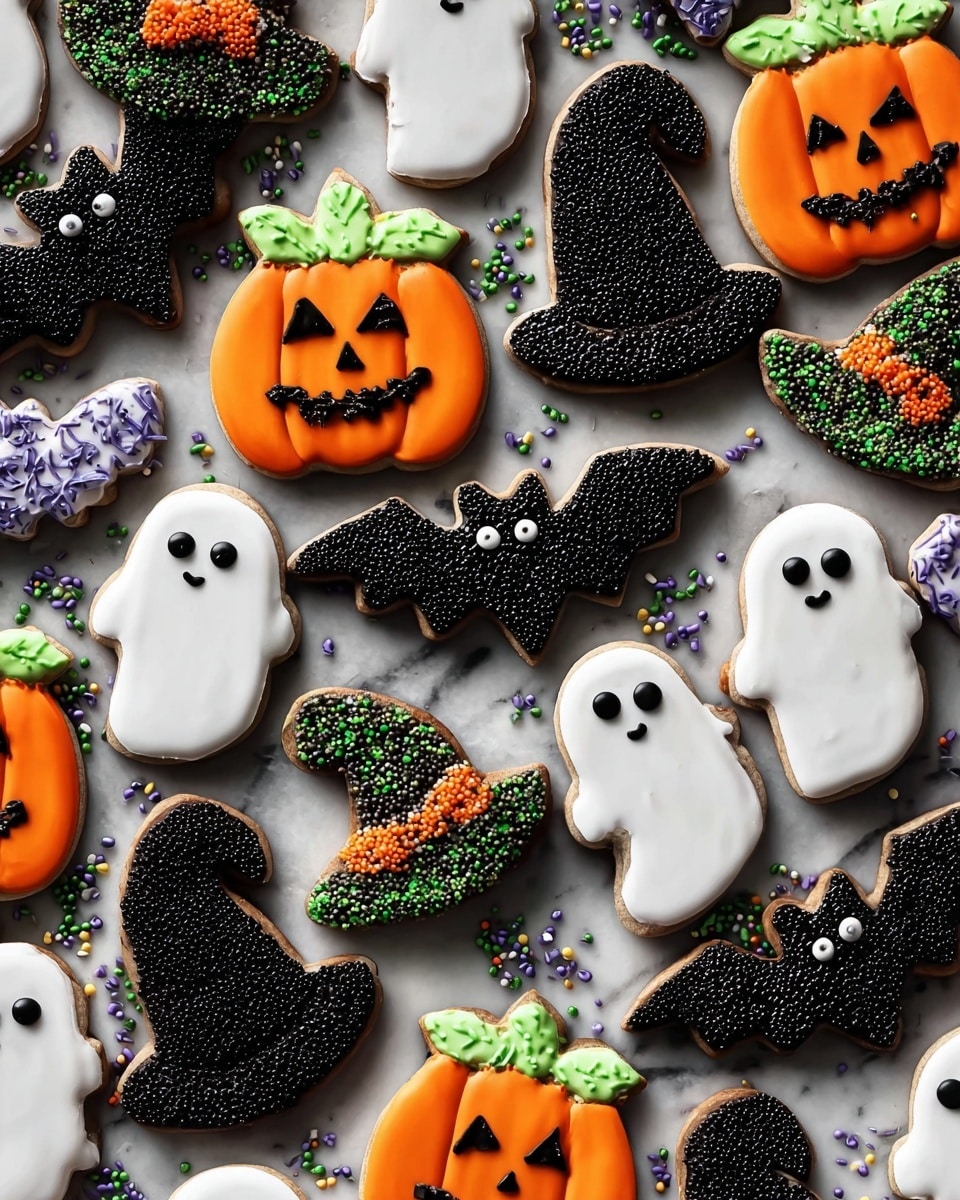
If you’re searching for a festive treat that blends spooky fun with rich chocolatey goodness, you’ve come to the right place! This Halloween Chocolate Cookies Recipe is one of my absolute favorites for celebrating the season. They’re soft, fudgy, and just sweet enough, plus decorating them is like a little Halloween party right in your kitchen. Whether you’re baking with kiddos or prepping for your next gathering, you’ll find these cookies irresistible.
Why You’ll Love This Recipe
- Rich Chocolate Flavor: The combination of natural cocoa powder and a touch of butter creates a deep, chocolaty taste that I never get tired of.
- Perfect Texture: These cookies strike the ideal balance between soft and chewy, making them a hit with both kids and adults.
- Fun to Decorate: I love how versatile the royal or easy icing options are – you can get super creative with colors and designs.
- Great for Gifting: These cookies keep soft for days and freeze beautifully, so they’re fantastic for sharing with friends or neighbors.

Ingredients You’ll Need
The ingredients for this Halloween Chocolate Cookies Recipe are simple yet thoughtfully chosen to give you that perfect rich taste and texture. Plus, I’ve included some helpful tips on what to look for when shopping to avoid any mishaps.
- All-purpose flour: Make sure to spoon and level your flour to avoid adding too much, which can dry out the cookies.
- Unsweetened natural cocoa powder: I use natural cocoa for a brighter chocolate flavor, but Dutch-process works fine if that’s what you have.
- Baking powder: This helps a little lift so your cookies don’t turn out too dense.
- Salt: Just a pinch balances the sweetness perfectly.
- Unsalted butter: Soften it to room temperature – this step really affects how well the sugar creams in for fluffy dough.
- Granulated sugar: This gives the cookies a gentle sweetness and lovely texture when creamed with butter.
- Egg: Helps bind everything together and adds moisture.
- Pure vanilla extract: A splash boosts all the flavors and smooths the cocoa’s bite.
- Royal icing or easy cookie icing: You get to pick! Use royal icing for detailed designs or easy icing if you want a simpler glaze.
- Gel food coloring: Optional but super fun for creating spooky Halloween colors.
Variations
One of the things I love about this Halloween Chocolate Cookies Recipe is how easy it is to tweak according to your mood or dietary needs. I’ve played around with a few versions, and trust me, the options are endless!
- Gluten-free version: I swapped all-purpose flour for a 1:1 gluten-free baking flour blend with great results—just keep an eye on the dough since it might be a bit softer.
- Vegan adaptation: Using vegan butter and a flax egg works surprisingly well, though the texture is slightly less rich but still delicious.
- Spiced chocolate: Adding a pinch of cinnamon or chili powder to the cocoa powder gives the cookies a warm, unexpected kick perfect for Halloween vibes.
- Simplified icing: If you’re short on time or tools, just dust these cookies with powdered sugar or drizzle melted chocolate instead of full icing.
How to Make Halloween Chocolate Cookies Recipe
Step 1: Mix Dry Ingredients
Start by whisking together the all-purpose flour, cocoa powder, baking powder, and salt in a medium bowl. This dry blend is the foundation, and I usually give it a good stir to make sure everything’s evenly incorporated — no surprises later when you bite down!
Step 2: Cream Butter and Sugar
Using a hand mixer or a stand mixer fitted with the paddle attachment, beat your softened butter and sugar on high speed. I found that about 3 minutes is the sweet spot to get a smooth, creamy texture – not too soft, not grainy. If you want a visual guide, I recommend checking out a quick tutorial on creaming butter and sugar; it’s a game-changer for cookie success.
Step 3: Add Eggs and Vanilla
Next, beat in the egg and vanilla extract on high for about one minute. Don’t skip scraping the bowl down once or twice here — you want a perfectly mixed batter that’s smooth and luscious.
Step 4: Incorporate Dry Ingredients
Mix the dry ingredients into your wet mixture on low speed. The dough will be soft and somewhat sticky, which is normal. If it feels too sticky for rolling, gently add an extra tablespoon of flour. You’ll want the dough pliable, but manageable.
Step 5: Roll Out the Dough
Divide the dough in half. I dust two sheets of parchment paper (or use silicone mats) with cocoa powder to prevent sticking. Roll each half to about a 1/4-inch thickness, dusting with cocoa powder as needed. This part is fun because it’s like you’re prepping your canvas for spooky masterpieces!
Step 6: Chill the Dough
This is a crucial step that makes a huge difference! Layer one rolled dough with parchment and place the second rolled dough on top. Cover the stack and refrigerate for at least 1-2 hours or up to 2 days. Chilling firms up the dough so it cuts cleanly and holds its shape while baking.
Step 7: Cut, Bake, and Cool
After chilling, preheat your oven to 350°F (177°C) and prepare baking sheets lined with parchment or silicone mats. Remove the top piece of dough and start cutting out your Halloween shapes with cookie cutters. Re-roll scraps quickly and keep dusting to avoid stickiness. Bake the cookies about 11-12 minutes until edges just set. Let them rest on the baking sheet for five minutes before transferring to a wire rack to cool completely. Cooling fully is key for icing success.
Step 8: Decorate with Icing
Whether you go with royal icing or the simpler cookie glaze, this step brings the Halloween vibe to life. I like dividing the icing into portions and tinting with gel food coloring — orange, black, green, and white work perfectly. Use piping bags with small tips for outlining and flooding. Take your time; icing isn’t a race. If you want layered details (like Jack-O-Lantern faces), make sure each layer is dry before adding the next. And if your royal icing gets too runny, just beat in a little more powdered sugar.
Pro Tips for Making Halloween Chocolate Cookies Recipe
- Don’t Skip Chilling: I learned the hard way that skipping the chill leads to misshapen cookies – your dough needs time to firm up for precise shapes.
- Use Cocoa Powder for Dusting: Switching from flour to cocoa powder when rolling enhances chocolate flavor and keeps the dough from drying out.
- Work Quickly While Cutting: The dough warms fast; if it gets sticky, pop it back in the fridge to avoid frustration.
- Be Patient with Icing: Let each layer dry fully – rushing causes smudging and frustration, but the wait is totally worth it.
How to Serve Halloween Chocolate Cookies Recipe
Garnishes
I usually top these cookies with colorful sprinkles on witch hats or bat wings, but my favorite garnish is edible candy eyeballs – they add such a fun, creepy factor. If you want something subtle, a light dusting of colored sugar crystals works beautifully too.
Side Dishes
Pair your cookies with a big mug of spiced hot cocoa or a frothy pumpkin spice latte for an ultimate Halloween treat spread. If you’re serving at a party, a bowl of mixed nuts or festive popcorn makes a nice salty counterpart.
Creative Ways to Present
I love presenting these cookies on a tiered Halloween-themed cake stand surrounded by mini pumpkins and fake spider webs for a spooky display. Wrapping stacks of cookies in cellophane bags tied with orange and black ribbons also makes for charming, easy gifts.
Make Ahead and Storage
Storing Leftovers
After icing, I store leftover cookies in an airtight container at room temperature for up to 5 days. I make sure they’re completely dry before sealing the container to keep them from getting sticky. If you want to keep them longer, refrigeration in the same container extends freshness up to 10 days.
Freezing
I often freeze both the raw dough and finished cookies. For dough, I shape into disks, wrap tightly, and freeze up to 3 months. When ready, thaw overnight in the fridge, then roll and cut as usual. Decorated cookies freeze best after the icing has completely set; pack with parchment paper between layers to avoid sticking.
Reheating
If you want to refresh cookie softness, pop them into a warm (not hot) oven for 3-5 minutes wrapped in foil. Avoid microwaving decorated cookies as that can melt the icing and mess up your artwork.
FAQs
-
Can I use Dutch-process cocoa instead of natural cocoa in this Halloween Chocolate Cookies Recipe?
Yes! Dutch-process cocoa works well too, but since it’s less acidic, the flavor might be milder and the cookie color darker. The texture won’t be affected much, so feel free to use whichever you have on hand.
-
How do I prevent my cookies from spreading too much during baking?
Chilling your dough after rolling and before cutting is essential to keep shapes firm. Also, make sure your butter isn’t too soft or melted when you cream it. Lastly, don’t overbake—cookies should just be set at the edges.
-
What’s the best way to decorate if I’m a beginner?
I’d recommend starting with the easy cookie icing, which is less fussy and still looks great. Use piping bags for borders and then flood inside. Letting the icing dry completely before stacking or packaging helps prevent smudging. You can always add simple sprinkles for extra flair!
-
Can I make these cookies ahead for a party?
Absolutely! Bake the cookies and decorate them a day ahead. Store in an airtight container at room temp to keep them fresh. If you want to make them even earlier, freeze decorated cookies after the icing sets and thaw gently before serving.
Final Thoughts
This Halloween Chocolate Cookies Recipe has become a seasonal staple in my house, partly because it’s just so delicious, but also because it turns cookie baking into such a fun memory-making activity. If you love indulging in chocolate and enjoy a bit of creative decorating, these cookies will definitely become a favorite for you and your family. Give them a try, and don’t be afraid to get playful with your icing – after all, Halloween is the perfect excuse to let your imagination run wild!
Print
Halloween Chocolate Cookies Recipe
- Prep Time: 2 hours
- Cook Time: 12 minutes
- Total Time: 3 hours 30 minutes (including chilling and icing setting time)
- Yield: 24 3-4 inch cookies
- Category: Dessert Cookies
- Method: Baking
- Cuisine: American
Description
These Halloween Chocolate Cookies are rich, soft, and perfectly cocoa-flavored sugar cookies, rolled out, cut into festive shapes, baked, and decorated with vibrant royal or easy cookie icing. Ideal for Halloween celebrations, these cookies combine classic chocolatey goodness with fun, colorful designs to delight all ages.
Ingredients
Dry Ingredients
- 1 and 1/2 cups (188g) all-purpose flour (spooned & leveled)
- 3/4 cup (62g) unsweetened natural cocoa powder (or Dutch process cocoa powder), plus more as needed for rolling and work surface
- 1 teaspoon baking powder
- 1/8 teaspoon salt
Wet Ingredients
- 3/4 cup (12 Tbsp; 170g) unsalted butter, softened to room temperature
- 1 cup (200g) granulated sugar
- 1 large egg, at room temperature
- 1 teaspoon pure vanilla extract
Decoration (Optional)
- Royal Icing or Easy Cookie Icing
- Gel food coloring for tinting icings (optional: orange, black, green)
Instructions
- Make the cookie dough: Whisk together the flour, cocoa powder, baking powder, and salt in a medium bowl. In a large mixing bowl, beat the softened butter and sugar with a hand or stand mixer on high speed until smooth and creamy, about 3 minutes. Add the egg and vanilla, beating on high speed for about 1 minute until combined. Scrape the bowl as needed. Gradually add the dry ingredients to the wet ingredients and mix on low speed until just combined. If the dough feels too soft and sticky, add an extra tablespoon of flour.
- Roll the dough: Divide the dough into two equal portions. Dust two large pieces of parchment paper or silicone mats with cocoa powder or flour. Place each dough half on the prepared surfaces and roll out evenly to about 1/4-inch thickness, dusting the rolling pin with cocoa powder or flour to prevent sticking.
- Chill the dough: Lightly dust one rolled dough with cocoa powder or flour and place a piece of parchment paper on top. Stack the other rolled dough on top. Cover with plastic wrap or aluminum foil and refrigerate for at least 1-2 hours, or up to 2 days, to firm up the dough for easier cutting.
- Preheat oven and shape cookies: Set oven to 350°F (177°C) and line 2-3 baking sheets with parchment paper or silicone mats. Remove the top dough sheet from the fridge and cut into Halloween shapes using cookie cutters. Re-roll scraps quickly on a lightly dusted surface and continue cutting shapes. If dough softens, refrigerate unused dough for 10 minutes before cutting again. Repeat for the second half of dough.
- Bake and cool: Arrange cookies about 3 inches apart on baking sheets. Bake for 11-12 minutes until edges are set. Rotate baking sheets halfway if needed. Let cookies cool on the sheet for 5 minutes before transferring to a wire rack to cool completely.
- Prepare icing: Make royal or easy cookie icing as preferred. Divide icing into separate bowls and tint with gel food coloring, starting with a few drops and adjusting to desired hues. Use Wilton #4 piping tips for outlining and flooding.
- Decorate the cookies: Fill piping bags with colored icing and pipe borders followed by filling centers with a thin layer to dry quickly. Add sprinkles or layered designs as desired, using royal icing for fine details or multiple layers. Allow about 2 hours for royal icing or 24 hours for easy glaze icing to dry.
- Let icing set and store: Let cookies dry uncovered at room temperature, or speed up drying by refrigerating. Enjoy immediately or store in a tightly covered container at room temperature for up to 5 days, or refrigerate up to 10 days. Plain or decorated cookies also freeze well up to 3 months.
Notes
- Freezing Instructions: Freeze decorated or plain cookies up to 3 months after icing fully sets. Layer between parchment sheets in airtight containers. Cookie dough can also be frozen before rolling by shaping into disks, wrapping well, and thawing in the refrigerator before rolling and chilling.
- Special Tools: Glass mixing bowl, whisk, electric mixer (hand or stand), rolling pin or adjustable rolling pin, baking sheets, parchment paper or silicone mats, cookie cutters, cooling rack, Wilton piping tips #4 and #2, piping bags, couplers, squeeze bottles, toothpicks or needle scribers, eyeball candies, and gel food coloring (orange, super black, mint green).
- Icing Tips: Royal icing is best for fine details and layering; easy cookie icing is quicker but takes longer to dry. Adjust icing thickness by beating in additional confectioners’ sugar for piping precision.
- Work quickly when rolling and cutting the dough to prevent softening; refrigerate scraps as needed to maintain firmness.
Nutrition
- Serving Size: 1 cookie (approx. 3-4 inch)
- Calories: 120
- Sugar: 12g
- Sodium: 45mg
- Fat: 6g
- Saturated Fat: 3.5g
- Unsaturated Fat: 2g
- Trans Fat: 0g
- Carbohydrates: 16g
- Fiber: 1.5g
- Protein: 2g
- Cholesterol: 25mg


