

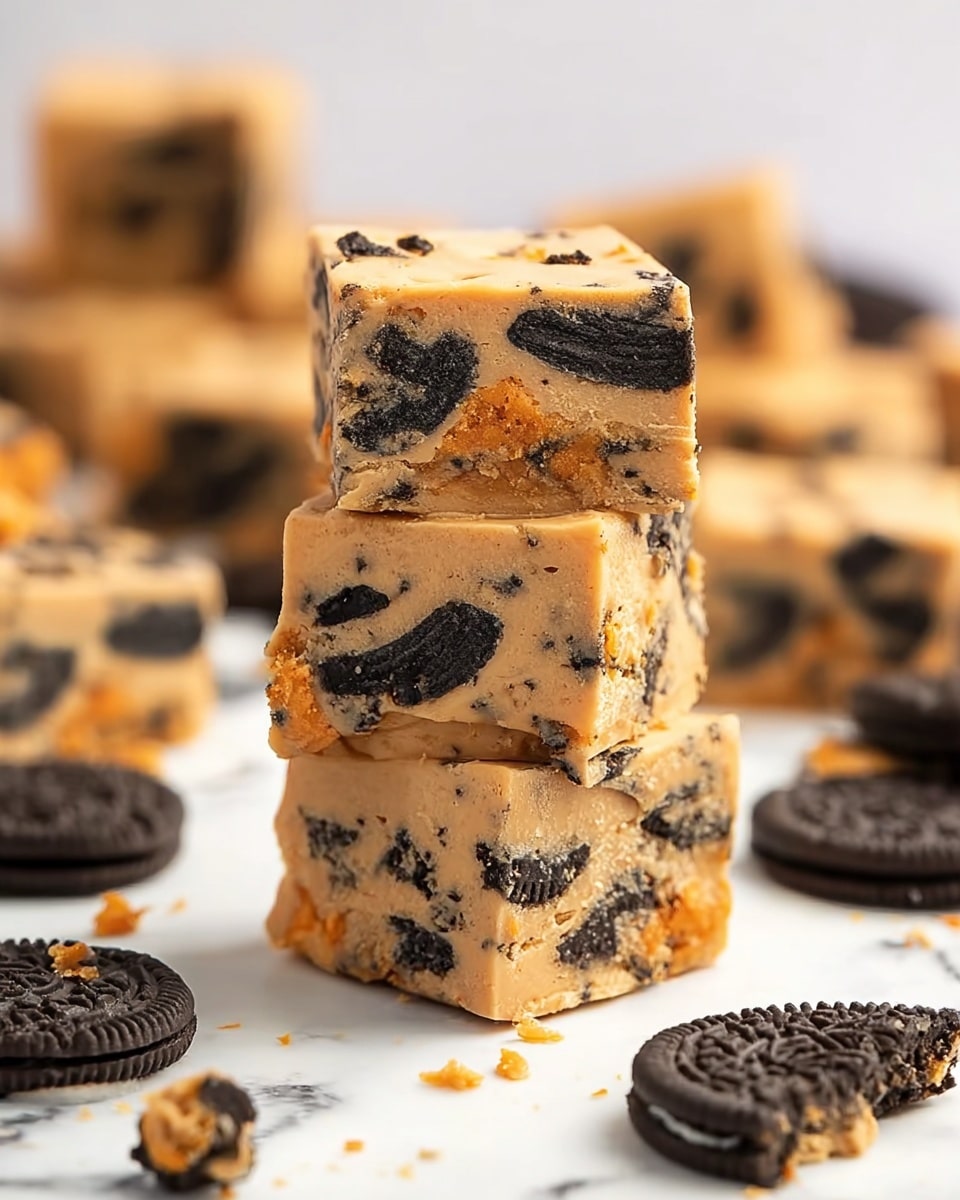
If you’re hunting for a show-stopping sweet to serve this spooky season, I’ve got just the thing for you — a fan-freaking-tastic Halloween Cookies and Cream Fudge Recipe that’s creamy, festive, and downright addictive. I absolutely love how this fudge balances rich white chocolate and crunchy Oreo cookies with a fun pop of orange color that’s perfect for Halloween festivities. Trust me, once you try this, your recipe box will thank you!
Why You’ll Love This Recipe
- Super Simple & Fast: This fudge comes together in under 5 minutes — perfect when you need a last-minute treat.
- Perfect Halloween Vibes: The orange gel food coloring gives it that seasonal pop without changing the texture or taste.
- Textural Delight: Crunchy Oreo bits throughout packed into smooth, creamy fudge — everyone’s favorite combo.
- No Baking Required: You don’t need an oven; a microwave makes it so easy for any skill level.

Ingredients You’ll Need
This recipe is refreshingly simple, which I love — just a handful of ingredients come together perfectly. When shopping, look for high-quality white chocolate chips to get that creamy melt and classic Oreos for the crunch. The orange gel food coloring is key since gel colors are more vibrant and won’t thin your fudge like liquid ones can.
- White chocolate chips: Choose good-quality chips that melt smoothly without seizing up.
- Sweetened condensed milk: This adds creaminess and a luscious texture; it’s the fudge’s backbone.
- Orange gel food coloring: Gel coloring packs more power without messing with your fudge’s consistency.
- Oreo cookies: Roughly chopped for texture—feel free to save some crumbs to press on top for eye appeal.
Variations
One of the best things about this Halloween Cookies and Cream Fudge Recipe is how easy it is to customize. I like to switch things up depending on who I’m serving it to — and it still turns out beautifully every time. Don’t hesitate to make this recipe your own!
- Mint Oreos: I swapped regular Oreos for mint ones once, and the fudge had this delightful cool twist everyone loved.
- Dairy-Free Option: Use dairy-free white chocolate and condensed coconut milk to make it vegan-friendly — just watch your melting times.
- Extra Festive: Add Halloween-themed sprinkles on top along with the reserved Oreo crumbs to amp up the spooky factor.
- Peanut Butter Swirl: Swirl in some peanut butter before setting for a rich, nutty spin I recently discovered.
How to Make Halloween Cookies and Cream Fudge Recipe
Step 1: Melt the White Chocolate and Sweetened Condensed Milk
Grab a large microwave-safe bowl and toss in the white chocolate chips and sweetened condensed milk together. Microwave for 2 minutes at medium power to start melting, then stir very well. I like to use a flexible spatula here so I can scrape the bowl’s sides and bottom, making sure nothing stays unmelted — sometimes chips like to cling! If it’s not silky smooth and combined after 2 minutes, zapping for an extra 30 seconds usually finishes the job nicely.
Step 2: Add the Orange Gel Food Coloring
Now for that festive touch: stir in your orange gel food coloring, starting with just an eighth of a teaspoon and adding more if you want a deeper hue. Because it’s gel-based, it blends in easily without making your fudge runny or sticky. I’ve learned to add it little by little to avoid going too bright — you want a lovely warm pumpkin shade, not neon!
Step 3: Fold in the Oreo Cookie Pieces
Stir in about 2 cups of roughly chopped Oreos for that iconic cookies-and-cream texture. I always reserve about a quarter cup of the crumbs to press on top of the fudge before it sets, which gives it such a cute finishing touch — plus, everyone loves the extra crunch right at the surface.
Step 4: Pour & Set
Pour your rich, creamy mixture into a 7×11 or 9×9-inch baking dish, spreading evenly with your spatula. Press those reserved Oreo crumbs gently but firmly on top. Let it sit at room temperature for a few hours until it firms up perfectly, or pop it in the fridge for about an hour if you’re impatient like me. Just keep an eye on it to make sure it’s fully set but not too cold and crumbly.
Pro Tips for Making Halloween Cookies and Cream Fudge Recipe
- Use a Silicone Spatula: It helps scrape every bit of fudge out of the bowl without wasting any – a small tool that makes a big difference!
- Don’t Overheat: Melting white chocolate can be tricky—microwave in short bursts and stir often to avoid graininess or burning.
- Let Fudge Fully Set: Rushing the set time leads to a softer fudge that’s harder to cut cleanly; patience pays off in cleaner slices.
- Chop Oreos Coarsely: Too small and they’ll get soggy; a nice chunk keeps that satisfying crunch every bite.
How to Serve Halloween Cookies and Cream Fudge Recipe
Garnishes
I’m a huge fan of finishing with a sprinkle of crushed Oreos on top along with a few candy eyeballs when serving around Halloween — it’s playful and adds texture. For a more decadent presentation, a drizzle of melted dark chocolate over the top creates a gorgeous contrast. It’s the little touches that make this fudge *pop* visually and flavor-wise!
Side Dishes
This fudge pairs well with a simple, salty snack like spiced nuts or salted popcorn, which balances its sweetness beautifully. I also love serving it alongside warm apple cider or a rich hot chocolate for those chillier fall evenings — the combo is divine and cozy.
Creative Ways to Present
For parties, I like cutting the fudge into bite-size squares and placing each piece in a mini cupcake liner decorated with Halloween colors. Another fun idea is to arrange slices on a festive platter with edible spider web cookie decorations or themed picks — your guests will definitely be impressed by the spooky charm!
Make Ahead and Storage
Storing Leftovers
I keep leftover fudge covered tightly with plastic wrap or in an airtight container at room temperature — it lasts beautifully for up to a week. This fudge actually tastes better after sitting overnight, so if you can wait, it’s worth it. Just store it somewhere cool and dry to maintain that perfect creamy texture.
Freezing
If you want to keep the fudge longer, freezing works great. Wrap pieces individually in parchment paper and then place in a freezer-safe bag. When you thaw it in the fridge overnight, the texture stays just as good — I learned it’s best to let it come slowly back to avoid condensation affecting the finish.
Reheating
I typically don’t reheat fudge since it’s best enjoyed chilled or at room temperature. But if it feels too firm out of the fridge, letting it sit for 15 minutes before serving softens it nicely without the risk of melting it down.
FAQs
-
Can I use regular food coloring instead of gel for this Halloween Cookies and Cream Fudge Recipe?
While you can technically use regular liquid food coloring, it’s not recommended because it might thin out the fudge, making it grainy or sticky. Gel food coloring provides vibrant color without altering the fudge’s texture, so it’s definitely the better choice here.
-
What’s the best way to chop Oreos for this fudge?
I find that chopping Oreos into rough chunks about ¼ to ½ inch gives the best texture. Pieces that are too small tend to get soggy and lose their crunch, which is a big part of what makes this fudge so irresistible.
-
Can I make this fudge without a microwave?
Absolutely! You can melt the white chocolate and sweetened condensed milk together using a double boiler on the stove. Just heat gently and stir frequently until smooth, then continue with the recipe steps as usual.
-
How long does this fudge stay fresh?
Stored properly in an airtight container at room temperature, it stays fresh for about a week. Keeping it in the fridge can prolong freshness a bit longer, but I prefer the room-temp texture for serving and slicing.
Final Thoughts
I can’t recommend this Halloween Cookies and Cream Fudge Recipe enough — it’s become my go-to festive treat for fall and Halloween parties because it’s so quick, easy, and crowd-pleasing. Every time I make it, I get the same “wow” reaction from friends and family, and it’s always gone in a flash. Give it a try yourself and watch it become a favorite in your kitchen, too. I promise, you’ll be coming back to this one year after year.
Print
Halloween Cookies and Cream Fudge Recipe
- Prep Time: 2 minutes
- Cook Time: 3 minutes
- Total Time: 5 minutes
- Yield: 16 servings (approximately 1 inch squares)
- Category: Dessert
- Method: No-Cook
- Cuisine: American
Description
This Halloween Cookies and Cream Fudge combines creamy white chocolate with sweetened condensed milk and crunchy Oreo cookies, enhanced with festive orange gel food coloring. Perfect for a spooky treat, this no-bake fudge is quick to prepare and sets beautifully for a delightful dessert or party snack.
Ingredients
Fudge Base
- 18 oz white chocolate chips
- 14 oz sweetened condensed milk
- 1/8 – 1/4 tsp orange gel food coloring
Add-ins
- 2 cups roughly chopped Oreo cookies
- Additional 1/4 cup Oreo cookie pieces (for topping)
Instructions
- Combine ingredients: Place the white chocolate chips and sweetened condensed milk in a large microwave-safe bowl, ensuring the bowl is large enough to stir comfortably.
- Microwave heating: Microwave the mixture for 2 minutes to begin melting the chocolate, then stir thoroughly to combine into a smooth mixture.
- Additional melting: If needed, microwave the mixture for an additional 30 seconds to achieve a fully melted and smooth consistency, stirring well after.
- Add coloring: Stir in the orange gel food coloring evenly until the fudge has a consistent festive orange hue.
- Incorporate Oreos: Fold in 2 cups of roughly chopped Oreo cookies gently so they are well distributed throughout the fudge while retaining some texture.
- Prepare pan: Pour the fudge mixture into a 7×11 or 9×9 baking dish and spread it evenly with a spatula.
- Add topping: Press the reserved 1/4 cup of Oreo cookie pieces on top of the fudge to add extra crunch and decorative appeal.
- Set fudge: Allow the fudge to set at room temperature for several hours until firm, or accelerate the process by refrigerating for about one hour before serving.
Notes
- Use a microwave-safe bowl large enough to allow stirring without spilling.
- Adjust the amount of orange gel food coloring to your preferred color intensity.
- Ensure the fudge is completely set before cutting for clean slices.
- This fudge can be stored in an airtight container in the refrigerator for up to one week.
- Room temperature setting takes longer but gives a soft texture; refrigeration results in a firmer fudge.
Nutrition
- Serving Size: 1 piece (approx. 1 inch square)
- Calories: 180
- Sugar: 18g
- Sodium: 70mg
- Fat: 10g
- Saturated Fat: 6g
- Unsaturated Fat: 3g
- Trans Fat: 0g
- Carbohydrates: 22g
- Fiber: 1g
- Protein: 2g
- Cholesterol: 5mg


