

If you’re looking for a festive, fun, and absolutely delicious way to impress your friends and family this spooky season, I’ve got just the thing for you. This Halloween Charcuterie Board Recipe is one of my favorite go-to party starters because it’s not only easy to make but also packs all the visual and flavor thrills you want for a Halloween gathering. I promise, once you try this, you’re going to want to create it every fall!
Why You’ll Love This Recipe
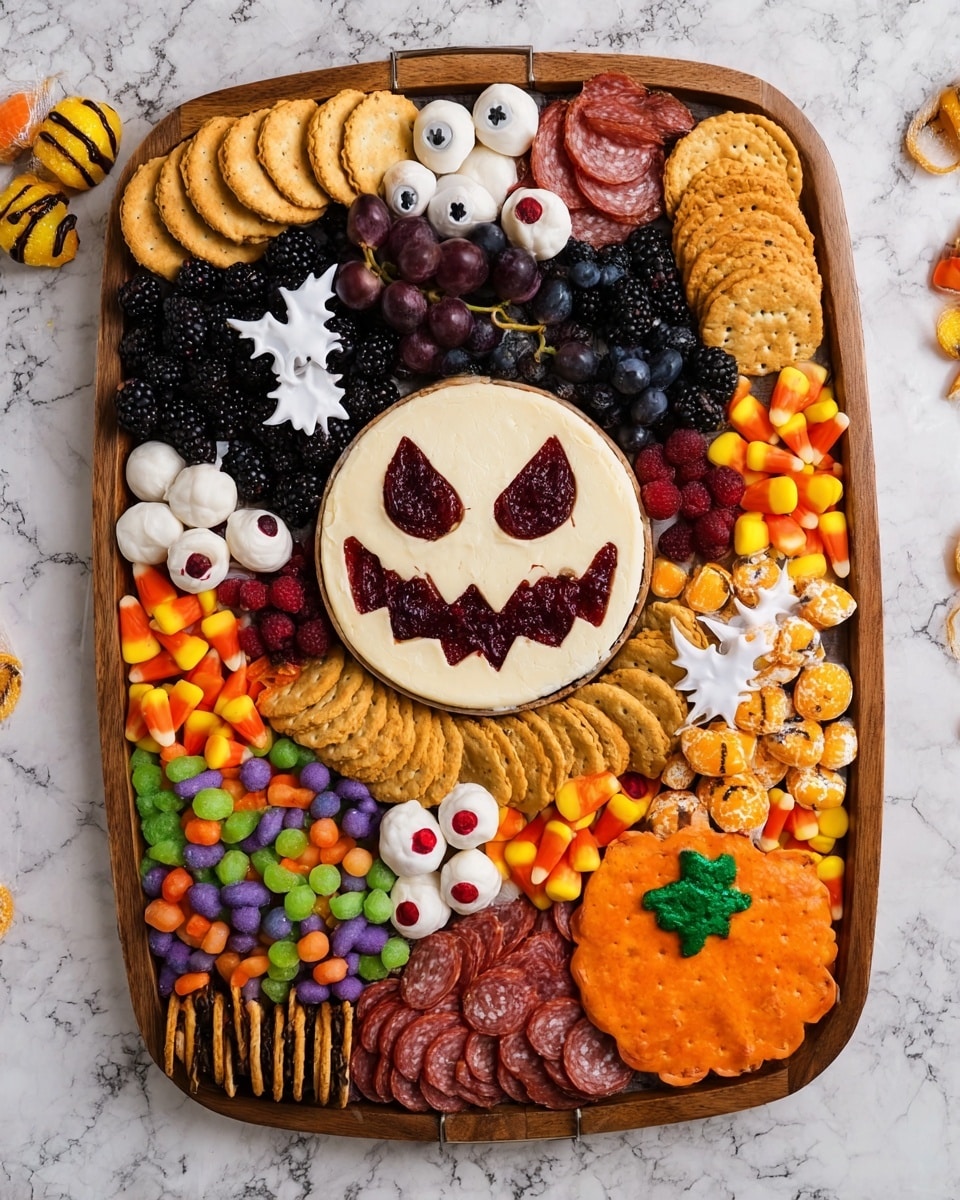
- Spooky and stunning presentation: The Jack Skellington brie centerpiece will wow guests from the get-go.
- No-cook, easy assembly: Perfect for those who want festive flair without fuss in the kitchen.
- Sweet and savory balance: A mix of cheeses, meats, fruits, and candies for every craving.
- Customizable: Swap or add your favorite Halloween treats and cheeses to make it uniquely yours.

Ingredients You’ll Need
Choosing the right mix of ingredients is key to getting the perfect blend of flavors and that hauntingly beautiful look. I like picking a mix of sweet berries, savory cheeses, and a few playful candies to truly capture the Halloween spirit.
- Brie wheel: This is the star—soft, creamy, and perfect for carving.
- Dark-colored jam (like blackberry or blueberry): Adds a gorgeous contrast and a touch of sweetness.
- Blueberries and blackberries: Use fresh and plump for that juicy burst and spooky dark tone.
- Purple grapes: These add mellow sweetness and a pop of color.
- Black olives: Perfect salty bites and great ‘eyes’ when paired with candy eyeballs.
- Cubed cheese: Pick your favorite type like cheddar or gouda for variety and bite-sized ease.
- Sliced white cheese: Great for shaping with Halloween cookie cutters.
- Mozzarella pearls: Small, mild, and perfect to decorate with candy eyes.
- Sliced salami: Adds savory richness and texture.
- Assorted crackers: Bring different flavors and textures to each bite.
- Candy eyeballs: The fun Halloween touch that brings the board to life.
- Pretzels (both chocolate-covered and regular): For sweet-salty crunch variety.
- Halloween cookies and candy: Use your favorites to fill in gaps and add festive charm.
- Serving tray or large wood cutting board: Essential for a beautiful display.
- Halloween cookie cutters: For shaping cheese slices into fun thematic shapes.
Variations
I love making this Halloween Charcuterie Board Recipe my own each year by swapping cheeses and candies or adding themed touches based on who’s coming over. Feel free to experiment to match your favorites and dietary needs – that’s the fun part!
- Variation: For a vegetarian board, swap salami for roasted nuts or marinated vegetables – my guests loved the crunchy protein alternatives!
- Variation: Try different dark jams like blackcurrant or cherry preserves depending on what’s in season.
- Variation: For a kid-friendly version, use milder cheeses and skip olives in favor of more candy eyes on mozzarella pearls.
- Variation: Add a pumpkin spice flavored dip or honey mustard to jazz up cracker combos.
How to Make Halloween Charcuterie Board Recipe
Step 1: Create Your Spooky Brie Centerpiece
Place your Brie wheel right in the center of your serving board or platter. I like using a wood board because it adds rustic charm. Next, take the edge of a knife or toothpick and gently outline the iconic Jack Skellington face onto the brie. This part can be a little tricky, so go slow! Once you have the face outlined, carefully scoop out the cheese from the eye and mouth areas using a small serrated knife or spoon to create little cavities.
Step 2: Fill the Face with Dark Jam
This is where you’ll add that beautiful pop of color! Spoon your chosen dark jam—blackberry is my fave—into the scooped-out holes. The jam’s deep tone stacks perfectly against the creamy white brie and looks eerily festive.
Step 3: Arrange Your Berries and Cheese Shapes
Start arranging blueberries, blackberries, and purple grapes around the brie wheel. Fresh berries add freshness and natural sweetness, plus they look like little spooky gems when clustered. Then, take your white cheese slices and use Halloween cookie cutters (think bats, ghosts, pumpkins) to cut out fun shapes. Nestle these on top of your berries for a playful, scary contrast that also tastes great.
Step 4: Add Candy Eyeballs to Olives and Mozzarella
I discovered this trick last year and it’s a total crowd-pleaser: stick candy eyeballs onto black olives and mozzarella pearls. It’s like creating little monsters or spooky eyes staring up at your guests. Use a dab of cream cheese as glue if they won’t stick on their own. Position them where they’ll surprise and delight!
Step 5: Fill the Board with Meats, Crackers, and Treats
Now the fun part—surround your masterpiece with sliced salami, cubed cheese, assorted crackers, and both chocolate-covered and regular pretzels. Fill any empty spaces with Halloween cookies and candy to complete the look. It’s all about varying textures, shapes, and flavors so everyone finds their favorite bite.
Pro Tips for Making Halloween Charcuterie Board Recipe
- Carving with precision: Use a toothpick to gently sketch Jack Skellington’s face before carving to avoid mistakes.
- Jam consistency matters: I prefer thick jams that won’t drip or run off the cheese cavities, keeping your board tidy.
- Room temperature cheese: Let your brie come to room temp before carving to make it easier and prevent crumbling.
- Balance flavors smartly: Don’t overcrowd the board—leave some space so guests can easily grab their favorites without a mess.
How to Serve Halloween Charcuterie Board Recipe
Garnishes
I love adding fresh rosemary sprigs and edible flowers around the edges whenever possible—it adds an almost magical forest vibe to the Halloween theme. If you want to stay on theme, tiny plastic spiders or skeleton figurines placed strategically can make it extra spooky without sacrificing edibility.
Side Dishes
Since this charcuterie board is heavy on savory and sweet snacks, I usually pair it with a crisp apple cider or a batch of warm mulled wine. For a heartier meal, serve alongside a pumpkin soup or witch’s chili to keep that fall feeling going.
Creative Ways to Present
I once laid out my Halloween Charcuterie Board Recipe on a vintage wooden crate with black linen underneath and used mini battery-powered flickering candles around it for atmosphere; guests loved the vibe. You could also place it on a large platter shaped like a pumpkin or skull, or use themed napkins and plates to complete the experience.
Make Ahead and Storage
Storing Leftovers
If you have any leftovers (which might be rare!), cover the board tightly with plastic wrap and store in the fridge. I like to remove any cookies or chocolate before refrigerating so they don’t get soggy or melt.
Freezing
This Halloween Charcuterie Board Recipe doesn’t freeze well because of the fresh fruit, cheeses, and crackers involved. Instead, I recommend making the brie centerpiece fresh and assembling the board the same day you plan to serve it for best quality.
Reheating
This board is meant to be enjoyed cold or at room temperature, so you don’t need to heat it up. If you want warm cheese bites, try melting small pieces of salami or cheese separately and serving alongside the board.
FAQs
-
Can I prepare the Halloween Charcuterie Board Recipe in advance?
You can prep most ingredients ahead like washing berries, slicing cheeses, and arranging candy eyeballs on mozzarella pearls. However, it’s best to assemble the brie centerpiece and final board a few hours before serving to maintain freshness and avoid sogginess.
-
What can I use if I don’t have candy eyeballs?
If candy eyeballs are tricky to find, try using tiny dots of cream cheese with small blueberries or olives for eyes. You could also draw eyes on small pieces of edible wafer paper or rice paper if you’re feeling crafty.
-
Is this recipe suitable for kids?
Absolutely! Just be mindful of any choking hazards like whole grapes for small kids. Use milder cheeses and increase sweet treats to appeal to younger palates. The playful shapes and candy eyes make it a big hit with children.
-
How do I keep crackers from getting soggy?
Place crackers in small piles away from juicy fruits and moist cheese. You can also serve some crackers on the side to keep them fresh longer during the party.
Final Thoughts
This Halloween Charcuterie Board Recipe holds a special place in my fall traditions because it brings everyone together around something simple, delicious, and a little spooky-fun. Whether you’re hosting a big party or just want a festive treat for the family, it’s a no-fail way to impress without stress. Trust me, once you put together these spooky bites and watch your guests’ faces light up, you’ll be hooked, too. Give it a try and have a boo-tiful Halloween season!
Print
Halloween Charcuterie Board Recipe
- Prep Time: 20 minutes
- Cook Time: 0 minutes
- Total Time: 20 minutes
- Yield: 8 servings
- Category: Appetizer
- Method: No-Cook
- Cuisine: American
Description
Create a spooky and festive Halloween Charcuterie Board featuring a Brie wheel decorated with a Jack Skellington face, surrounded by a variety of cheeses, berries, cured meats, crackers, pretzels, and Halloween-themed candies. This easy-to-assemble platter is perfect for Halloween parties and gatherings, combining savory and sweet elements with a fun, seasonal presentation.
Ingredients
Cheeses
- 16 ounce (454g) Brie wheel
- Cubed cheese (assorted varieties) – approximately 1 cup
- Sliced white cheese – about 1 cup
- Mozzarella pearls – ½ cup
Fruits & Olives
- Dark-colored jam such as blackberry, blueberry, or purple grape – ⅓ cup
- Blueberries – ½ cup
- Blackberries – ½ cup
- Purple grapes – ½ cup
- Black olives – ½ cup
Meats & Crackers
- Sliced salami – ½ cup
- Assorted crackers – 2 cups
Snacks & Decorations
- Candy eyeballs – 12 pieces
- Pretzels (chocolate-covered and regular) – 1 cup
- Halloween cookies and candy (assorted) – 1 to 1½ cups
- Serving tray or large wood cutting board – 1
- Halloween cookie cutters (small) – assorted shapes
Instructions
- Prepare the Brie: Place the Brie wheel in the center of the serving board. Using the edge of a knife or toothpick, carefully outline the face of Jack Skellington on the surface of the Brie.
- Carve the Outline: Using a small serrated knife or spoon, scoop out the cheese from the carved areas to create the facial features of Jack Skellington.
- Fill the Details: Fill the carved-out holes with the dark-colored jam to highlight the facial features and add flavor contrast.
- Arrange Berries: Surround the Brie with an assortment of fresh blueberries, blackberries, and purple grapes, creating a colorful and seasonal look.
- Shape Cheese: Use small Halloween-themed cookie cutters to cut the sliced white cheese into festive shapes. Place these shaped cheeses on top of the berries for decoration.
- Add Candy Eyeballs: Stick candy eyeballs onto the black olives and mozzarella pearls to give a spooky, fun appearance. Place them on the board evenly.
- Assemble Meats and Crackers: Arrange the sliced salami, cubed cheese, assorted crackers, and both chocolate-covered and regular pretzels around the board, filling in spaces while maintaining aesthetic appeal.
- Decorate with Halloween Treats: Fill in any remaining empty spaces on the board with Halloween cookies and candy to complete the festive display.
Notes
- Use a gentle hand when carving the Brie to avoid breaking the wheel.
- Choose dark-colored jams like blackberry or blueberry for the best contrast with the cheese.
- For added variety, include different types of cubed cheeses such as cheddar, gouda, or pepper jack.
- Use fresh, firm fruits to maintain appearance throughout the event.
- Keep the board refrigerated until serving to ensure the cheese and fruits remain fresh.
- Customize the board with your favorite savory and sweet snacks to suit your guests’ preferences.
Nutrition
- Serving Size: 1/8th of board including meats, cheeses, fruits, and snacks
- Calories: 280 kcal
- Sugar: 6 g
- Sodium: 480 mg
- Fat: 18 g
- Saturated Fat: 8 g
- Unsaturated Fat: 8 g
- Trans Fat: 0 g
- Carbohydrates: 15 g
- Fiber: 2 g
- Protein: 10 g
- Cholesterol: 35 mg


