

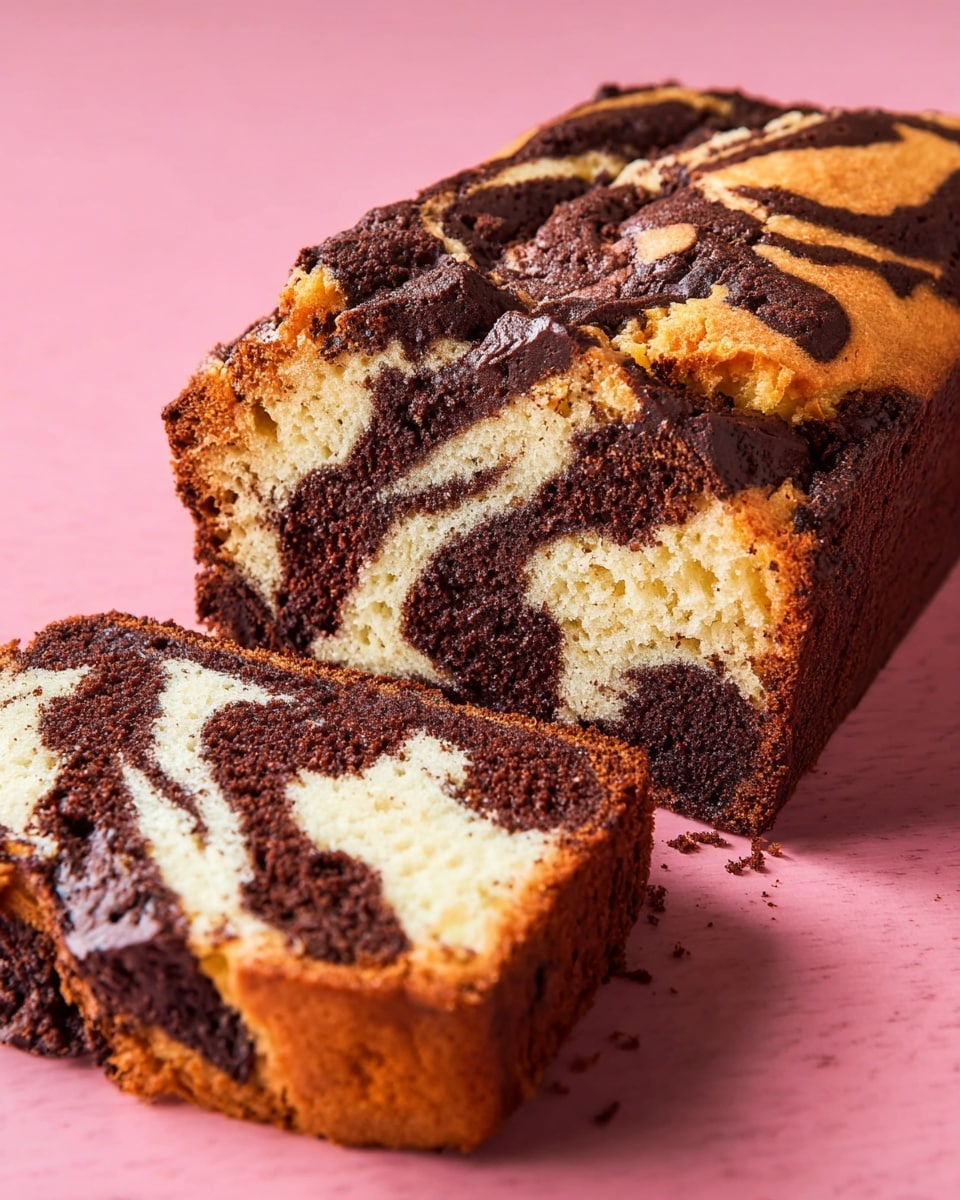
If you’re craving something visually stunning yet delightfully simple to make, this Vegan Marble Cake Recipe might just become your new favorite bake. I absolutely love this because the swirls of rich cocoa and light vanilla come together for a moist, fluffy cake that everyone—vegan or not—will enjoy. Whether you’re new to vegan baking or an old pro looking for a showstopper, keep reading because I’ve got some handy tips that’ll help you nail it every time.
Why You’ll Love This Recipe
- Easy to Make: No fancy techniques needed—just simple steps that anyone can follow at home.
- Perfect Texture: Moist and tender crumb with just the right crumb balance thanks to vegan yoghurt and butter.
- Versatile Flavor: Classic vanilla and rich cocoa swirl—familiar yet exciting in every bite.
- Impressively Presentable: The beautiful marble effect looks store-bought but is all you!

Ingredients You’ll Need
All the ingredients in this Vegan Marble Cake Recipe come together to create a balance of moistness, flavor, and lift. When you pick your vegan butter, I recommend block style for that perfect melt and creaminess in the batter. Also, using room temperature plant milk and yoghurt helps the batter come together smoothly without clumps.
- Vegan butter block style: The block melts beautifully, giving the batter richness and moisture.
- Cocoa powder: Use unsweetened for a deep chocolate flavor in your swirls.
- Boiling water: Helps bloom the cocoa powder to maximize its chocolatey intensity.
- Plain white flour: This all-purpose flour keeps the cake light and tender.
- Cornstarch: Adds a delicate crumb and softness to the cake texture.
- Baking powder & bicarbonate of soda: Work together to make the cake rise nicely.
- Fine sea salt: Enhances all the flavors in a subtle way.
- Caster sugar: Dissolves quickly, ensuring an evenly sweet cake.
- Vegan yoghurt (unflavored, unsweetened): Keeps the cake moist without any tangy overpowering.
- Plant milk (unflavored, unsweetened): I prefer soy or oat milk for creaminess, but any neutral variety works.
- Vanilla extract: Adds warmth and depth to the vanilla batter portion.
- White vinegar: Reacts with the baking soda to give a nice rise and tender crumb.
Variations
I love tweaking this Vegan Marble Cake Recipe depending on the occasion. It easily adapts to what you have on hand or the flavors you’re craving. Don’t be shy about making it your own!
- Nutty Twist: I once stirred in a handful of chopped toasted walnuts to the vanilla batter—added a lovely crunch that my family went crazy for.
- Spiced Swirl: Adding a pinch of cinnamon or a sprinkle of chili powder to the cocoa batter makes the marbled pattern even more interesting and flavorful.
- Fruit Boost: Swapping the white vinegar with apple cider vinegar and adding fresh or dried berries gives the cake a fruity zing and extra moistness.
- Gluten-Free: Try a gluten-free flour blend instead of all-purpose flour, just be mindful of the texture—it might be slightly denser but still delicious.
How to Make Vegan Marble Cake Recipe
Step 1: Prepare and Preheat
First things first: slice about 15g worth of vegan butter into thin rods and freeze them. This little trick will give you a fun surprise texture after baking. Meanwhile, preheat your oven to 160°C (320°F) and line a 2lb loaf tin with greaseproof paper—this lining makes it so easy to lift your cake out later without sticking or crumbling.
Step 2: Mix Dry Ingredients and Cocoa
Whisk your flour, cornstarch, baking powder, bicarbonate of soda, and salt together in a medium bowl—that’s your dry base. Then, in a small bowl, stir cocoa powder into boiling water until smooth and dark—that blooming step really intensifies the chocolate flavor.
Step 3: Blend Wet Ingredients
Using a high-speed blender or a whisk, combine caster sugar, vegan yoghurt, plant milk, vanilla extract, white vinegar, and melted vegan butter until super smooth. Gradually add this wet mixture to your dry ingredients—do it in small increments while whisking gently so you get a silky, lump-free batter without overmixing.
Step 4: Create the Marble Effect
Split the batter almost in half, then whisk the cocoa mixture into one half. In your loaf tin, alternate spooning vanilla and chocolate batter layers. I usually start with a vanilla layer to get a nice contrast at the base. Then, use a bamboo skewer to swirl the layers gently—don’t overdo it or you’ll lose the pretty marbled look!
Step 5: Add the Secret Butter Strip and Bake
Lay your frozen strip of vegan butter right down the center of the batter in the loaf tin. This melts during baking, giving a slightly gooey ribbon effect in the middle that I adore. Bake on a preheated baking sheet for about 60 minutes. You’ll know it’s done when a skewer inserted near the center comes out mostly clean with just a few moist crumbs.
Step 6: Cool and Enjoy
Let the cake cool in the tin for 15 minutes—this resting period lets it firm up so it won’t break when you remove it. Then, transfer it to a wire rack to cool completely before slicing. Trust me, the full-cool down makes slicing clean and keeps the texture perfect for those beautiful swirls to shine.
Pro Tips for Making Vegan Marble Cake Recipe
- Room Temperature Ingredients: I always let plant milk and yoghurt sit out before mixing—it prevents lumps and ensures a smooth batter.
- Don’t Overmix: When combining wet and dry, whisk until just smooth. Overmixing can make your cake dense.
- Marbling Technique: Swirling gently with a skewer instead of stirring vigorously keeps the beautiful pattern intact.
- Use a Baking Sheet: Placing your loaf tin on a baking sheet prevents drips in the oven and promotes even baking.
How to Serve Vegan Marble Cake Recipe
Garnishes
I love keeping it simple—a light dusting of powdered sugar or some toasted almond flakes scattered on top brings just enough extra flair. For celebrations, a drizzle of vegan chocolate ganache or a dollop of coconut whipped cream can turn it into a decadent treat.
Side Dishes
Pair your vegan marble cake slice with fresh berries or a warm cup of coffee or chai tea—this combo has become my go-to afternoon pick-me-up. It’s also fantastic alongside a fruit compote or some dairy-free vanilla ice cream for dessert.
Creative Ways to Present
For birthdays or brunch, I’ve served this cake sliced vertically to show off the marbled cross-section on each plate, adding edible flowers or fresh mint leaves for color. Another fun idea is to make mini loaf cakes in individual tins—perfect for gifting or portion control!
Make Ahead and Storage
Storing Leftovers
I wrap the cooled vegan marble cake tightly in plastic wrap and keep it in an airtight container at room temperature for up to three days. It stays moist and soft, I promise. If your kitchen is warm, storing it in the fridge works too, just bring it back to room temp before serving for best flavor.
Freezing
I’ve frozen slices wrapped individually in parchment and foil for up to a month. When it’s time to enjoy, thaw overnight in the fridge or for a few hours on the counter—it retains that lovely texture and flavor.
Reheating
To warm up slices, I pop them in a toaster oven or microwave for just 10-15 seconds. You’ll get that fresh-baked warmth and softness back, making every bite feel just like the first.
FAQs
-
Can I use other types of plant milk in this Vegan Marble Cake Recipe?
Yes! You can use almond, oat, soy, or any plant milk you prefer. Just make sure it’s unsweetened and unflavored for the best results so it doesn’t affect the cake’s flavor.
-
What can I substitute for vegan yoghurt if I don’t have any?
If you’re out of vegan yoghurt, a flax egg or applesauce can work as a moistening substitute, though the texture might be slightly different. You might need to experiment with quantities—start with ¼ cup of applesauce for 150g yoghurt.
-
How do I know when the Vegan Marble Cake is fully baked?
Use a bamboo skewer or toothpick inserted near the center. It should come out mostly clean with just a few moist crumbs, not wet batter. Every oven is different, so keep an eye on it after 55 minutes.
-
Can I make this cake nut-free?
Absolutely! This Vegan Marble Cake Recipe contains no nuts by default. Just avoid adding any optional nut variations if you need it nut-free for allergies or preferences.
Final Thoughts
This Vegan Marble Cake Recipe has become a staple in my kitchen for its beautiful look and deliciously tender crumb. It’s a genuine crowd-pleaser whether you’re serving guests or just indulging yourself. I’m confident you’ll enjoy making and eating it as much as I do—give it a try the next time you want a cake that’s simple, stunning, and truly satisfying.
Print
Vegan Marble Cake Recipe
- Prep Time: 15 minutes
- Cook Time: 60 minutes
- Total Time: 75 minutes
- Yield: 8 servings
- Category: Dessert
- Method: Baking
- Cuisine: Vegan, Western
- Diet: Vegan
Description
This Vegan Marble Cake combines rich cocoa and creamy vanilla batters swirled together for a beautiful marble effect. Made with plant-based ingredients including vegan butter, yoghurt, and milk, this moist and fluffy cake is perfect for those seeking a delicious dairy-free dessert. The cake is baked to perfection in a loaf tin, offering a delightful treat that’s both visually striking and full of comforting flavors.
Ingredients
Butter
- 170 g vegan butter block style, melted, plus 15 g extra refrigerated
Dry Ingredients
- 40 g cocoa powder
- 250 g plain white flour (all purpose flour)
- 2 tablespoon cornstarch (cornflour)
- 1 ½ teaspoon baking powder
- ¼ teaspoon bicarbonate of soda (baking soda)
- ½ teaspoon fine sea salt
- 280 g caster sugar (white superfine sugar)
Wet Ingredients
- 4 tablespoon boiling water
- 150 g vegan yoghurt, unflavoured and unsweetened at room temperature
- 180 ml plant milk, unflavoured and unsweetened at room temperature
- 1 tablespoon vanilla extract
- 1 tablespoon white vinegar (lemon juice, rice vinegar or white wine vinegar can also be used)
Instructions
- Prepare the Butter: Slice off two corners from the block of vegan butter to create two thin oblong rods totaling around 15 g. Pinch them together into one long strip and place in the freezer to firm up.
- Preheat the Oven and Prepare Tin: Preheat your oven to 160 °C (320 °F) and place a baking sheet inside. Line a 2lb loaf tin with greaseproof paper to prevent sticking.
- Make Cocoa Mixture and Dry Ingredients: In a small bowl, whisk the cocoa powder with the boiling water until smooth. Set this mixture aside to cool. In a separate bowl, whisk together the plain white flour, cornstarch, baking powder, bicarbonate of soda, and fine sea salt. This will be your dry ingredient base.
- Blend Wet Ingredients: Using a high-speed blender, combine the caster sugar, vegan yoghurt, plant milk, vanilla extract, white vinegar, and the melted vegan butter. Blend until smooth and creamy.
- Combine Wet and Dry Ingredients: Gradually add the blended wet mixture to the dry ingredients in increments, whisking thoroughly after each addition. Stop mixing once the batter is smooth and fully combined to avoid overmixing.
- Divide Batter and Add Cocoa: Pour just under half of the batter into a clean bowl and whisk in the cooled cocoa mixture until incorporated to create the chocolate batter.
- Layer Batters in Loaf Tin: Spoon a layer of the plain vanilla batter into the bottom of the loaf tin, then add a layer of the chocolate batter on top. Alternate layers until all batter is used up, creating a marbled effect. You can also use a piping bag to alternate layers neatly.
- Create Marble Swirls and Add Butter Strip: Use a bamboo skewer to gently swirl through the batters to enhance the marble pattern without overmixing. Remove the butter strip from the freezer and lay it down the center of the batter layers for extra richness and visual appeal.
- Bake the Cake: Place the loaf tin on the preheated baking sheet and bake in the oven for 60 minutes. Check doneness by inserting a skewer in the center; it should come out clean.
- Cool the Cake: Once baked, remove the cake from the oven and allow to cool in the tin for 15 minutes. Then transfer it to a wire rack to cool completely to room temperature before slicing and serving.
Notes
- Ensure all wet ingredients (vegan yoghurt, plant milk) are at room temperature for best mixing results.
- Do not overmix the batter once combined to maintain a light texture.
- Use high-quality cocoa powder for the best chocolate flavor.
- The butter strip in the center adds moments of rich moisture and a decorative touch.
- This cake keeps well stored in an airtight container at room temperature for up to 3 days or refrigerated for up to a week.
- Substitute plant milk with your preferred variety such as almond, oat, or soy milk.
- The vinegar reacts with baking soda to help the cake rise and remain fluffy.
Nutrition
- Serving Size: 1 slice (1/8th of cake)
- Calories: 310
- Sugar: 20 g
- Sodium: 150 mg
- Fat: 15 g
- Saturated Fat: 5 g
- Unsaturated Fat: 8 g
- Trans Fat: 0 g
- Carbohydrates: 40 g
- Fiber: 2 g
- Protein: 3 g
- Cholesterol: 0 mg
