

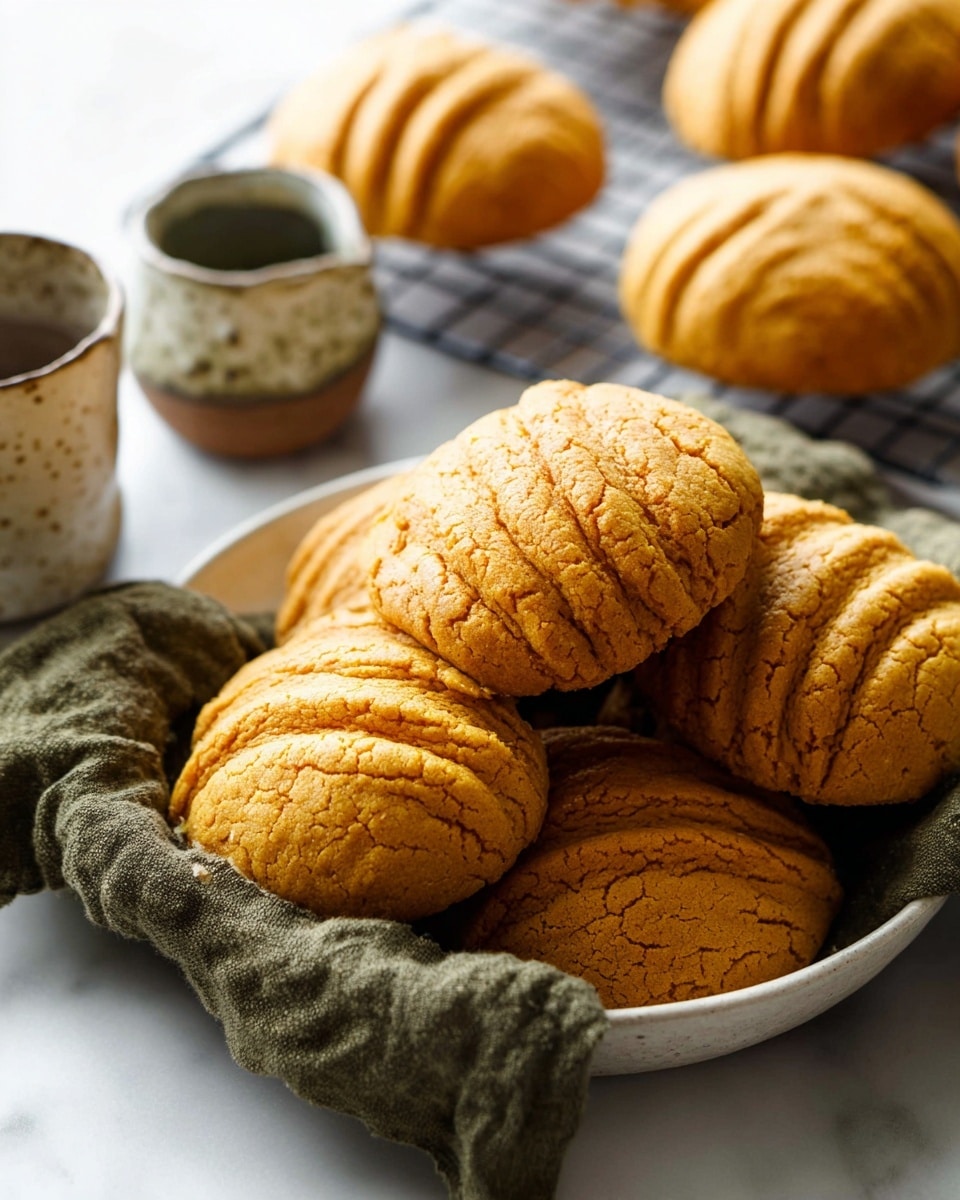
If you’re anything like me and have a soft spot for cozy, warmly spiced breads, you’re going to absolutely fall in love with this Pumpkin Conchas Recipe. These are not your everyday sweet rolls — the tender, pumpkin-infused dough paired with that iconic, crumbly concha topping has a way of making mornings feel like a special occasion. When I first tried making these, I was blown away by how the pumpkin puree adds moisture and that subtle fall flavor, without being overpowering. Stick around, and I’ll walk you through everything you need to make your own batch of these fan-freaking-tastic pumpkin conchas!
Why You’ll Love This Recipe
- Perfect Fall Flavors: Pumpkin puree and warm spices like cinnamon and nutmeg blend beautifully to create that classic autumn vibe.
- Soft and Moist Dough: The pumpkin keeps the dough tender and sticky in the best possible way—no dry bites here.
- Traditional Concha Topping: The crumbly, sweet topping adds that iconic texture contrasting with the soft bread underneath.
- Fun and Impressive: These look gorgeous and will WOW your family or guests, but the steps are totally doable, even if you’re new to yeast baking.

Ingredients You’ll Need
The magic of this Pumpkin Conchas Recipe lies in the balance of classic baking ingredients enhanced with pumpkin and warming spices. A quick tip: make sure your pumpkin puree is smooth and not watery to get the best dough consistency.
- Granulated Sugar: Divided for blooming yeast and sweetness in the dough.
- Active Dry Yeast: The key to getting that perfect rise; make sure it’s fresh and bubbly when activated.
- Whole Milk: Warmed gently to wake up the yeast without killing it.
- All-Purpose Flour: Forms the base of the dough and topping; measure carefully.
- Light Brown Sugar: Adds a subtle molasses flavor that warms up the dough.
- Pumpkin Pie Spice: The aromatic blend that really says “fall!” in every bite.
- Fine Salt: Balances the sweetness perfectly.
- Ground Cinnamon & Nutmeg: Additional spices that layer in complexity.
- Unsalted Butter: Softened, enhances richness in both dough and topping.
- Large Eggs: Divided for the dough and egg wash; they add structure and shine.
- Pumpkin Puree: The star ingredient that keeps the dough moist and flavorful.
- Powdered Sugar: For that sweet, delicate concha topping texture.
- Vanilla Extract: Brings a lovely, mellow aroma to the topping.
- Orange Gel Food Coloring (Optional): Just a few drops to give the topping that classic pumpkin-inspired hue.
Variations
I love making this Pumpkin Conchas Recipe my own by switching things up depending on the season or mood. Feel free to customize it—you’ll discover what fits your taste best.
- Spiced-Up Topping: Once, I experimented by adding a pinch of ground cloves and ginger into the concha topping, and it took the flavor to the next level.
- Vegan Adaptation: I’ve tried swapping butter with coconut oil and using a flax egg; it’s a bit different but still delicious!
- Chocolate Drizzle: For a decadent touch, drizzle melted chocolate on top of the baked conchas—my family goes crazy for this twist.
- Full Pumpkin Spice Dough: Up the pumpkin pie spice and add a little maple syrup instead of brown sugar for extra fall flair.
How to Make Pumpkin Conchas Recipe
Step 1: Wake Up Your Yeast
This is a crucial moment! I whisk together 1 tablespoon of granulated sugar, active dry yeast, and warm milk (110-115°F). Cover it and wait about 10 minutes until the surface gets bubbly and foamy. When I first started baking, I learned the hard way that if this mixture isn’t alive and frothy, your dough won’t rise properly. If it’s quiet and flat, toss that yeast and start fresh.
Step 2: Mix the Dry Ingredients
In my stand mixer bowl, I whisk together flour, the remaining granulated sugar, brown sugar, pumpkin pie spice, salt, cinnamon, and nutmeg. Then, I use the paddle attachment to blend in the softened butter until the mixture looks crumbly—kind of like coarse sand. This step gives the dough its tender crumb and richness.
Step 3: Combine Wet Ingredients
In a separate bowl, whisk 2 eggs with the pumpkin puree until smooth. This mixture adds moisture and subtle sweetness. Next, switch to the dough hook and gradually add the yeast mixture to the dry ingredients, followed by the pumpkin-egg mix. Knead on medium speed for about 5-6 minutes. You’ll feel the dough getting smooth and elastic, but still nicely sticky—which is exactly what you want.
Step 4: First Rise
Transfer the dough to a large greased bowl, cover it with plastic wrap, and find a warm, draft-free spot for it to rise. Patience is key here—it should double in size, which usually takes about 1½ to 2 hours. I like to preheat my oven slightly, then turn it off, and place the dough bowl inside with the oven door closed; it creates an ideal cozy environment.
Step 5: Shape Your Conchas
Once risen, punch down the dough to gently release the air and let it rest for 5 minutes. Divide it into 12 equal pieces and roll each into a ball. The dough is sticky here, so don’t be tempted to add extra flour—just grease your hands lightly with oil or cooking spray. Place 4 balls on each parchment-lined baking sheet. Cover loosely and let them rise again, about 45 minutes to an hour, until fluffy and puffy.
Step 6: Make the Signature Topping
I mix the concha topping by beating flour, powdered sugar, butter, vanilla, and optional orange gel food coloring in my stand mixer until it’s soft and pliable—kind of like Play-Doh. If you’re not using it immediately, wrap it up and refrigerate it. When ready, divide the topping into 12 balls and flatten each between plastic wrap with a tortilla press or rolling pin. This part is fun because you get to decide your pattern!
Step 7: Assemble and Bake
Preheat the oven to 350°F. I beat the final egg and brush it over each risen dough ball for that gorgeous golden shine. Then, carefully peel off the plastic wrap from each topping and place it over the dough, patting lightly to secure. Use a small knife to carve grooves in your preferred pattern—classic shell-like or a grid works perfectly. Bake for 15-17 minutes until the conchas turn a lovely golden brown. Let them cool on a rack for 10 minutes before digging in.
Pro Tips for Making Pumpkin Conchas Recipe
- Check Your Yeast: Always ensure your yeast blooms fully before mixing—it’s the difference between fluffy conchas and heavy dough.
- Don’t Add Extra Flour: The dough should be sticky; resist the urge to add flour while shaping to keep softness intact.
- Use Oil on Hands: Keep your hands greased when handling dough to prevent sticking without messing with flour ratios.
- Avoid Overcrowding Pans: Give each concha room to expand in the oven to prevent uneven baking or soggy bottoms.
How to Serve Pumpkin Conchas Recipe
Garnishes
I like to sprinkle a little powdered sugar dusting over the cooled conchas for an effortless extra touch of sweetness and a homey feel. Sometimes, I also toss a pinch of cinnamon powder over the top just before serving for a little aroma boost.
Side Dishes
These pumpkin conchas pair beautifully with a hot cup of coffee or creamy hot chocolate for breakfast or afternoon snack. I’ve also served them alongside fresh fruit like orange slices for a bright contrast, which everyone really enjoys!
Creative Ways to Present
For special occasions, I’ve arranged the pumpkin conchas in a circular wreath on a festive platter and placed little edible flowers or autumn leaves around them for an eye-catching centerpiece. You could also serve them warm with a small ramekin of whipped cinnamon butter in the middle for dipping.
Make Ahead and Storage
Storing Leftovers
I make sure to let the conchas cool completely, then store them in an airtight container at room temperature. I’ve found they stay moist and soft for about 4-5 days this way. If it’s humid where you live, try refrigerating them wrapped tightly in plastic wrap.
Freezing
I usually freeze the conchas before baking, tightly wrapped in plastic and then foil, which keeps them fresh for up to 3 months. When I’m ready to enjoy, I thaw them overnight in the fridge and bake fresh the next day.
Reheating
To reheat, pop the conchas in a 300°F oven for about 5-7 minutes or until warmed through. This method helps keep the crust crisp while the inside stays soft, much better than microwaving, which tends to make them soggy.
FAQs
-
Can I use canned pumpkin puree for this Pumpkin Conchas Recipe?
Absolutely! Canned pumpkin puree works wonderfully. Just make sure it’s plain pumpkin puree, not pumpkin pie filling which contains added sugars and spices. This way, you control the flavor balance perfectly in your dough.
-
What if I don’t have a stand mixer?
No worries at all. You can mix and knead the dough by hand using a sturdy bowl and a wooden spoon to combine ingredients. Knead by hand for 8-10 minutes on a lightly floured surface until you get a smooth, elastic dough. The sticky dough might feel challenging but trust me, it’s worth it!
-
How do I know when the dough has doubled in size?
A good trick is to gently press the dough with your finger. If the indentation stays and doesn’t immediately spring back, the dough has risen enough. It should look puffy and noticeably larger than when you started.
-
Can I make the pumpkin conchas without the topping?
You can definitely skip the topping if you want more of a plain pumpkin roll, but the topping is what makes conchas unique. I recommend at least a simple sugar topping to get that classic texture contrast.
-
Can I substitute the spices in this Pumpkin Conchas Recipe?
Yes! Feel free to adjust the spice mix to your liking—ginger, cloves, or allspice make excellent additions or substitutions. Just keep in mind that the pumpkin pie spice blend is balanced to complement the pumpkin flavor perfectly.
Final Thoughts
Making this Pumpkin Conchas Recipe quickly became one of my favorite fall baking adventures. The process might take some time with the rising, but honestly, it’s so relaxing to slow down and let the dough work its magic. Plus, the aroma filling your kitchen? Pure happiness. I can’t recommend this recipe enough—whether you’re baking for yourself, family, or friends, these conchas bring a little daily comfort wrapped in pumpkin spice warmth. Trust me, once you taste one, you’ll be hooked just like I am!
Print
Pumpkin Conchas Recipe
- Prep Time: 15 minutes
- Cook Time: 15 minutes
- Total Time: 3 hours 30 minutes
- Yield: 12 conchas
- Category: Bread
- Method: Baking
- Cuisine: Mexican
Description
This charming Pumpkin Conchas recipe combines the soft, fluffy texture of traditional Mexican sweet bread with the warm, spiced flavors of pumpkin and pumpkin pie spice. Each dough ball is topped with a moist, buttery, and colorful topping that is patterned to resemble a clamshell, making these treats as visually appealing as they are delicious. Perfect for fall or any time you crave a seasonal twist on a classic pastry, these conchas are ideal for breakfast, brunch, or an afternoon snack paired with coffee or hot chocolate.
Ingredients
For the Dough
- ½ cup + 1 tablespoon granulated sugar, divided
- 2 ¼ teaspoons active dry yeast
- 1 cup warm whole milk (about 110-115°F)
- 5 ½ cups all-purpose flour
- ½ cup light brown sugar
- 1 teaspoon pumpkin pie spice
- ½ teaspoon fine salt
- ½ teaspoon ground cinnamon
- ½ teaspoon ground nutmeg
- ½ cup unsalted butter, softened to room temperature
- 3 large eggs, divided and at room temperature
- 1 cup pumpkin puree
For the Topping
- 1 cup all-purpose flour
- 1 cup powdered sugar
- ½ cup unsalted butter, softened to room temperature
- 2 ½ teaspoons vanilla extract
- A few drops of orange gel food coloring (optional)
Instructions
- Prepare the yeast mixture. In a small bowl, whisk together 1 tablespoon of the granulated sugar, the active dry yeast, and the warm milk. Cover with plastic wrap and let it rest for about 10 minutes until the yeast blooms and becomes very foamy, indicating it’s active.
- Mix the dry ingredients. In the bowl of a stand mixer or a large mixing bowl, whisk together the flour, the remaining granulated sugar, light brown sugar, pumpkin pie spice, salt, cinnamon, and nutmeg to evenly distribute all ingredients.
- Add the butter. Using the paddle attachment, mix in the softened butter until the mixture becomes coarse and crumbly, about a few minutes.
- Combine wet ingredients. In a separate medium bowl, whisk together 2 eggs and the pumpkin puree until smooth and fully combined. Set aside.
- Form the dough. Using the dough hook attachment, slowly incorporate the yeast mixture into the dry ingredients, then add the pumpkin-egg mixture. Mix on medium speed for 5-6 minutes until the dough is smooth, elastic, and slightly tacky but not too sticky.
- First rise. Transfer the dough to a large greased bowl, cover with plastic wrap, and let it rise in a warm place for 1 ½ to 2 hours, or until doubled in size.
- Prepare baking sheets. Line 3 baking sheets with parchment paper and set aside.
- Divide and shape the dough. After the dough has risen, gently punch it down to release air, then let it rest for 5 minutes. Divide the dough into 12 equal pieces and roll each into a ball. To handle sticky dough, lightly grease your hands with oil or cooking spray, but avoid adding more flour.
- Second rise. Place 4 dough balls on each prepared baking sheet, cover loosely with plastic wrap or a kitchen towel, and let them rise again for 45 minutes to 1 hour until they double in size.
- Make the concha topping. While the dough rises, beat together the flour, powdered sugar, butter, vanilla extract, and orange gel food coloring (if using) in a stand mixer with a paddle attachment until you get a soft and moist dough that resembles Play-Doh. If not using immediately, form into a ball and cover with plastic wrap until ready.
- Shape the topping. Divide the topping into 12 balls, then gently flatten each ball between two sheets of plastic wrap using a tortilla press or rolling pin to form round discs roughly the size of the dough balls.
- Preheat the oven and apply egg wash. Preheat your oven to 350°F (175°C). In a small bowl, beat the remaining egg and brush this egg wash onto each risen dough ball to give them a shiny golden finish.
- Attach the topping and create patterns. Carefully peel the plastic wrap off the topping discs and drape each one over a dough ball, lightly pressing down to adhere. Using a paring knife, score the topping in a crisscross or clamshell pattern, or any design you prefer.
- Bake. Bake the conchas in the preheated oven for 15-17 minutes or until they turn lightly golden brown on top and fully cooked through.
- Cool and serve. Transfer the baked conchas onto a cooling rack and let them cool for about 10 minutes before serving to allow flavors to settle and the texture to set.
Notes
- Ensure your yeast is active: the milk and yeast mixture should be bubbly and frothy. If not, discard and start fresh with new yeast.
- To make shaping the topping easier and more authentic, consider using a concha shell cutter if available.
- The dough will be sticky and tacky; lightly greasing your hands helps manage shaping without adding flour, which could toughen the dough.
- Avoid overcrowding the baking sheets as conchas expand during baking, which could cause uneven cooking or burnt bottoms.
- Store leftover conchas in an airtight container in a cool, dry place for up to 5 days to maintain freshness.
Nutrition
- Serving Size: 1 concha (about 90g)
- Calories: 320 kcal
- Sugar: 20 g
- Sodium: 150 mg
- Fat: 12 g
- Saturated Fat: 7 g
- Unsaturated Fat: 4 g
- Trans Fat: 0 g
- Carbohydrates: 45 g
- Fiber: 2 g
- Protein: 6 g
- Cholesterol: 70 mg
