

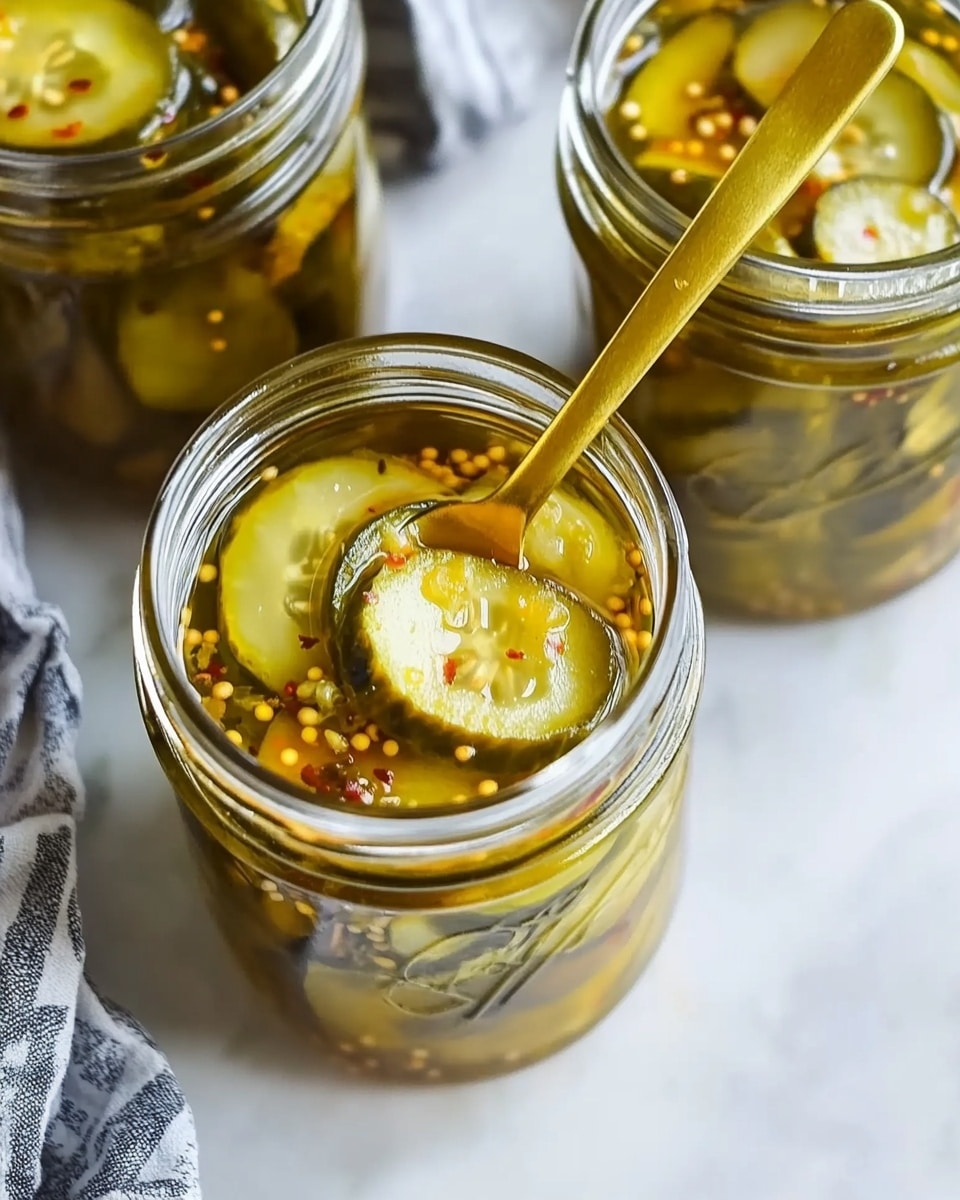
I’m so excited to share this classic Bread and Butter Pickles Recipe with you! I absolutely love how this recipe strikes the perfect balance of sweet and tangy, transforming simple cucumbers into a crunchy, flavorful treat. Whether you’re looking to jazz up a sandwich, add a zesty side to your summer BBQ, or simply enjoy a satisfying snack, these pickles never disappoint.
When I first tried making bread and butter pickles at home, I was amazed at how easy it was to get that nostalgic diner-style taste without any fancy equipment. You’ll find that this recipe works beautifully because it uses a blend of white and apple cider vinegar for depth and a medley of spices that give these pickles their unforgettable flavor. Trust me, once you try this, you won’t want store-bought pickles again!
Why You’ll Love This Recipe
- Perfect Sweet and Tangy Balance: The blend of vinegars and sugar creates that classic bread and butter pickle flavor you love.
- Crunchy and Satisfying Texture: Salting and chilling the cucumbers keeps them crisp and fresh.
- Great for Beginners: Simple steps that demystify pickling, so you won’t feel overwhelmed.
- Versatile Serving Options: Perfect for sandwiches, burgers, or just snacking straight from the jar.

Ingredients You’ll Need
The ingredients for this Bread and Butter Pickles Recipe come together to create a beautifully balanced flavor and texture. Each one plays its role, so choosing fresh cucumbers and the right vinegars will set you up for pickling success.
- Pickling cucumbers: Look for firm, fresh cucumbers that are specifically for pickling—they have fewer seeds and are perfect for crunch.
- Pickling salt: Use this instead of table salt as it doesn’t contain additives that can cloud your brine.
- White or yellow onions: Thinly sliced onions add subtle sweetness and a nice bite.
- White distilled vinegar: Provides acidity and that classic pickle tang—make sure it’s 5% acidity for safety.
- Apple cider vinegar: Adds a gentle fruitiness that deepens the flavor profile.
- Sugar: The key to that signature sweetness in bread and butter pickles.
- Pickling spices: Mustard seeds, crushed red pepper flakes, celery seeds, cinnamon stick, allspice (berries and ground), cloves (whole and ground), and turmeric all create that signature aromatic blend.
Variations
I love tweaking the Bread and Butter Pickles Recipe based on what I have in the kitchen or my mood—feel free to experiment and make it your own. Some variations can highlight spice, sweetness, or even add a smoky vibe.
- Sweeter Pickles: If you like your pickles on the sweeter side, add an extra 1/4 cup of sugar—I’ve done this and it’s like candy for your sandwich.
- Spicy Kick: Increase the crushed red pepper flakes for more heat; my family loves a little fiery crunch that wakes up the taste buds.
- Vinegar Swap: Try using all apple cider vinegar if you want a fuller, fruitier pickle flavor—just be sure to maintain acidity for safety.
- Herb Twist: Toss in a few fresh dill sprigs or garlic cloves when packing jars for an added aromatic lift.
How to Make Bread and Butter Pickles Recipe
Step 1: Prep and Slice Your Cucumbers
First things first—give your pickling cucumbers a good rinse to remove dirt and grit. I like to scrub them gently with my hands, paying close attention to the ribs where dirt likes to hide. Slice off just a tiny sliver (about 1/8 inch) from each end and then slice the cucumbers into 1/4-inch thick rounds. This thickness keeps them crunchy but lets the pickling flavors soak in perfectly.
Step 2: Salt, Chill, and Drain
This step is a game-changer I learned over time—salting the cucumber and onion slices draws out excess moisture, which keeps your pickles crisp instead of soggy. Toss the sliced onions with the cucumbers in a large bowl, sprinkle all the pickling salt evenly, and give it a gentle stir. Then cover the bowl with a clean tea towel and top with a few inches of ice for added chill. Refrigerate for 4 hours, then rinse thoroughly under cold water twice to avoid salty pickles.
Step 3: Heat Your Jars and Make the Pickling Syrup
If you’re canning for shelf storage, warming the jars in a hot water bath helps prevent cracking and ensures a good seal. While jars are warming, combine the vinegars, sugar, and whole spices (leave out the salt) in a large pot and bring to a rolling boil. Once the sugar dissolves, add your drained cucumbers and onions back in and heat until it returns to a boil—this infuses them with that sweet-spicy vinegar mix.
Step 4: Pack Jars and Pour Pickling Syrup
Using a slotted spoon, scoop the hot cucumber and onion mixture into the heated jars, leaving about 1 inch from the rim. Then ladle the hot vinegar syrup over the top, leaving 1/2 inch space for expansion. Wipe rims clean, place lids, and screw on bands firmly—but not too tight to prevent air from escaping during processing.
Step 5: Process in Hot Water Bath (Optional)
To store your bread and butter pickles for months, you’ll want to process the jars in a boiling water bath for 15 minutes. This step kills bacteria and creates a vacuum seal so the pickles stay safe outside the fridge. Remember to keep the water at least 1 inch above the tops of the jars and adjust time for altitude if you’re above 1,000 feet. Once done, carefully remove the jars and let cool undisturbed—they’ll make that satisfying pop as they seal.
Step 6: Cool, Store, and Wait (Patience is Key!)
Now the hardest part: waiting! While you can enjoy the pickles after just 24 hours, they’re best after resting at least a week or even three. This resting period allows the flavors to mellow and marry, making every bite pop with that authentic deli-style goodness.
Pro Tips for Making Bread and Butter Pickles Recipe
- Use Fresh Pickling Cucumbers: I discovered that using fresh, firm pickling cucumbers makes all the difference in crunch.
- Don’t Skip the Salting Step: Salting and chilling reduce water content and help your pickles stay crisp longer.
- Keep Jars Warm Before Filling: This prevents thermal shock and helps jars seal properly, something I learned the hard way!
- Seal Test: After cooling, press the center of each lid—if it pops back, it’s not sealed right; keep those jars in the fridge and consume soon.
How to Serve Bread and Butter Pickles Recipe
Garnishes
I like to add a few fresh dill sprigs or thin slices of fresh onion on top when serving to brighten up the flavor visually and aromatically. Sometimes, just a sprinkle of cracked black pepper adds a nice contrast to the sugary tang.
Side Dishes
My family goes crazy for these pickles alongside grilled burgers, pulled pork sandwiches, or even crispy fried chicken. They add an unbeatable zip to creamy potato salad or a cheese and charcuterie board as well.
Creative Ways to Present
For special occasions, I like to serve the pickles in small glass bowls with cocktail forks, paired with sliders or picnic-style platters. Making mini mason jar gifts for friends during garden season has become a fun tradition—I always include a handwritten label with a note on how to enjoy them.
Make Ahead and Storage
Storing Leftovers
Once opened, I keep the bread and butter pickles refrigerated and tightly sealed—they stay fresh and crisp for up to three months. If you didn’t process in a water bath, definitely keep them in the fridge, or they won’t last.
Freezing
I don’t recommend freezing pickles because they can lose their texture and become soggy. Instead, I suggest making smaller batches or sharing with friends to enjoy fresh.
Reheating
Since these are best served cold or at room temp, I usually don’t reheat bread and butter pickles. Just pull them from the fridge and let them sit for a few minutes before serving to take the chill off.
FAQs
-
How long do bread and butter pickles last?
Properly canned and sealed bread and butter pickles can be stored in a cool, dark pantry for up to 1 year. Once opened, keep them refrigerated and use within 3 months for the best flavor and crunch.
-
Can I skip the canning water bath step?
Yes! If you plan to eat the pickles within 3 months and keep them refrigerated the whole time, you can skip the water bath. Just make sure to store the jars in the fridge and consume within that time frame for safety.
-
Why do I need to salt and chill the cucumbers?
Salting draws out excess water from the cucumbers and onions, which helps keep the pickles crunchy instead of soggy. Chilling also firms them up before packing in the hot syrup.
-
Can I use regular table salt instead of pickling salt?
Pickling salt is preferred because it doesn’t contain additives like iodine or anti-caking agents that can cause discoloration or cloudiness in your pickle brine. If needed, you can substitute, but expect slight differences in appearance.
-
How soon can I eat these bread and butter pickles?
You can enjoy them as soon as 24 hours after making, but the flavor really improves if you wait at least a week—ideally 3 weeks—to let the spices fully develop.
Final Thoughts
There’s something comforting about homemade bread and butter pickles that brings back memories and brightens any meal. This recipe has become a staple in my kitchen, easy to whip up and rewarding with every crunchy, sweet-tangy bite. I encourage you to give this bread and butter pickles recipe a try—you’ll be surprised at how simple and satisfying homemade pickling can be. Once you do, these pickles will find a permanent spot on your table and in your favorites list, just like they did in mine!
Print
Bread and Butter Pickles Recipe
- Prep Time: 20 mins
- Cook Time: 30 mins
- Total Time: 4 hrs 50 mins
- Yield: 24 servings
- Category: Pickling
- Method: Stovetop
- Cuisine: American
Description
This classic Bread and Butter Pickles recipe delivers sweet, tangy, and crunchy pickles that are perfect for sandwiches, burgers, or snacking. Made with fresh market cucumbers, onions, vinegar, sugar, and a blend of aromatic pickling spices, these pickles can be enjoyed right away or canned for long-term storage. The process involves salting and chilling the cucumbers to draw out excess moisture, then simmering them in a sweet vinegar syrup before packing into jars. Whether you prefer to refrigerate or water bath can your pickles, this recipe ensures a flavorful homemade treat with a perfect balance of sweetness and spice.
Ingredients
Fresh Produce
- 2 1/2 pounds pickling cucumbers, fresh from the market
- 1 pound white or yellow onions, thinly sliced
Salt
- 1/4 cup pickling salt
Vinegars
- 1 1/4 cups white distilled vinegar (5% acidity)
- 1 cup apple cider vinegar (5% acidity)
Sweetener
- 2 1/4 cups sugar
Pickling Spices
- 1 tablespoon mustard seeds
- 1 teaspoon crushed red pepper flakes
- 3/4 teaspoon celery seeds
- 1 inch cinnamon stick
- 6 allspice berries plus a pinch of ground allspice
- 6 whole cloves plus a pinch of ground cloves
- 1/2 teaspoon ground turmeric
Instructions
- Rinse and slice the cucumbers: Carefully rinse the cucumbers, scrubbing away any dirt that may have stuck to the ribs. Slice off 1/8 inch from the ends and discard. Slice the cucumbers into 1/4-inch thick slices and place them in a large bowl.
- Salt, chill, and drain the cucumber slices: Add the thinly sliced onions and all of the pickling salt to the cucumber slices. Stir well to distribute the salt evenly. Cover the bowl with a clean, thin tea towel and then cover with a couple of inches of ice. Place in the refrigerator and let chill for 4 hours. After chilling, discard the ice, rinse the cucumber and onion mixture thoroughly, and drain. Rinse and drain a second time to remove excess salt.
- Heat the jars (optional for canning): If you plan to store your pickles outside the refrigerator for long-term preservation, heat clean canning jars by placing them on a metal rack inside a large canning pot filled with warm water that covers the jars by at least an inch. Bring the water to a boil, then reduce heat to keep jars hot until needed. Wash lids separately in hot, soapy water. If you plan to keep pickles refrigerated and consume within a few months, you can skip this step.
- Make the pickling syrup: In a 4 or 6-quart pot, combine the white distilled vinegar, apple cider vinegar, sugar, and all of the pickling spices (excluding salt). Bring the mixture to a boil, stirring occasionally until the sugar completely dissolves. Add the rinsed cucumber and onion slices to the boiling syrup. Bring the mixture back to a boil once more.
- Pack the jars and add syrup: Using a slotted spoon, begin transferring the hot cucumbers and onions into the prepared jars, packing them to about 1 inch from the rim. Pour the hot vinegar-sugar syrup over the pickles, leaving 1/2 inch of headspace at the top of the jars. Wipe the rims clean of any residue with a paper towel. Place dry, clean lids on the jars and secure them with metal screw bands. Repeat with remaining jars.
- Process in a hot water bath (optional for canning): For pickles to be shelf-stable, submerge the filled jars in a boiling water bath ensuring the water covers at least 1 inch above the jar tops. Boil hard for 15 minutes. If you live above 1,000 feet elevation, adjust processing time accordingly. Remove jars using tongs or jar lifters and let cool to room temperature. You will hear a popping sound as the lids seal.
- Let cool and store: Allow jars to cool completely at room temperature. Store properly sealed jars in a cool, dark place such as a pantry for up to one year. Refrigerate opened jars and consume within 3 months. If you skipped the water bath, store pickles in the refrigerator immediately and use within 3 months.
- Enhance the flavor: Although the pickles can be eaten after 24 hours, they develop the best flavor if left to sit for at least one week, ideally 3 or more weeks.
Notes
- Use pickling salt specifically, as it contains no additives that can cloud the pickling liquid.
- Adjust the crushed red pepper flakes to your preferred spice level for more or less heat.
- Ensure that jars and lids are clean to prevent spoilage during storage.
- If not water bath canning, always keep the pickles refrigerated and consume within 3 months for safety and quality.
- Let pickles sit for at least a week to develop a deeper, mellow flavor.
- For altitude adjustments in canning times, consult reliable sources such as the USDA guidelines.
Nutrition
- Serving Size: 1/4 cup
- Calories: 45
- Sugar: 10 g
- Sodium: 620 mg
- Fat: 0 g
- Saturated Fat: 0 g
- Unsaturated Fat: 0 g
- Trans Fat: 0 g
- Carbohydrates: 11 g
- Fiber: 1 g
- Protein: 0.4 g
- Cholesterol: 0 mg
